How to Fix a Rice Cooker
If your rice cooker won't heat, won't switch on, or keeps kicking to warm, you're probably a thirty-dollar part away from a fix. Learning how to fix a rice cooker is one of the simplest appliance repairs you can do at your kitchen table.
Most mechanical rice cookers fail in the same three spots. The thermal fuse, the magnetic thermostat, or the switch linkage. The thermal fuse costs under $5, and the repair takes about ten minutes with a basic multimeter.
As of 2026, this remains one of the most approachable DIY fixes in your kitchen.
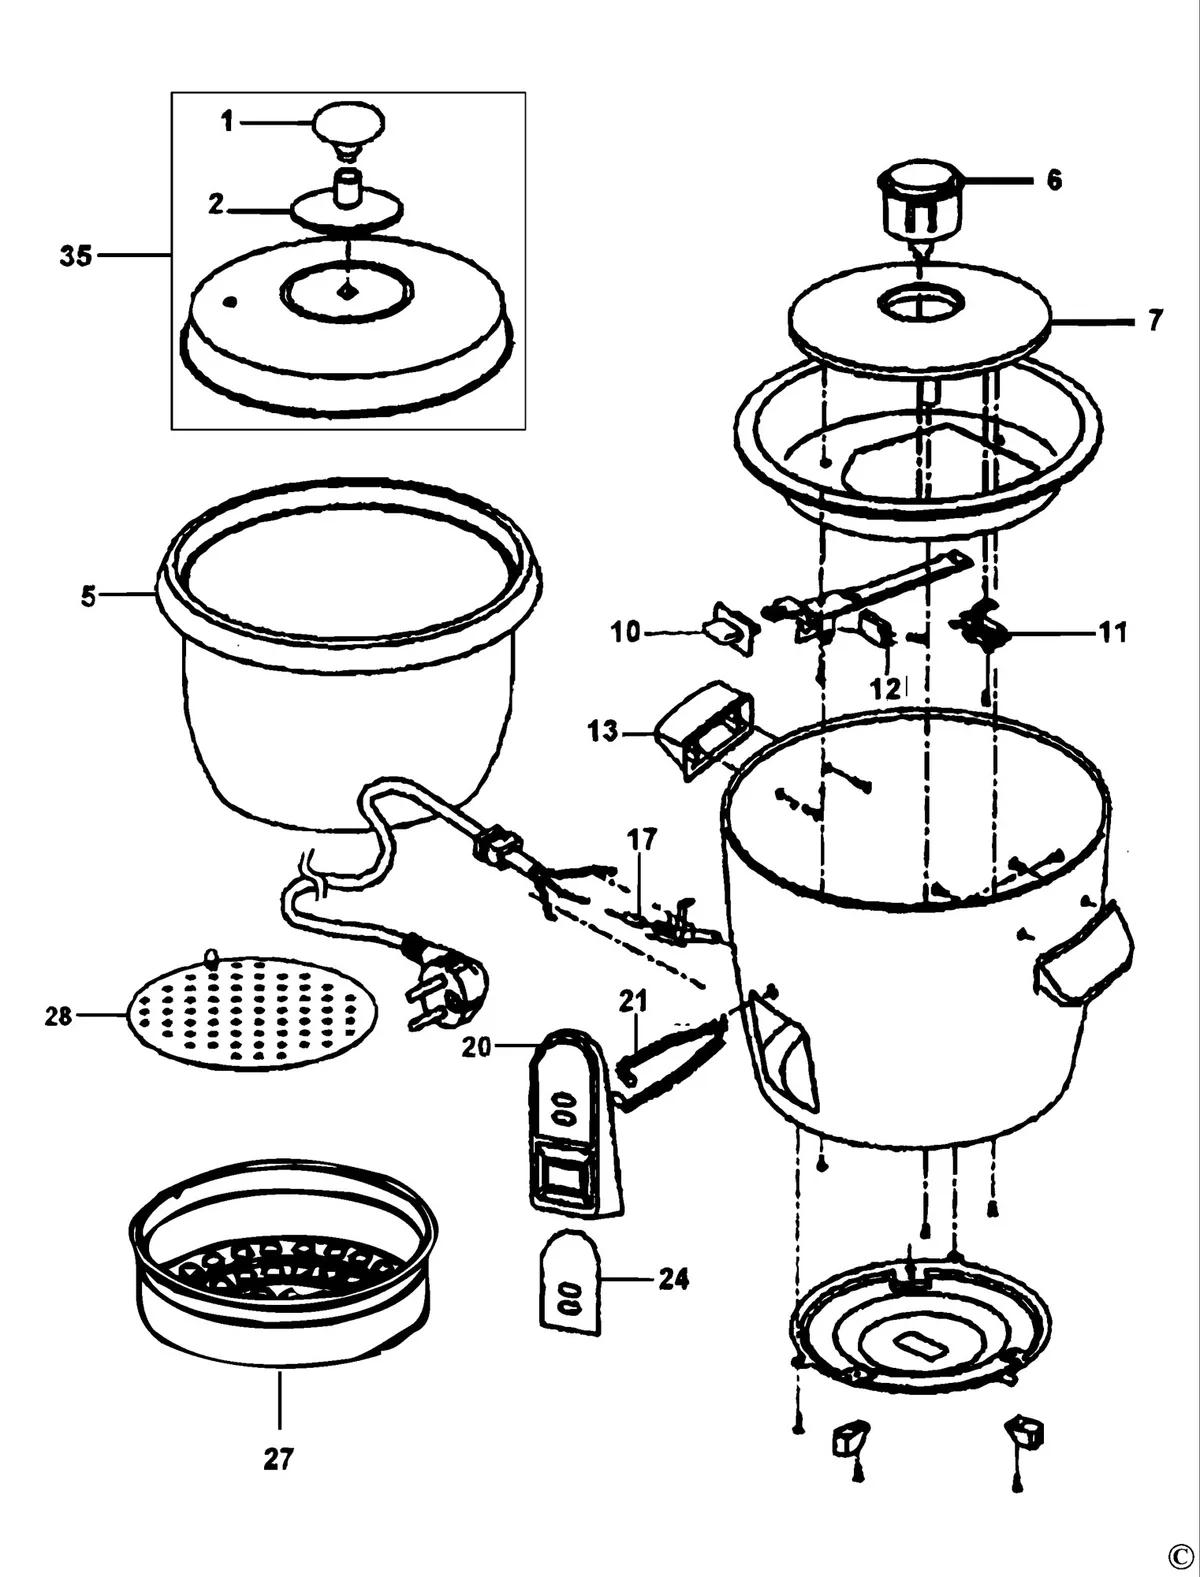
Image source: Bing (Web (fair-use with source credit))
Diagnose by Symptom: What Your Rice Cooker Is Telling You
A rice cooker is a simple appliance. It's a heating plate, a switch, and a temperature sensor. When something breaks, the symptom points straight to the culprit.
| Symptom | Likely Culprit | Fix Location |
|---|---|---|
| Switch won't stay down | Latch or actuator mechanism | Fix 1 |
| No power, no indicator light | Cord, thermal fuse, or thermostat | Fix 2 |
| Light on, no heat | Heating element or relay | Fix 3 |
| Burns or undercooks rice | Magnetic sensor or contact issues | Fix 4 |
Start with the simplest check. If the cooker shows zero signs of life, that's a power delivery problem. If the switch clicks but flops back up, that's mechanical.
If the light glows but the pot stays cold, that's electrical.
Don't skip the order. The thermal fuse is the cheapest part and the most common failure. Test it before you blame the heating element.
The fuse costs five dollars, the element costs twenty, the thermostat costs ten. Work from cheapest to most expensive and you'll usually fix it on the first try.
Tools, Safety, and the 10-Minute Rule
Here's what you need before touching anything. A Philips screwdriver, a flathead screwdriver, and a multimeter set to continuity mode. Add needle-nose pliers and fine sandpaper if you're cleaning contacts.
Unplug the cooker. Always. Even if you're just peeking inside.
The heating plate can stay warm if you accidentally hit the switch, and capacitors on newer models can hold a charge.
Flip the cooker upside down. Lay it on a folded towel so the base doesn't scratch. The bottom cover usually has four to six screws.
Removing them takes two minutes.
The "10-minute rule" isn't a joke. Once the cover is off, you can visually inspect every wire, solder joint, and terminal in under sixty seconds. Loose wires are easy to spot.
Discolored contacts stand out. A broken switch linkage is obvious the moment you see it. If nothing looks burnt or broken, grab the multimeter and start testing.
That same troubleshooting mindset works for other countertop gear. A hand mixer that hums but won't spin often needs a new switch, and a food scale giving wild readings might just need a cleaning.
Fix 1: Switch Won't Stay Down (Latch and Actuator Issues)
The switch not staying down is the most common mechanical failure. When you push the lever, a small latch should catch a metal hook and hold the switch in the "cook" position. When the rice reaches temperature, the magnetic thermostat releases the hook and the switch pops to "warm."
If the switch pops up immediately or halfway through cooking, the latch is slipping. Three things cause this. A worn plastic catch, a weak spring, or a dirty actuator that binds against the housing.
Visual inspection comes first. Look at the latch hook and the catch surface. If the plastic is rounded or worn, you need a new switch assembly.
That's a $5 to $8 part. If the plastic looks fine, clean the actuator and the surrounding slot with electrical contact cleaner. Gunk builds up over time and prevents the mechanism from seating fully.
Check the spring. The spring should push the actuator forward with firm tension. If it feels weak or sags, replace it.
Some models use a separate return spring on the switch lever itself. Make sure both are present and seated.
Finally, test the linkage alignment. With the cooker upside down, push the lever down slowly by hand. Watch the latch engage the hook.
If it misses by a fraction, bend the actuator arm slightly with pliers. Just a millimeter or two. That usually restores a solid catch.
Fix 2: No Power, No Indicator Light (Cord, Fuse, Thermostat)
Zero response when you press the switch means power isn't reaching the circuit. Start at the wall and work inward. Plug a lamp into the same outlet to confirm the outlet works.
Then test the power cord for continuity.
Unplug the cooker and remove the base cover. Locate where the cord enters the body. You'll see two or three wires soldered or crimped to terminals.
Set your multimeter to continuity mode and touch the probes to the two prongs inside the socket end of the cord. If you hear a beep, the cord is fine. If not, replace the cord.
Next, find the thermal fuse. It's a small white or brown cylinder with two wires connected to it. It sits near the heating plate or attached to the side of the cooker body.
This is the single most common failure point when a rice cooker goes totally dead.
Test the fuse for continuity. If it reads open, it's blown. Replace it with the exact same temperature and amperage rating, usually stamped on the fuse body.
Common ratings are 185°F and 230°F. Never bypass a thermal fuse. It exists to stop the cooker from catching fire if the thermostat fails.
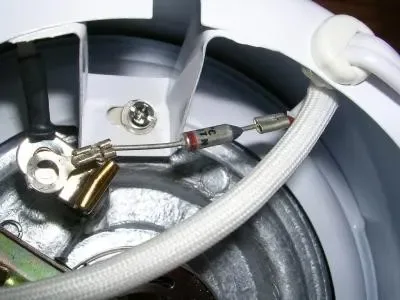
Image source: Bing (Web (fair-use with source credit))
Check the magnetic thermostat next. It sits under the heating plate, attached to the spring-loaded sensor. Test continuity across its terminals.
If the switch is set to "warm" but the thermostat reads open, it needs replacing. The part runs $5 to $10 and simply unscrews from the base.
If you're the type who likes reviving small appliances, the same patience applies to other gadgets. A digital scale that won't reset often needs nothing more than a battery swap and a clean sensor.
Fix 3: Light On, No Heat (Heating Element and Relay)
The indicator light glows but the rice never cooks. That tells you power reaches the circuit, but the heating element isn't doing its job. Two possibilities: the element itself burned out, or a relay or thermostat in the circuit is stuck open.
Test the heating element with your multimeter. Set it to resistance mode. Touch the probes to the two terminals on the heating plate.
A good element reads low resistance, usually under 100 ohms. If the display shows "OL" or "1," the element is open and needs replacement. Heating plates cost $10 to $20 and bolt directly to the base.
If the element reads fine, suspect the relay on micom and induction models. These electronic cookers use a small relay to switch power to the heating element. When the relay fails, the light comes on but the element never energizes.
Listen for a click when you press the switch. No click means the relay isn't engaging. That requires a soldering iron to replace a $5 component.
On mechanical cookers, the magnetic thermostat itself can fail open. It should pass continuity in the "cook" position. If it doesn't, the switch can be down and the light on, but the element stays cold.
Replace the thermostat and reassemble.
One more check. Look at the wire connections between the switch and the heating element. Loose spade connectors cause intermittent heat.
Re-crimp or replace any corroded terminal before ordering parts. It costs nothing.
Fix 4: Burns or Undercooks Rice (Sensor and Contact Problems)
Scorched rice on the bottom means the heat is staying on too long. Crunchy rice in the middle means the heat is cutting out too soon. Both symptoms point to the same part: the magnetic thermostat.
This sensor uses a magnet that loses its pull at the Curie point, around 100 to 110°C. When the magnet releases, the switch drops from cook to warm. If the sensor's spring has weakened, it releases early.
If its contacts have corroded, it sticks and lets the element overheat. No calibration dial exists, so the fix is replacement. A new thermostat costs $5 to $10 and bolts to the underside of the heating plate.
Before you swap parts, check the contact between the inner pot and the heating plate. A warped pot rests on the rim instead of the element, trapping heat in one spot. Starchy residue does the same thing.
Wipe the plate with a damp cloth, let it dry, and seat the pot again. If it wobbles, the pot is bent. That's about a $15 replacement.
If it sits flush and still scorches, replace the sensor.
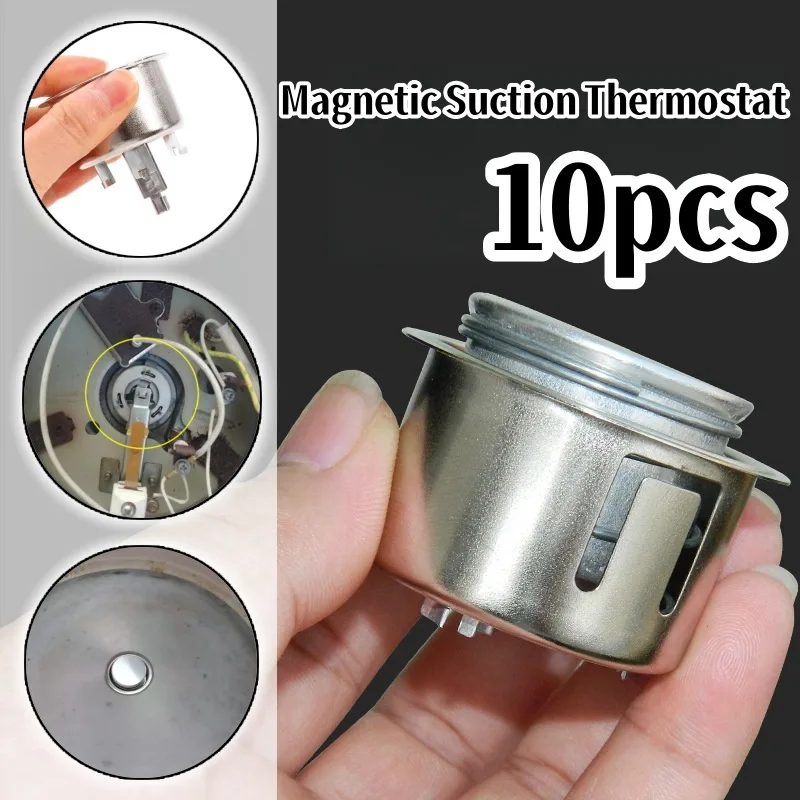
Image source: Bing (Web (fair-use with source credit))
The Curie point behavior is well-documented by physics standards and explains why a simple mechanical cooker hits the right temperature every time. For a reference on how magnets and heat interact, check the National Institute of Standards and Technology. It's the same principle that makes these sensors fail when they degrade.
Mistakes to Avoid and When to Replace Instead
The most dangerous move is bypassing a blown thermal fuse. That part exists to cut power if the heating plate overheats. Jumper it, and you turn a cheap repair into a fire hazard.
Always replace the component at the same temperature rating.
Also replace the lid gasket if you see steam damage, since moisture causes most fuse failures. Don't solder the fuse directly to the wire. Use proper crimped connectors instead.
The same logic applies to the magnetic sensor. Don't bend its contacts or "repair" the spring. Replace it for $10 and get on with your life.
Use a quick replacement algorithm to decide where your cooker falls. This keeps you from sinking $30 into an appliance worth $25.
- If the heating element reads open on your multimeter, replace the whole cooker. The element costs nearly half the price of a new rice cooker.
- If the inner pot is warped but everything tests fine, you only need a new pot.
- If the cooker is over 8 years old and needs more than $25 in parts, shop for a replacement.
- If the cooker is under 3 years old, fixing it makes sense.
For everything else, you can apply the same diagnostic discipline across your kitchen. A hand mixer that stops mid-bowl often has a worn switch, and a scale that drifts while weighing just needs a proper wipe-down. Diagnose before you replace and you'll save money beyond the rice cooker.
FAQ: Quick Answers and Final Verdict
Why won't my rice cooker switch stay down?
The latch mechanism isn't catching properly. Most often, the spring behind the switch lever has tired out, or the plastic catch has worn smooth. Clean the actuator and look for wear.
If the plastic is rounded, replace the switch assembly. It's a $5 to $8 part and takes about five minutes to install.
How do I test a rice cooker thermal fuse?
Unplug the cooker and remove the base cover. Find the small cylindrical fuse near the heating plate. Set your multimeter to continuity mode and touch the probes to both fuse terminals.
A beep means the fuse is functional. No beep means it's blown. Replace it with an identical temperature and amperage rating.
Can I bypass a blown thermal fuse?
No. The thermal fuse is a safety component that interrupts power during overheating. Bypassing it disables the cooker's only fire protection.
The heating element can then run without a cutoff, creating a serious burn and fire risk. Always replace the fuse with an identical part.
How much does it cost to repair a rice cooker?
Typical repairs cost between $5 and $15 in parts, plus about 20 minutes of labor. Switching the thermal fuse or thermostat usually covers most failures. If you need a new heating element or inner pot, costs rise beyond $20.
At that point, a new cooker is more practical.
When should I throw out my rice cooker?
Replace it if the heating element fails or the inner pot is warped. Also replace it if total repair parts exceed $25 on a model over 8 years old. Finally, retire any cooker after a severe overheating event that melted plastic or released smoke, even if it seems to work again.
The smartest approach is methodical. Test the cheap parts first, suspect the thermal fuse and thermostat, and never force the switch. Most basic mechanical cooker failures resolve with a $10 part.
Follow the order above, and you'll likely have your cooker back in service tonight.