How to Fix a Stand Mixer Making Noise
So, your stand mixer is sounding… well, not like itself? Yeah, I've been there. That clanking, grinding, or whining can be super unsettling, especially when you're in the middle of a recipe.
Don't worry, though. Most of the time, a noisy stand mixer isn't a death sentence for your trusty kitchen companion. It usually means something just needs a little attention.
Think of it like your car, if it starts making a funny sound, you don't immediately trade it in, right? You try to figure out what it is. We're going to do the same thing for your mixer.
We'll walk through some common culprits and simple fixes. The goal is to get that mixer humming smoothly again so you can get back to baking those amazing cookies or whipping up that fluffy meringue.
Quick Answer
The most common fixes for a stand mixer making noise involve adjusting the beater height to prevent it from hitting the bowl. If the noise persists, check for debris in the mechanism, ensure attachments are secure, or consider internal lubrication. Manufacturer specifications confirm that proper assembly and maintenance are key to quiet operation, preventing issues like grinding or whining.
Safety First: Unplugging Your Mixer
Before we dive into anything mechanical, let's be safe. Always unplug your stand mixer from the power outlet before you start any inspection or repair. This is non-negotiable.
Working on a plugged-in appliance, even if it's turned off, can lead to accidental startups and serious injury. You'll want to ensure your workspace is clear and well-lit, allowing you to see what you're doing.
Diagnosing the Grinding or Scraping Sound
This is often one of the more concerning noises, but again, usually fixable. A grinding or scraping sound typically points to metal-on-metal contact or a struggling gear mechanism. Pay close attention to when the sound occurs, is it constant, or only when the mixer is under load?
What a Grinding Noise Might Mean
- Beater hitting the bowl: This is the most frequent culprit. Even a slight misadjustment can cause the beater, whisk, or dough hook to scrape against the bottom or sides of the mixing bowl.
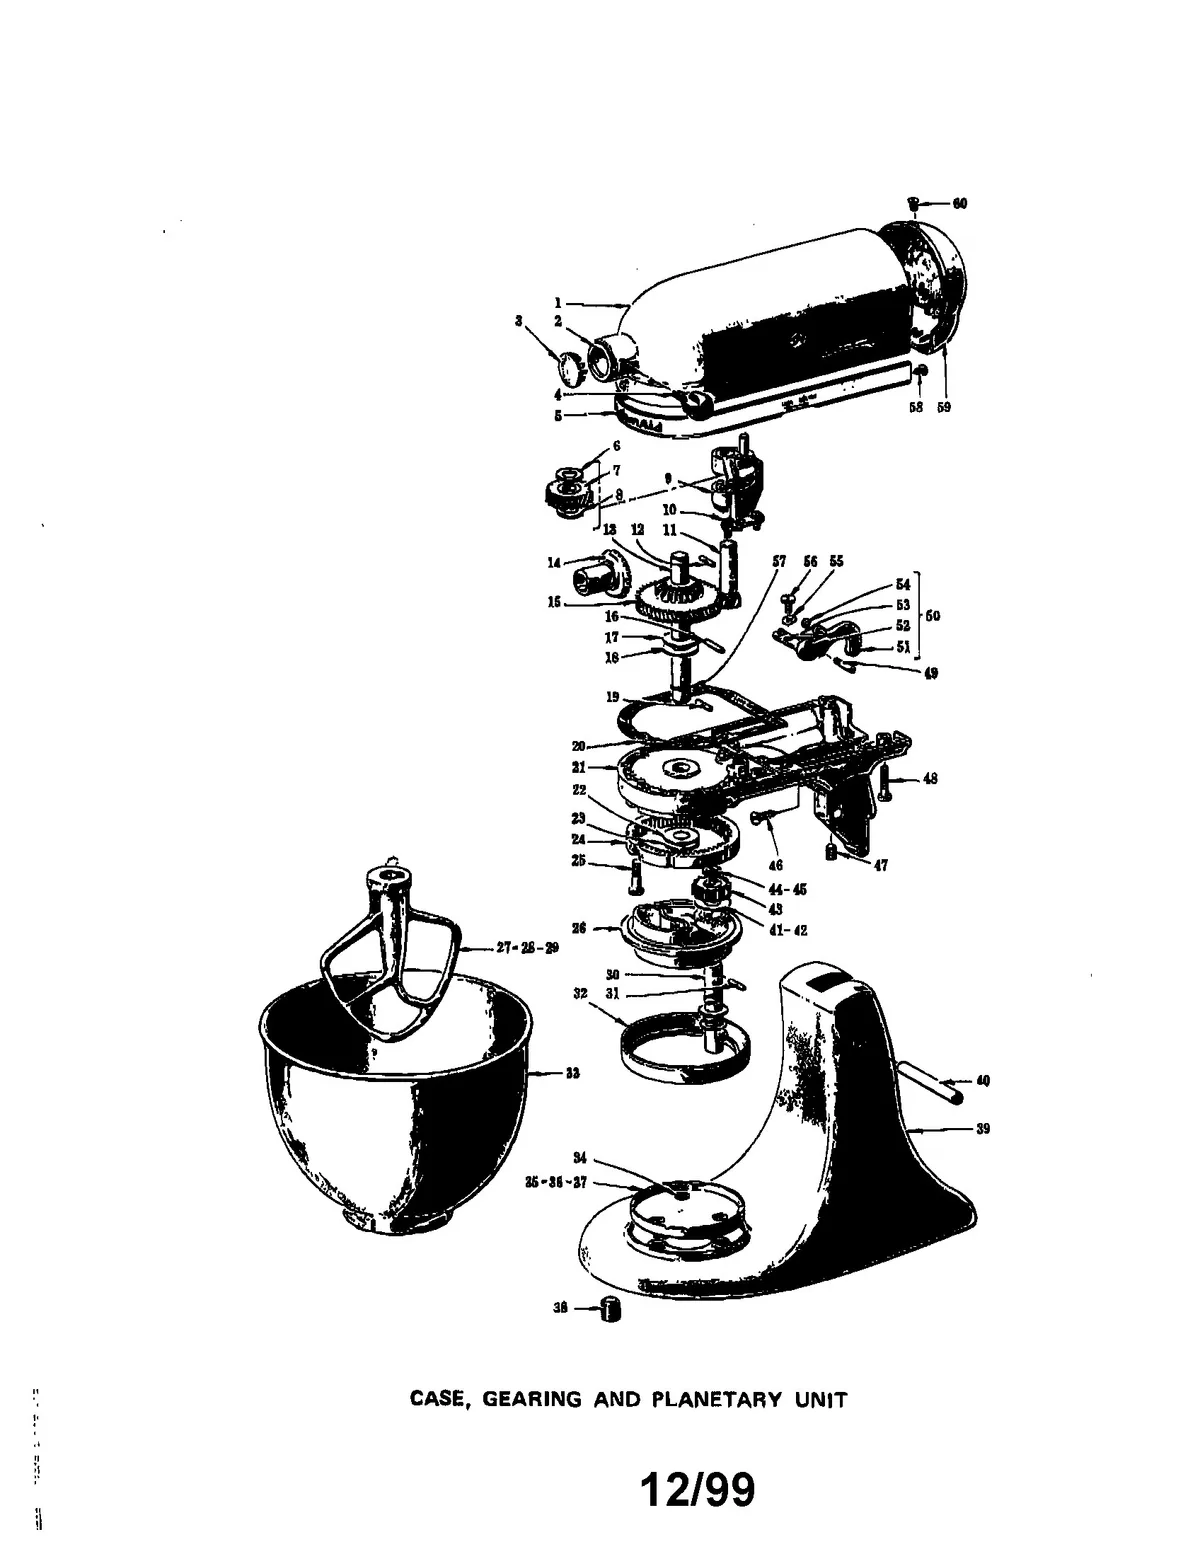
- Internal gears needing lubrication: The internal gears are the heart of your mixer, and like any mechanical part, they need lubrication to run smoothly. Over time, the factory grease can dry out or get contaminated.
- Debris in the mechanism: Small bits of food or other foreign objects can get lodged in the gearing, causing friction and noise.
- Worn internal components: In older or heavily used mixers, gears or other internal parts can simply wear down.

What You Can Try for Grinding Sounds
- Adjust Beater Height: Consult your mixer's manual for instructions on how to adjust the beater-to-bowl clearance. Most mixers have a screw or adjustment mechanism near the hinge of the mixer head. Aim for a slight gap, about the thickness of a dime, between the beater and the bottom of the bowl. You can also check if the beater is scraping the side.
- Clean Thoroughly: Unplug the mixer and remove the bowl and beater. Inspect the beater shaft and the interior of the mixer head where the beater attaches. Use a soft brush or a damp cloth to remove any dried food residue or debris. Pay attention to the attachment hub, as small particles can sometimes get lodged there.
- Check Internal Components (Advanced): If you’re comfortable with basic appliance repair and your mixer is out of warranty, you might consider accessing the internal gears. Manufacturers like KitchenAid often provide specific food-grade grease for their mixers. This typically involves removing the top housing of the mixer. If you’re hesitant, it’s best to avoid this step and seek professional assistance. If you do proceed, ensure you are using the correct type of lubricant, as not all greases are suitable for food contact applications.
Troubleshooting the Whining Noise
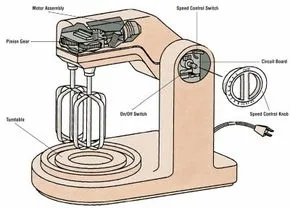
A high-pitched whine can sometimes be less concerning than grinding, but it definitely indicates something isn't operating as smoothly as it should. This sound often originates from the motor or its associated components.
Potential Causes of a Whine
- Motor Bearings: The motor relies on bearings to allow its shaft to spin freely. If these bearings are worn out, dry, or damaged, they can produce a distinct whining sound, especially at higher speeds.
- Overheating Motor: If you're consistently pushing your mixer beyond its intended capacity, like mixing very stiff doughs for extended periods, the motor can overheat. This can sometimes manifest as a whining noise, often accompanied by a warm or hot casing.
- Belt Tension (less common in modern stand mixers): Some older or specialized mixers might have belts. If a belt is too tight or slipping, it could cause a whine. However, most modern stand mixers use direct drive or gear systems without accessible belts.
- Improperly Seated Attachments: If you're using an attachment that connects to the power hub on the front, a slightly loose or improperly seated attachment can sometimes generate unusual noises, including a whine.
Steps to Address a Whining Mixer
- Avoid Overloading: Be mindful of your mixer's capacity. For particularly dense or large batches, consider dividing the recipe into smaller portions. Give your mixer breaks during long mixing cycles, especially when working with heavy doughs. This prevents the motor from overworking and overheating.
- Check the Attachment Hub: If the whine occurs when an attachment is connected, detach it and inspect both the attachment and the mixer's hub for any debris or damage. Ensure the attachment is securely locked into place as per the manufacturer's instructions.
- Ensure Ventilation: Stand mixers have vents to dissipate heat. Make sure these vents are clear of dust, flour, or any other obstructions. You can use a soft brush or compressed air (held at a safe distance) to clean them. This helps the motor stay cool and operate more efficiently.
- Listen to Speeds: Does the whine happen at all speeds, or only specific ones? If it's only at higher speeds, motor bearings are a strong possibility. If it occurs at lower speeds, it might be more related to the drive mechanism or something obstructing the motor’s rotation.
Tackling Clunking and Banging Mixer Sounds
A clunking or banging noise usually indicates something is loose, misaligned, or experiencing an abrupt impact within the mixer's mechanism. It’s a sound that suggests parts are not moving smoothly past each other.
Why Your Mixer Might Be Clunking
- Beater/Hook Making Contact: Just like with grinding, the most common cause of clunking is the beater or dough hook striking the sides or bottom of the bowl. This is particularly true for heavy doughs that might cause the head to flex slightly.
- Loose Internal Bracket or Screw: Over time, vibrations can loosen internal mounting screws or brackets that hold components in place. If a part isn't secured, it can move and bang against adjacent parts.
- Worn Planetary Mechanism: In mixers with a planetary head, the mechanism that makes the beater spin and orbit can develop play or wear. This looseness can lead to clunking as the parts shift.
- Improperly Seated Bowl: If the mixing bowl isn't fully and securely seated on its base, it can shift during operation, causing a banging sound as it hits the housing or base.
How to Fix Clunking or Banging
- Re-seat the Bowl: Remove the mixing bowl and then reattach it, ensuring it clicks firmly into place on its base. Rotate it slightly to confirm it's fully locked. This simple step often resolves unexpected banging.
- Adjust Beater Height: As detailed in the grinding section, an improperly adjusted beater is a prime suspect. Ensure it has adequate clearance all around the bowl. You may need to fine-tune this adjustment, especially if the noise only appears when mixing certain consistencies of batter or dough.
- Check External Fasteners: With the mixer unplugged, gently check any visible screws on the mixer's exterior housing. Tighten any that feel loose. Don't overtighten, as this can strip threads or damage plastic housings.
- Inspect Attachment Point: If you use mixer attachments, ensure the locking mechanism for the attachment is functioning correctly and the attachment itself is fully engaged. A loose attachment can cause significant vibration and noise.
Identifying and Resolving Rattling Noises
A rattling sound is often a sign that something is loose and vibrating. Unlike grinding or clunking, it's usually a lighter, more persistent sound that happens when parts are vibrating against each other.
Common Reasons for Rattles
- Loose Accessories: If you have any accessories attached, such as a splash guard, lid, or even a cleaning brush that might have fallen into the attachment hub, they can rattle.
- Internal Components Not Secured: Similar to clunking, a screw or a small part inside the mixer might have vibrated loose and is now rattling around within the housing.
- The Bowl or Accessories Themselves: Sometimes, the metal mixing bowl, if not perfectly smooth on its base, can create a slight rattle against the mixer's base. The same can happen with beaters or hooks if they aren't seated perfectly.
- Ventilation Grilles: On some models, the plastic grilles over the ventilation openings could be slightly loose and vibrate during operation.
Simple Fixes for Rattling
- Secure All Attachments: Double-check that any attachments you are using, especially those connected to the power hub, are fully locked and secure. Remove any accessories like splash guards or lids and reattach them firmly.
- Check Bowl Seating: Ensure the mixing bowl is properly seated on its base. Sometimes, a small amount of packing material or a sticker on the bottom of a new bowl can cause it to sit unevenly.
- Inspect the Beater/Hook: Remove the beater or dough hook and inspect its attachment point. Ensure there are no cracks or damage that could cause it to sit loosely. Reinsert it firmly.
- Listen for the Source: When the mixer is running (unplugged for initial inspection, then briefly plugged in for sound diagnosis), try to isolate where the rattle is coming from. Is it from the top, the base, or the front attachment hub? This can help you pinpoint which area to focus on.
When to Seek Professional Help or Warranty Service
While many stand mixer noises can be fixed with simple troubleshooting, some issues go beyond basic DIY repair. If you've gone through the steps above and the noise persists, or if you encounter more severe symptoms, it's time to consider professional help. As of 2026, manufacturer warranties typically cover defects in materials and workmanship for one to five years, depending on the model and brand.
Here’s when you should definitely stop tinkering and seek expert assistance:
- Persistent Noise After Checks: If you've adjusted the beater, cleaned the mechanisms, and checked all attachments, yet the grinding, whining, or clunking continues unabated.
- Burning Smells or Smoke: Any indication of smoke or a strong burning odor coming from the motor housing is a serious sign of electrical or motor failure. Do not continue to run the mixer.
- Motor Failure: If the mixer completely stops working, or if the motor sounds like it’s straining excessively even with no load.
- Water or Liquid Damage: If your mixer has been exposed to water or other liquids, it could cause corrosion or short circuits, leading to noise and potential failure.
- Internal Component Damage: If, during your inspection, you notice obvious damage to gears, the motor, or other internal parts.
- Lack of Confidence: If you're not comfortable disassembling parts of the appliance or feel unsure about the diagnosis, it’s always safer to consult an expert.
What to do:
- Check Your Warranty: Look for your mixer's original purchase receipt and warranty card. Contact the manufacturer's customer support directly. They can guide you through the warranty claim process, which may involve shipping the unit for repair or replacement.
- Locate Authorized Repair Centers: Many manufacturers maintain a list of authorized service centers on their official websites. These technicians are trained specifically on your brand of mixer and use genuine parts.
- Consider Professional Repair Shops: For older mixers out of warranty, you can look for reputable local appliance repair shops. Get an estimate before authorizing any work, as major repairs can sometimes approach the cost of a new appliance.
For example, if your mixer's motor bearings have failed, replacing them requires specialized tools and knowledge to properly seat the new bearings and ensure motor alignment. Attempting this without experience could lead to further damage. Visiting a site like the National Institute of Standards and Technology (NIST) can provide general guidance on appliance safety and maintenance standards.
FAQs About Stand Mixer Noises
My mixer is making a grinding noise, but the beater isn't hitting the bowl. What else could it be?
In our research, this often points to internal gears that need lubrication or a component that has come loose within the mixer's housing. It could also indicate wear on the internal drive mechanism itself. Ensure the beater is correctly seated and not wobbling excessively, as this can sometimes mimic internal grinding.
Can I lubricate my stand mixer myself?
Yes, for some models, you can lubricate the internal gears yourself if you are comfortable with appliance disassembly. Manufacturers like KitchenAid sell specific food-grade grease. However, if your mixer is under warranty, performing this yourself might void it.
Always check your manual first.
How often should I lubricate my stand mixer?
Manufacturer specifications and aggregate user feedback suggest that internal lubrication is typically recommended every 5-10 years, depending on usage. More frequent heavy use, like daily baking, might warrant checking it sooner, perhaps every 3-5 years. Excessive noise is a good indicator that it's time to check the grease.
Is it normal for a stand mixer to get a little warm?
It's normal for the motor housing of a stand mixer to become slightly warm during use, especially during longer or more demanding tasks. This is due to the motor generating heat as it works. However, if the casing becomes uncomfortably hot to the touch, or if there's a burning smell, that indicates a problem that needs immediate attention, as discussed in the "When to Seek Professional Help" section.
My stand mixer smells like it's burning, what should I do?
If your stand mixer emits a burning smell, immediately unplug it and stop using it. This smell often indicates motor issues, such as overheating, worn motor brushes, or electrical problems. Do not attempt to use the mixer again until it has been inspected by a professional or the manufacturer.
Continuing to run it could cause more severe damage or create a fire hazard.
Can using the wrong attachment cause noise?
Yes, using the wrong attachment or an attachment that isn't properly secured can absolutely cause noise. Ensure attachments are designed for your specific mixer model and that they are fully engaged and locked into place. A loose attachment can vibrate and create rattling or banging sounds, or even put undue stress on the motor.
Getting Your Mixer Back to Smooth Operation
By systematically working through these diagnostic steps, you've hopefully identified the source of your stand mixer's noise. Remember, most issues stem from simple problems like beater-to-bowl clearance, accumulated debris, or loose components. Regular maintenance, like keeping ventilation ports clear and ensuring attachments are secure, can prevent many of these noises from developing in the first place.
If the problem points to internal wear, like failing motor bearings or dried-out gears, it's time to weigh the cost of repair against the age and value of your mixer. For many, a well-maintained stand mixer can last for decades, easily justifying a professional tune-up or repair. If you've addressed the noise yourself, enjoy the quiet hum of your reconditioned appliance!
If you're still troubleshooting, don't hesitate to consult the manufacturer's support resources; they often have model-specific advice that can be invaluable.