How to Set up a Treadmill
You know the scene: the delivery driver drops off a huge box, the cat climbs inside, and you're left with a manual that reads like it was translated twice. If you're wondering how to set up a treadmill without creating a wobbly, squeaky monster in your living room, you're not alone.
In our research, the most common setup failures come down to missing visual cues, not missing strength. As of 2026, most home treadmills are manufactured to the ASTM F2115 standard for stationary fitness equipment, which assumes the frame is assembled correctly before it ever plugs in. That's why the job is less about brute force and more about seeing the right connections.
Let's look at what those are.
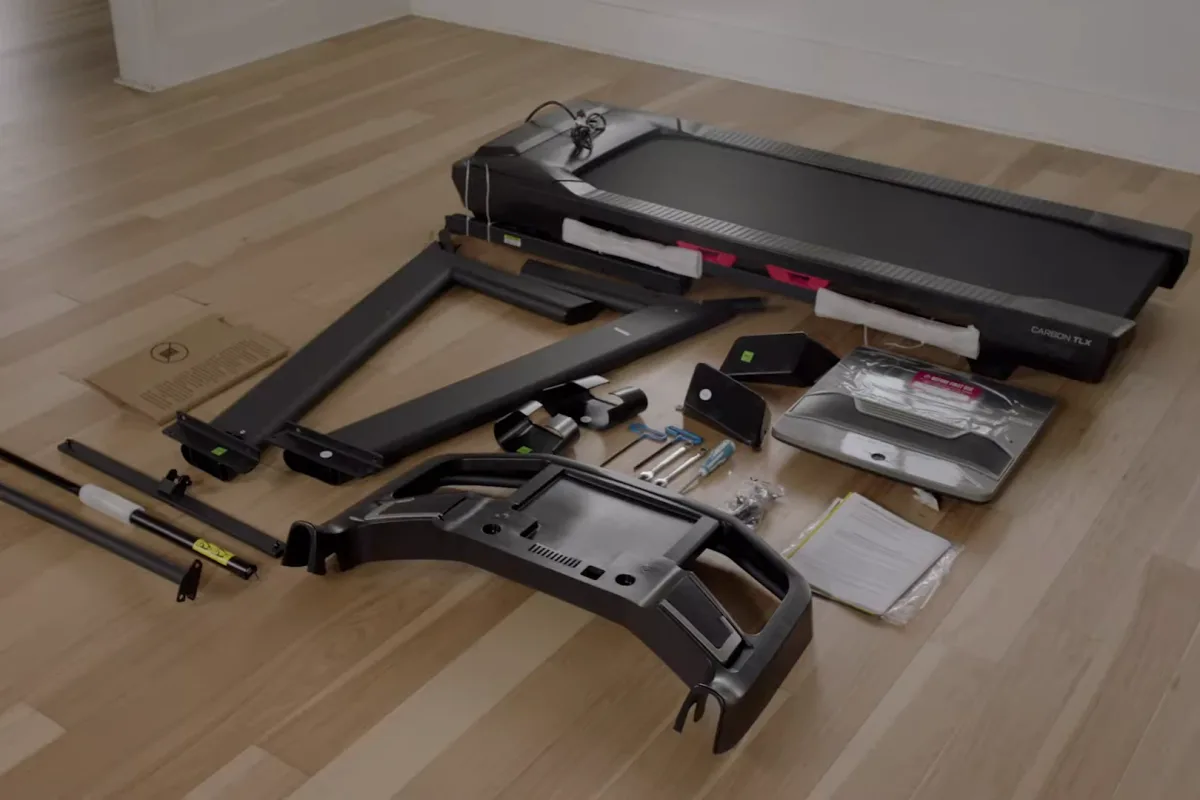
Image source: Bing (Web (fair-use with source credit))
Quick Answer
Setting up a treadmill takes one to two hours. Unbox all parts and check the hardware list. Attach the upright posts to the base, connect the console wire, then bolt on the handles.
Tighten every fastener, level the feet, and test the belt before use.
Why Treadmill Setup Is a Visual Job (and Why Guessing Gets You Squeaks, Wobbles, and Wear)
Treadmills are the one piece of home gym equipment where "close enough" comes back to bite you. A dumbbell is a hunk of metal. A treadmill has a running belt, a drive motor, a folding hinge, and a console wire harness that all have to line up exactly.
That makes this a visual process.
Most assembly mistakes aren't hidden deep inside the machine. They're staring at you: a pinched cable, a belt that rides one edge, a deck that rocks when you step down. The problem is that the manual's line drawings don't always show what those failures look like in real life.
That's why we recommend pulling up a manufacturer video before you start, if one exists. The same way you'd watch a plumber replace a valve before trying it yourself, seeing the actual sequence is worth more than a thousand exploded diagrams. If a video isn't available, look for the visual cues in the sections below.
They'll save you a world of headache.
Also, don't skip the part where you read the warning labels. They're not there for legal protection. They show exactly where fingers and wires don't belong.
Once the machine is set up and stable, you'll have a cardio machine you'll actually climb on, which is why a realistic workout schedule needs a safe starting point. And if you already own other equipment like an elliptical, you know that regular maintenance matters just as much on day one.
What to Look For Before You Touch a Bolt: Manual, Parts Map, and Hardware Checks
Before you even pick up that hex key, do one full pass through the owner's manual. We know, the manual is boring. But it contains the parts map, torque values, and alignment specs for your specific model.
Lay every piece on a flat, clean surface. Separate the fasteners by type. Count them against the manual's hardware list before you dive in.
This single step catches missing screws before you're halfway through the build, which is far easier than waiting and guessing which size bolt goes into which hole.
We've seen people skip this step and later realize they'd swapped two similar-looking bolts. That leads to stripped threads and a wobbling mast. A few minutes now saves an hour of rework later.
Here's a quick list to verify:
- The running belt is pre-installed on the deck and free of tape
- The console wire harness is attached to the mast
- The safety key and lanyard are in the box
- The leveling feet are adjustable by hand
- Your floor has a realistic spot with three feet of clearance behind
If any part is missing, don't start the assembly. Call the manufacturer and wait for a replacement. Setting up with a missing bolt or a damaged wire is a recipe for injury.
The manual will also tell you if you need a specific torque wrench, but most home treadmills just need a snug fit with a socket wrench.
Here's a quick reference for the fasteners you'll likely see:
| Fastener type | Typical use |
|---|---|
| Allen head bolts | Upright posts to base frame |
| Phillips screws | Console cover and handrail facia |
| Washers + nyloc nuts | Hinge points and deck-to-frame joints |
Treadmill Setup Step by Step: Visual Cues for Every Critical Connection
The most important part of the build happens early: routing the console wire. On most treadmills, the wire runs from the console down through one of the upright posts and into the base. If you pinch it between metal parts, the console may power on but flicker, or it may not work at all.
Look at the manual's wire path. As you feed the cable, keep it smooth and out of any pinch points. This photo shows what a properly seated harness looks like before the mast is bolted down.
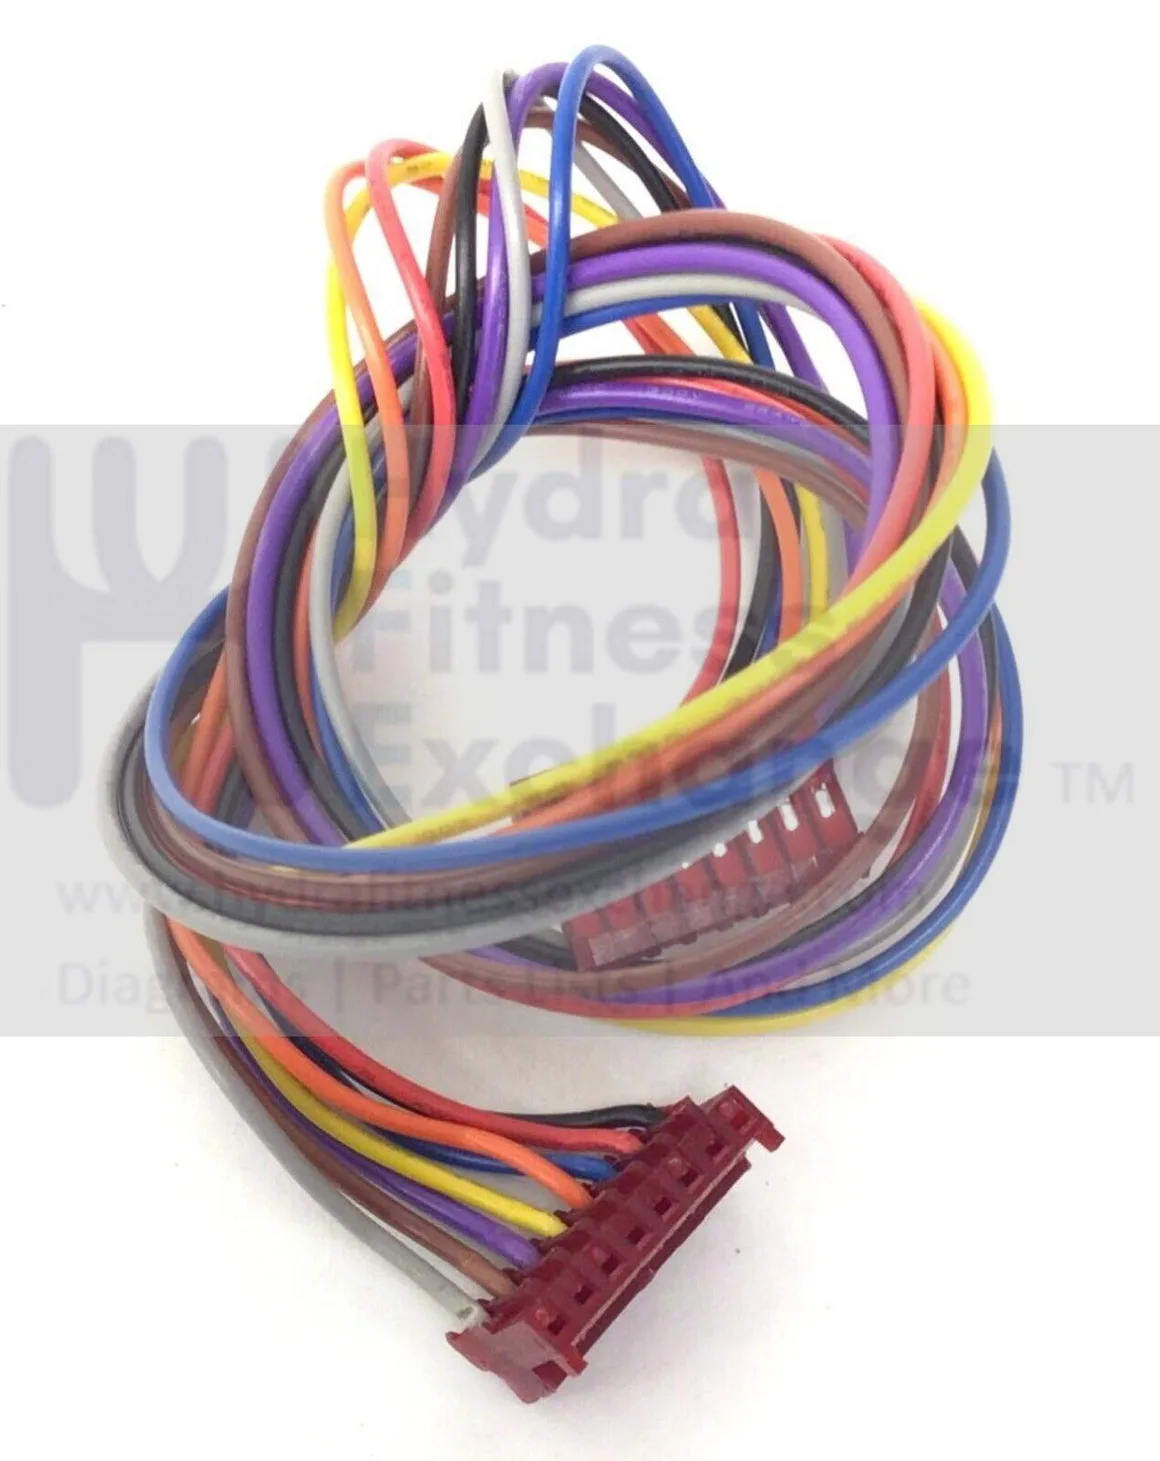
Image source: Bing (Web (fair-use with source credit))
Here's the order that works for most models:
- Attach the upright posts to the base frame with the included bolts, but hand-tighten them first. Leave everything loose until the posts are aligned.
- Connect the console wire harness now, while the mast is still easy to angle. Tug it gently to confirm it's secure.
- Lift the console and mast assembly into place, then align the bolt holes. Keep fingers clear of hinge points.
- Tighten the bolts with the wrench, starting from the bottom and working upward. The manual may list a torque value, so use that if available.
- Attach the handrails and the safety key tether, then check that the emergency stop magnet clicks into its catch.
- Before you fold or flip the treadmill upright, make sure all cables are slack-free inside the mast. A wire that looks taut can snap after a few miles.
A second pair of hands matters most during step 3. You'll be holding the mast, threading bolts, and keeping the wire clear. Trying to juggle all three alone is how wires get crushed.
And a crushed wire is exactly the kind of annoying problem you'll spend hours diagnosing, not unlike the squeaks you'd troubleshoot on other machines with rollers and belts. If you're new to home fitness equipment, the same logic applies whether you're setting up a treadmill or tuning an elliptical's moving parts.
Spotting Assembly Errors: Belt Tracking, Pinched Wires, and Unleveled Decks
After the frame is fully bolted down, check the running belt before you ever power it on. The belt should sit centered between the two rear roller guards. If it drifts toward one side, you'll see an uneven gap between the belt edge and the deck.
Here's what an off-center belt looks like up close:
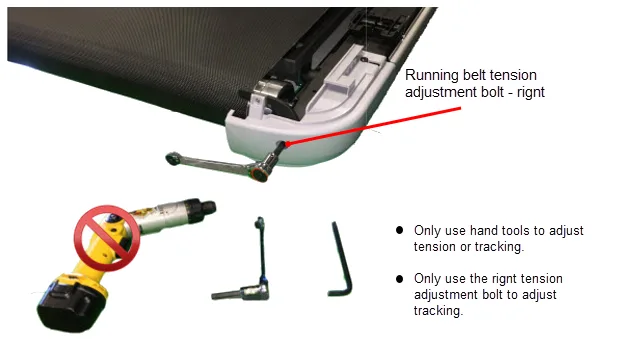
Image source: Bing (Web (fair-use with source credit))
Adjust belt tracking with the rear roller bolts. A quarter turn on the left or right side usually centers it. Turn the bolt clockwise to move the belt right, counterclockwise to move it left.
Run the belt slowly while you watch it glide, then re-check after a few minutes of use.
After the belt passes the visual test, do a slow walk for five minutes. That's also a great moment to decide on a realistic workout schedule for the machine, because consistent use is what catches alignment changes early. The same habit of inspecting belts and rollers applies to other machines in your home gym, and keeping them clean makes the checks easier.
If you already own an elliptical, keeping other cardio equipment clean will keep your whole workout space safer.
Also look for pinched wires at every joint. The most common spots are where the upright post meets the base and where the console hinges. A pinch shows up as a flattened cable or a visible metal crease.
If you spot one, loosen the nearby bolts, reposition the wire, and rebuild that joint.
The frame itself should sit rock-solid on the floor. Push the handrails from left to right. If the treadmill rocks even slightly, you likely forgot to tighten a bolt or you haven't adjusted the leveling caps yet.
The U.S. Consumer Product Safety Commission has documented injuries from users losing balance on unstable or misaligned treadmills, so this isn't a cosmetic issue.
Placement and Leveling: Seeing Is Believing
Where you put the treadmill matters just as much as how you bolt it together. Carpet makes the frame tilt unless you use a treadmill mat. Hardwood floors amplify noise.
Concrete basements feel steady but can transmit vibration upstairs.
Place the treadmill on a flat, hard surface. If you're on carpet or a rug, put a dense treadmill mat underneath to give the feet a stable base. This also prevents your deck from becoming a swaying bridge.
Use the leveling feet to fine-tune the frame. Turn each cap until it's snug against the floor, then check for wobble by pressing on each corner. The good news is that most treadmills have small bubble levels near the console, but you can also use a standard carpenter's level on the side rails.
Give yourself at least three feet of open space behind the treadmill and a foot on each side. The instruction manuals from most major brands list clearance requirements in the same diagram that shows assembly, but they're easy to miss.
Once the machine is level, set a reminder to re-tighten the bolts after your first few sessions. The vibration of running will settle everything into place. Regular equipment upkeep is what keeps a home gym from turning into a landfill donation, and it applies to every machine in your space.
If you've got an elliptical in the same room, the same discipline of routine maintenance will keep both machines running smoothly.
First Test Run: What to Watch, Listen for, and Adjust
After the frame is level and the belt is centered, you're ready for the first test run. Plug the power cord into a grounded outlet that meets your model's spec. Attach the safety key to your clothing, just like a gym treadmill.
Start at the lowest speed setting. Stand on the side rails first. Step onto the belt only when it's moving slowly.
Keep a hand on the console until you're comfortable.
Watch the belt as it moves. It should stay centered. If it drifts, stop and turn the rear roller bolts a quarter turn.
Clockwise moves the belt right, counterclockwise moves it left. You'll use the same attention to detail when adjusting other fitness gear to keep it stable.
Listen for rhythmic squeaks. A steady scrape often means a guard is touching the belt. If squeaks persist, you might need to troubleshoot the moving parts the same way you would with other home cardio equipment.
Give the leveling feet a final check too. Push down on the handrails. A wobbling deck needs another turn of the leveling caps.
Run for five to ten minutes at a walking pace. Then increase speed gradually. After the session, re-tighten the bolts on the upright posts and hinges.
Vibration from the run settles everything into place.
Finally, test the emergency stop. Press the safety key's clip while the belt moves. The belt should stop quickly and cleanly.
If it drags, the console may need calibration. Also check the motor area for burning rubber smells. That could mean a seized roller or an overtightened belt.
The Consumer Product Safety Commission tracks treadmill-related injuries, so a full safety check before each run is worth the extra minute.
FAQs About Treadmill Setup
How long does it take to set up a treadmill?
Most home treadmills take one to two hours. A second person speeds up the heavy lifting. If your floor is uneven or you need a treadmill mat, add about 30 minutes.
Do I need two people to assemble a treadmill?
Yes, for most models. The console mast is heavy and awkward to lift alone. A helper keeps the wire harness from pinching while you align the bolts.
Why does my treadmill belt drift to one side?
The rear roller tension is uneven. Turn the left or right rear roller bolt a quarter turn. Clockwise moves the belt right, counterclockwise moves it left.
Run at low speed and check again. You'll use the same patience when tuning the alignment of other home fitness equipment.
Can I set up a treadmill on carpet?
You can, but you need a treadmill mat. Carpet compresses and makes the frame wobble. A mat also protects the carpet from dust and wear, just like keeping other fitness equipment clean.
Why is my treadmill making a squeaking noise after setup?
A squeak right after setup usually comes from a loosely bolted hinge or a misaligned belt guard. Tighten every visible fastener first. If the noise continues, the deck might need lubrication or the rollers need adjustment.
You'll often solve similar noises on other cardio machines with the same troubleshooting steps.