How to Use a Spin Bike Correctly
To use a spin bike correctly, you need more than just strong legs. The bike has to fit you first. Without the right seat height and handlebar position, every ride puts wear on your knees and lower back.
The good news is that proper technique is simple to learn, if you know what to check.
Manufacturer specs and exercise physiology guidelines are clear on the basics. The saddle should sit level with your hip bone when you stand next to the bike, and your knee should keep a slight 25- to 35-degree bend at the bottom of the pedal stroke. Get those two numbers right and most common pain disappears.
Let's walk through the full setup and technique step by step.
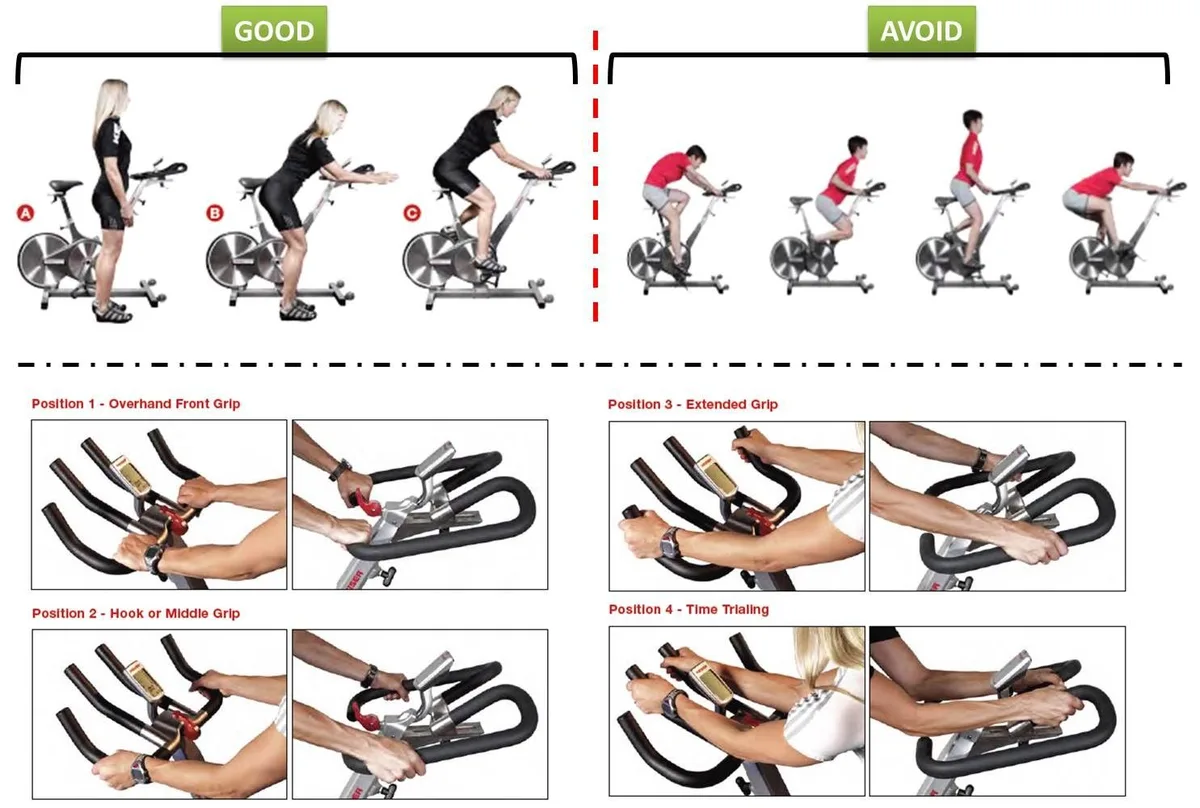
Image source: Bing (Web (fair-use with source credit))
Quick Answer
To use a spin bike correctly, start with the seat at hip height. Your knee should stay slightly bent at the bottom of the stroke. Set the fore-aft position so your front knee lines up over the pedal axle.
Then pedal at a smooth cadence, keeping your upper body still. Add resistance before standing up out of the saddle.
Why Getting Your Spin Bike Setup Right Actually Matters
Most people assume that pain from indoor cycling means they're out of shape. More often, it means the bike is configured for someone else's body. Exercise medicine clinics tie most indoor cycling injuries to a poorly adjusted saddle.
Exercise guidelines as of 2026 still put setup first, before intensity and duration.
A seat that's too low forces your knees forward and increases pressure on the kneecap. A seat too high makes you rock side to side, straining your lower back and hamstrings. Handlebar position matters too.
If you're reaching too far forward, you'll collapse into your shoulders and wrists.
The same rule applies to other cardio equipment. Poor positioning causes similar problems on a rower, so the fix always starts with equipment adjustment before you pedal. Good form protects you from injury, but it also makes you more efficient.
When your joints stay in their proper range, your glutes and quads do the work, instead of wasted energy fighting a bad fit.
The Parts That Control Your Form: Flywheel, Resistance, Pedals, and Cleats
Walk up to any spin bike and you'll see the same core parts. The flywheel is the heavy wheel that keeps momentum going when you ease off. Resistance comes from either a magnetic brake or a felt pad pressing against the flywheel.
| Component | What it does | Why it matters for form |
|---|---|---|
| Flywheel | Stores momentum | Smooths out dead spots in your pedal stroke |
| Resistance knob | Adds or releases load | Controls cadence and leg effort |
| Pedals | Carry your feet | Determine foot stability and knee tracking |
| Cleats | Lock your shoes to pedals | Prevent foot sliding and improve efficiency |
Most studio bikes carry a flywheel weighing between 18 and 25 kg. Lighter flywheels are harder to spin smoothly. Heavier ones give you a more road-like feel and forgive rough pedaling.
That weight makes a real difference when you're learning to smooth out your stroke.
Clip-in pedals use cleats, which are small plastic or metal clips bolted to the sole of a cycling shoe. If you're riding in sneakers, toe cages work fine, but you lose some connection. That small gap is a big deal during sprints and climbs.
How to Set Up a Spin Bike for Your Body
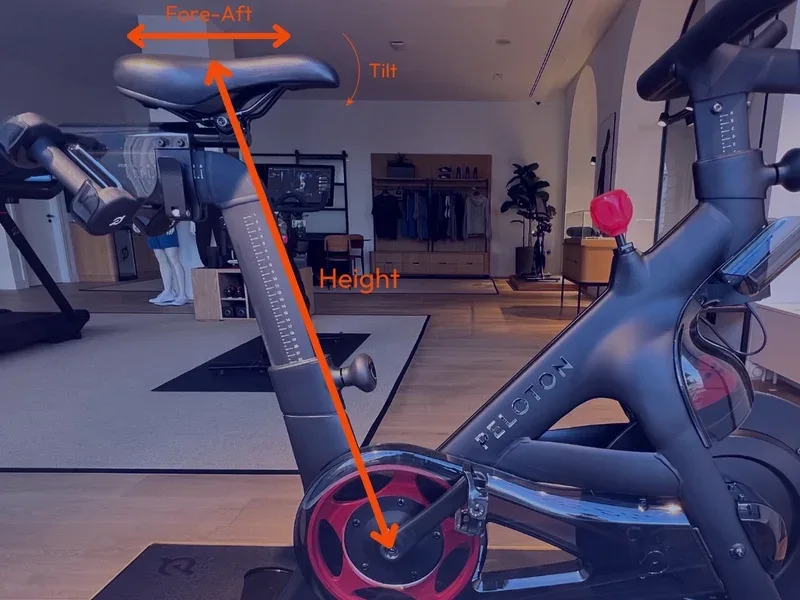
Image source: Bing (Web (fair-use with source credit))
Before you clip in, set up the bike. This takes about two minutes and prevents most of the aches people blame on cycling.
Seat Height: The Hip-Bone Test
Stand next to the bike and set the saddle level with the top of your hip bone. According to the American Council on Exercise, this starting point keeps your knees in a safe range. When you sit and bring the pedal to the bottom, your knee should still have a slight 25- to 35-degree bend.
If your leg locks out, lower the seat. If your knee stays deeply bent, raise it.
Seat Fore-Aft: The Knee-Over-Pedal-Spindle Check
Sit on the bike with the pedals at three and nine o'clock. Drop a straight line from the front of your front knee. It should meet the pedal axle or the ball of your foot.
Slide the saddle forward or back until it lines up. If you've ever spent time dialing in a rower's fit, this part will feel familiar.
Handlebar Height and Reach
Set the handlebar about level with the seat for a first ride. If you have tight hips or a lower back condition, go higher. Reach forward so your arms have a slight bend.
Your torso should lean around 45 degrees, not fold onto the console.
Foot Placement and Cleat Position
The ball of your foot should sit over the pedal spindle. If you use cleats, make sure your foot doesn't sit crooked. Many riders angle the front foot outward, which misaligns the knee.
Keep both feet parallel to the crank arm when viewed from above.
The Correct Riding Technique: Seated Flat, Standing Climb, and Cadence Control
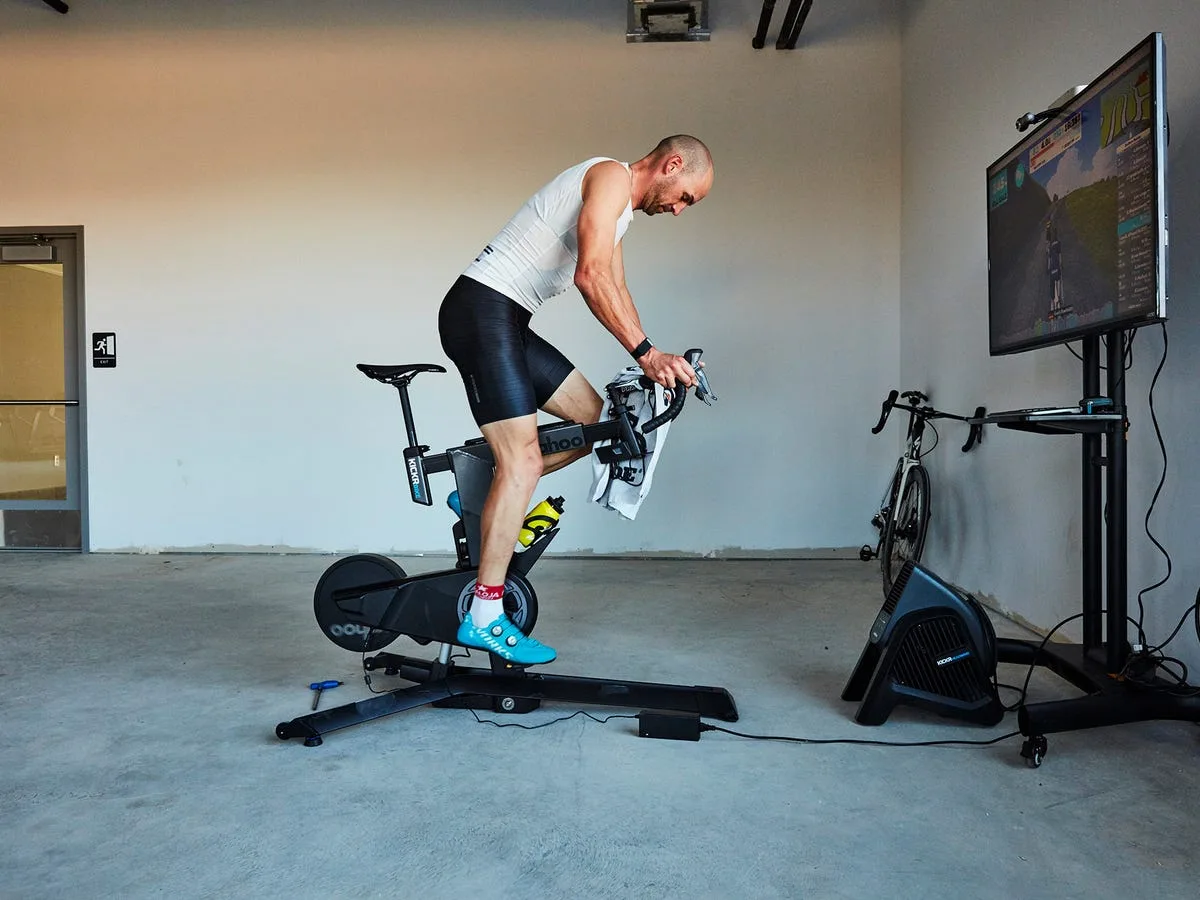
Image source: Bing (Web (fair-use with source credit))
Once the bike fits, it's time to think about how you pedal. Your riding style changes with cadence and resistance. Cadence is your pedal speed, measured in revolutions per minute, or RPM.
Seated Flat Riding (80–100 RPM)
For flat road simulation, keep your upper body still. A small forward lean is normal, but don't rock side to side. Push and pull through the whole pedal circle.
Imagine scraping mud off your shoe at the bottom of each stroke.
Standing Climbs (60–70 RPM) and Heels-Down Pressure
Standing climbs demand more resistance. Add load until the pedals feel heavy but smooth. Stand with your hands on the top of the handlebar.
Let your hips sit back over the saddle, not in front of it. Drop your heels slightly and press through the back of the pedal stroke. This shifts work to your glutes and hamstrings.
Once your technique feels smooth, you can start paying attention to workout length and pacing and build from there.
Smooth Transitions and the Unweighted Spin
The most common transition mistake is easing the resistance knob all the way off before you stand. That lets the flywheel spin out from under you. Instead, add resistance before you lift from the saddle.
When you move back down, keep your foot speed steady and your hands light on the bars.
Common Form Mistakes That Cause Injury (And How to Fix Them)
Even with the perfect setup, form slip-ups can derail a ride. Here are the most common indoor cycling mistakes and the fixes that actually work.
- Bouncing hips. Your torso moves up and down as you pedal. That usually means tension is too light or your cadence is too high. Add resistance and slow your legs until your hips stay still.
- Locked elbows and wrist pain. Straight arms transfer every bit of force to your wrists. Soften your elbows and lighten your grip. Imagine your fingertips resting on piano keys.
- Pointed toes. Dropping your toes toward the ground at the bottom of the stroke strains your shins and Achilles tendon. Keep your foot nearly flat and push through the ball of your foot.
- Flared knees. Letting your knees push outward stresses your hips and knees. Keep your knees tracking in line with your second toe.
- Numb feet or toes. Over-tightened toe cages and misplaced cleats cut off circulation. Loosen the straps and adjust your cleats so your feet sit naturally.
- Lower back strain. This is often a setup problem, not a strength problem. Protecting your lower back starts with a saddle height that isn't too high and handlebars that aren't too low.
Your First Ride: A Practical 20-Minute Session to Practice Good Form
Now that your bike fits, put it to work. This 20-minute beginner session practices everything we've covered. It's short on purpose, because good form gets sloppy when the legs tire.
| Time | Effort | Focus Cue |
|---|---|---|
| 0-5 min | Easy spin, low resistance, 80-90 RPM | Smooth pedal circles, light hands |
| 5-10 min | Moderate resistance, seated flat, 80 RPM | Hips still, shoulders relaxed |
| 10-15 min | Add resistance, standing climb, 60-65 RPM | Heels down, hips back over saddle |
| 15-18 min | Reduce resistance, seated flat, 90 RPM | Unweighted spin, no bouncing |
| 18-20 min | Very easy spin, low resistance | Deep breathing, shake out legs |
Do this ride two or three times a week. Once your form holds steady for all 20 minutes, extend the seated block by five minutes. Add one extra standing climb the following week.
Slow progression beats intense sessions when you're still building muscle memory.
Check your setup again after a few rides. Saddles settle and quick-release levers loosen. Give everything a quick tug before you clip in.
Safety Notes, Warning Signs, and When to Ask a Professional
Indoor cycling is safe for most people, but it's not risk-free. Some muscle fatigue is normal in the first sessions. Sharp pain is not.
Know the warning signs that mean you should stop.
- Sharp knee pain. Usually a setup issue. Re-check your seat height and fore-aft position.
- Persistent lower back pain. Often from handlebars that are too low. Raise them and brace your core.
- Dizziness or lightheadedness. Stop immediately and check your hydration.
- Chest pain or unusual shortness of breath. Stop and contact your doctor.
- Numbness or tingling. In hands, feet, or saddle area. Adjust pressure points on the bike.
If you have heart conditions, high blood pressure, or are pregnant, get medical clearance before starting. The National Institutes of Health publishes clear guidance on physical activity for these situations. That checkup matters more than any workout plan.
If joint pain continues after adjusting the bike, see a physiotherapist or a professional bike fitter. They can spot alignment issues you can't feel. A little soreness is fine.
Joint pain is a signal, so respect it.
Frequently Asked Questions About Using a Spin Bike
How often should I use a spin bike?
Most riders train three to four times a week, with a rest day between hard sessions. That gives your muscles time to recover and adapt. Beginners should start with two or three rides per week and assess how their knees and back feel before adding more.
Why does my lower back hurt after spinning?
Usually it's a seat set too high, handlebars too low, or a weak core. Re-check your setup before your next ride. Keep your torso at around 45 degrees and brace your abs during climbs.
If the pain lingers for more than a week, see a physiotherapist to rule out anything structural.
Should I use sneakers or cycling shoes?
Sneakers with toe cages work fine for gentle, low-intensity rides up to 30 minutes. Cycling shoes with cleats give you a stiff sole and a locked-in foot. That improves power transfer and reduces foot fatigue on longer sessions.
For most home riders, sneakers are a fine starting point.
How much resistance should I use?
Use enough that your pedal stroke feels smooth and controlled at all times. On flats, hold 80 to 90 RPM without letting your hips bounce. On climbs, slow to 60 to 70 RPM while adding resistance.
If your upper body is rocking, the tension is too light.
Is a spin bike good for weight loss?
Yes. A 45-minute session can burn 400 to 600 calories, depending on effort and body weight. Consistency beats intensity for long-term results.
Pair your rides with a sensible diet and a structured cardio routine to see reliable changes within a few weeks.