How to Fix an Ice Maker Leaking Water
A puddle of water under your refrigerator or around the ice maker isn't just annoying; it can signal a problem that needs attention fast. Figuring out how to fix an ice maker leaking water often boils down to a few common culprits, most of which you can tackle yourself without needing a plumber. We'll walk you through the most likely causes and how to address them.
The U.S. Environmental Protection Agency (EPA) estimates that household leaks can waste about 90 gallons of water per day. A persistent ice maker leak, even a small one, contributes to this waste and can potentially cause water damage or mold growth over time.
Let's get this fixed.
Quick Answer
To fix an ice maker leaking water, first turn off the water supply and disconnect power. Then, inspect the water supply line connection for tightness and check the tubing for cracks or kinks. Examine the water inlet valve for damage or buildup, and ensure the ice bucket seals properly.
Most leaks stem from these components.
Why Is My Ice Maker Leaking Water?
It's frustrating to see water where it shouldn't be, especially when you just want ice. When your ice maker starts leaking, it’s usually a sign that something isn't quite right with the water delivery system. These systems are pretty straightforward, but a small issue can quickly turn into a noticeable mess.
The most common reasons for leaks include loose connections, damaged tubing, or a malfunctioning water inlet valve. Sometimes, it's as simple as a frozen line or an improperly seated ice bucket. We’ll break down the troubleshooting process so you can pinpoint the exact cause.
Quick Fixes: What to Check First If Your Ice Maker is Leaking
Before diving deep into disassembly, there are a few quick checks you can do that often resolve the problem. These are the low-hanging fruit, the easiest things to fix and the most common causes of a leak.
Checking the Water Supply Line Connection
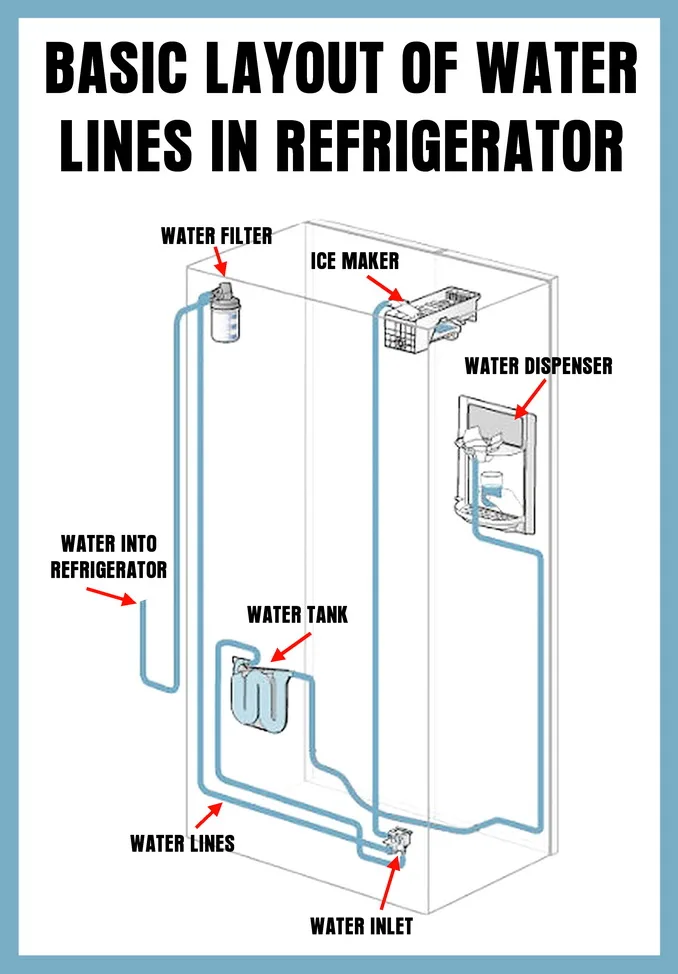
The water supply line is usually a thin tube, often made of copper or plastic, that runs from your home's water plumbing to the back of the refrigerator or ice maker. This connection is a frequent source of leaks.
- Tightness: Over time, vibrations can cause the fittings to loosen. Gently try to tighten the connection at both the refrigerator and the wall valve. Don't overtighten, as this can strip the threads or damage the fittings.
- Damage: Inspect the entire length of the water line for any visible cracks, kinks, or signs of wear. Even a tiny split can cause a significant drip.
- Wall Valve: Ensure the shut-off valve for the ice maker line is fully open and not leaking itself. If the valve is dripping, that’s a separate plumbing issue to address.
Inspecting the Ice Bucket Seal
If your ice maker is part of a refrigerator's dispenser system, the ice bucket itself needs to seal properly to prevent water from escaping as ice is formed or dispensed. A poorly seated bucket can lead to water pooling around the dispenser area.
- Seating: Remove the ice bucket and reinsert it, making sure it clicks into place or sits firmly. Check for any obstructions that might be preventing a proper seal.
- Gaskets: Some ice buckets have rubber gaskets or seals to create a watertight barrier. Inspect these for any tears, cracks, or dryness. If they look worn, they might need replacement.
- Drainage: In some models, there's a small drain hole at the bottom of the ice bin that can get clogged. If this happens, water can back up and leak out. Check for and clear any blockages.
Step-by-Step: Troubleshooting Your Leaky Ice Maker
If the quick checks didn't solve the leak, it’s time for a more systematic approach. This involves carefully examining the internal components that handle water flow. Remember to always turn off the water supply and unplug the refrigerator before proceeding with these steps.
Isolating the Leak Source
The first crucial step is to figure out where the water is coming from. Is it dripping from the back, the bottom, or somewhere inside the freezer compartment?
- Observation: Place a dry towel or newspaper under and around the refrigerator. Run the ice maker for a short period and observe where the water appears first. This helps narrow down the area of the problem.
- Water Lines: If the leak is coming from the back, it's almost certainly related to the water supply line connection or the fill tube.
- Internal Components: If the leak is inside the freezer, it could be an issue with the ice maker's fill tube, the water valve, or even condensation freezing and melting.
Diagnosing Common Component Issues (Valve, Tubing, Filter)
Many leaks trace back to specific parts within the water system. Understanding what to look for can save you a lot of guesswork.
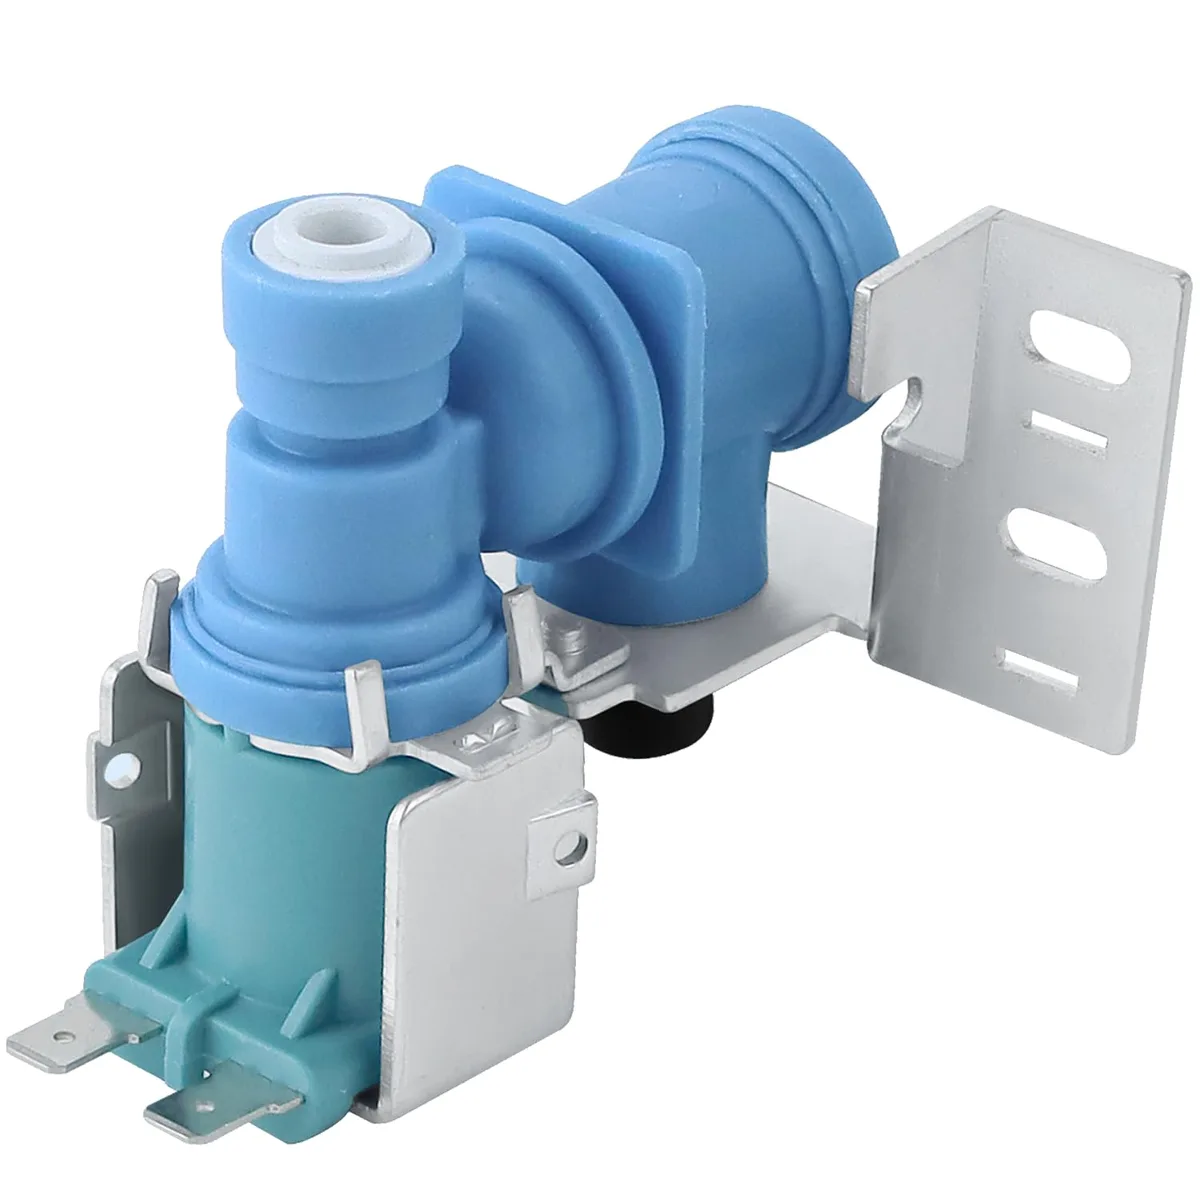
- Water Inlet Valve: This is where the water line connects to the appliance. It controls the flow of water into the ice maker.
- What to look for: Cracks in the valve housing, a faulty solenoid, or a loose connection. Sometimes sediment can build up, preventing it from sealing correctly.
- Fix: If the valve itself is damaged or leaking from its housing, it typically needs to be replaced. Manufacturer specifications often detail the correct replacement valve for your specific refrigerator model.
Tubing and Fill Tube: The tubes carry water from the valve to the ice maker mold. The fill tube guides water into the ice mold.
- What to look for: Cracks, kinks, punctures, or loose connections at either end. The plastic or rubber can become brittle over time.
- Fix: Small cracks or holes in flexible tubing can sometimes be repaired with specialized repair tape, but replacement is usually the most reliable solution. Ensure new tubing is rated for potable water.
Water Filter: If your refrigerator has an internal water filter, a faulty seal or a cracked filter housing can cause leaks.
- What to look for: Water pooling around the filter cartridge or leaking from the filter housing area.
- Fix: Try replacing the water filter. Ensure it's seated correctly and the O-rings are intact. If the housing itself is cracked, it may require replacement of the housing assembly.
Ice Maker Fill Tube: This is the tube that delivers water into the ice mold. If it's cracked or has a poor seal at the ice maker unit, water can drip out during filling.
Addressing Ice Buildup and Freezing
Sometimes, the "leak" isn't a true leak but melted ice. This happens when the water line or components freeze up.
Frozen Fill Tube: If the fill tube freezes, water can't get into the mold properly. When the freezer's defrost cycle runs, the melting ice will drip out.
- Why it happens: Usually due to insufficient heat from the water valve's heater (if equipped) or a blocked tube that causes water to freeze in place.
- Fix: Try to carefully thaw the tube with a hairdryer on a low setting. Ensure the water inlet valve is functioning correctly to deliver the right amount of water, and check if any other components are causing the freeze.
Condensation: In humid environments or if the freezer door isn't sealing properly, condensation can build up and freeze. When it melts, it can appear as a leak.
- What to look for: Frost buildup around the ice maker or on internal components.
- Fix: Check door seals for damage or debris. Ensure the freezer temperature is set correctly.
When to Call a Pro: Recognizing Serious Issues
While many ice maker leaks are DIY-friendly, some situations warrant professional help. If you're uncomfortable with any step, can't find the source of the leak, or suspect a more complex issue, it's best to call an appliance repair technician or a qualified plumber.
- Persistent Leaks: If you've tried the common fixes and the leak continues, there might be an internal issue that requires specialized tools or knowledge.
- Electrical Concerns: If you notice any signs of electrical damage near the water source, stop immediately and call a professional to avoid shock hazards.
- Major Component Failure: Issues with the main water valve for the entire appliance or the internal refrigerant lines can be complicated and dangerous to fix yourself.
- Lack of Confidence: Appliance repair can be intimidating. If you're not confident in your abilities to safely and effectively perform a repair, calling a pro is the wisest choice. Their expertise can save you time, frustration, and potentially costly mistakes.
Safety First: Avoiding Hazards While Fixing Your Ice Maker
Working with water and electricity, even in a relatively low-voltage appliance, requires caution. Always prioritize safety to prevent injury.
- Disconnect Power: Before touching any internal components, always unplug the refrigerator from the wall outlet. This is the most critical safety step to prevent electrical shock.
- Turn Off Water Supply: Locate the shut-off valve for the water line to your ice maker (usually behind the refrigerator) and turn it completely off. This prevents water from spraying out when you disconnect lines.
- Wear Protective Gear: Consider wearing gloves, especially if dealing with older appliances or potentially sharp edges. Safety glasses can protect your eyes from debris or unexpected sprays.
- Clear the Area: Make sure you have ample space to work and that the floor around the appliance is dry to prevent slips.
- Proper Disposal: If you replace parts, ensure you dispose of old components responsibly, especially if they contain refrigerants or other regulated materials.
Mistakes to Avoid: Common Errors When Fixing Ice Maker Leaks
Even with the best intentions, it's easy to make a misstep when troubleshooting appliance issues. Understanding common mistakes can help you avoid further problems and ensure a successful repair.
- Ignoring the Obvious: Many leaks are caused by simple issues like loose fittings or a blocked fill tube. Jumping straight to complex part replacements without checking these basics is a common error. Always start with the easiest and most frequent causes.
- Overtightening Fittings: While you want connections to be snug, overtightening can strip threads or crack plastic components, turning a small leak into a much bigger problem. Gentle, firm pressure is usually sufficient.
- Not Disconnecting Power or Water: Attempting repairs without shutting off the electricity and water supply is extremely dangerous. Always follow safety protocols to prevent electrical shock or flooding.
- Using Improper Parts: Using generic tubing or fittings not designed for potable water or your specific appliance can lead to leaks or contamination. Always use parts that meet manufacturer specifications or are certified for food-grade water systems.
What to Do If Your Ice Maker Keeps Leaking
Sometimes, even after a fix, the leak might reappear. This often indicates a recurring issue or a problem that wasn't fully resolved. If the leak persists after your repair attempt, it's time to re-evaluate.
- Re-inspect Your Work: Double-check every connection you made and every part you replaced. Did you miss a small crack? Is a new part seated correctly? Sometimes a second look reveals an overlooked detail.
- Consider a Hidden Cause: The leak might be coming from a component you haven't yet examined. For instance, a crack deep within the ice maker mold itself, or a subtle issue with the water inlet valve's internal seal, might be the culprit.
- When to Seek Professional Help: If the leak continues after you've diligently followed troubleshooting steps, it’s a strong signal to call in an expert. They have the diagnostic tools and experience to identify less obvious problems, like internal pressure issues or component wear that’s not visible to the naked eye. For instance, if you’re trying to fix a complex appliance, it's similar to seeking help for how to fix a slow cooker when a simple reset doesn't resolve the issue.