How to Set up an Exercise Bike
If you've ever climbed onto an exercise bike and felt knee pain or a numb lower back within minutes, the machine probably wasn't set up for you. How to set up an exercise bike properly comes down to a few simple measurements that most riders skip. Nobody fits a factory default.
The difference between a comfortable ride and a painful one is usually a matter of inches.
Manufacturer specifications and ISO 20957, the global standard for stationary training equipment, point to the same core factors: saddle height, fore-aft position, handlebar reach, and pedal alignment. As of 2026, most home bikes still ship with only a generic adjustment chart. A tape measure and an Allen key fix it in about ten minutes.
Here's where most riders go wrong.
Why Most Exercise Bikes Get Set Up Wrong
Most exercise bikes leave the factory set for an average-sized male rider. That position fits almost nobody. It ignores your height, your leg length, and your flexibility.
So you sit too low, reach too far, or both.
Aggregate reviews across home fitness forums show the same pattern. Knee pain is the number one complaint from new bike owners. Lower-back strain is the second.
Both trace back to poor setup, not a defective machine.
Watch someone ride a poorly fitted bike and you'll see the warning signs. They rock side to side at the hips. They ride with locked elbows.
They complain about wrist pressure after ten minutes. If any of that sounds familiar, your position is the problem.
People blame the machine, not the fit. That's why so many exercise bikes end up gathering dust in a corner. Get the setup right, and the bike becomes comfortable enough to use regularly.
You don't need a professional bike fit. You need a tape measure, a set of Allen keys, and a little patience. The same discipline that applies to fine-tuning your position on other cardio machines works here.
The most common causes of a bad setup are:
- Factory settings that fit no one
- Copying a partner's seat position
- Using a generic chart that ignores your proportions
- Never re-checking after the first few rides
Step One: Know Your Bike Type and Rider Profile
Before you change anything, figure out what kind of bike you're riding. Each type has its own adjustment order. Get that wrong, and you'll chase your tail.
| Bike Type | Setup Priority | Key Adjustment |
|---|---|---|
| Upright bike | Comfort and posture | Saddle height, handlebar height |
| Recumbent bike | Leg extension and recline | Seat distance, backrest angle |
| Spin bike | Power transfer and stability | Saddle height, fore-aft position, handlebar reach |
| Smart bike | Guided by body measurements | Auto-fit systems, but manual checks still matter |
If you ride an upright bike, you want a mostly vertical torso with relaxed shoulders. If you're on a recumbent, the backrest and leg extension do most of the work. A spin bike demands a more aggressive position, close to what you'd use on a road bike.
Smart bikes often guide you through setup with on-screen prompts, but you still need to verify the numbers.
Your rider profile matters just as much. Tall riders should check the seat post range before anything else. Shorter riders need to confirm the handlebars are adjustable enough to bring them within reach.
If you have a history of knee pain, you'll want a smoother knee bend rather than an aggressive one.
If the bike serves multiple people, choose quick-release levers for easy re-fitting. If it's a single-rider bike, bolt-style clamps are fine. If you're recovering from an injury, a recumbent might be the safer starting point.
If you're still comparing home cardio options, beginner-friendly cardio machines can help you decide.
The Setup Workflow: Saddle Height, Fore-Aft, Handlebars, Pedals
Here's the order that works for every bike type: saddle height, saddle fore-aft position (how far forward or back the saddle sits), saddle tilt, handlebars, then pedals. Follow this sequence and you'll avoid redoing your work.
- Measure your inseam barefoot.
- Set the saddle to roughly hip height as a starting point.
- Use the heel-on-pedal test to fine-tune saddle height.
- Level the saddle tilt.
- Adjust fore-aft position using the KOPS rule.
- Set handlebar height and reach.
- Clip in or strap in, then take a two-minute test ride.
Start with your inseam. Stand barefoot against a wall and measure from the floor to your crotch. Write that number down.
It's the foundation for everything else.
The heel-on-pedal test is the practical check. Put your heel on the pedal at the bottom of the stroke. Your leg should be fully straight.
If it's bent, raise the saddle. If your hips rock, lower it.
Level the saddle next. A spirit level works best. Most riders prefer a perfectly level seat or a one-to-two-degree nose-down tilt.
Anything more causes forward sliding.
For fore-aft position, use the knee-over-pedal-spindle rule. Set the cranks horizontal. The front of your knee should hang directly above the pedal spindle.
An imaginary line from the kneecap drops straight down to the axle.
Handlebar height follows. For comfort, set the bars level with or slightly above the saddle. For a performance position, drop them a little lower.
Finish with the pedals. Flat pedals just need snug straps. Clipless pedals should have cleats positioned under the ball of your foot.
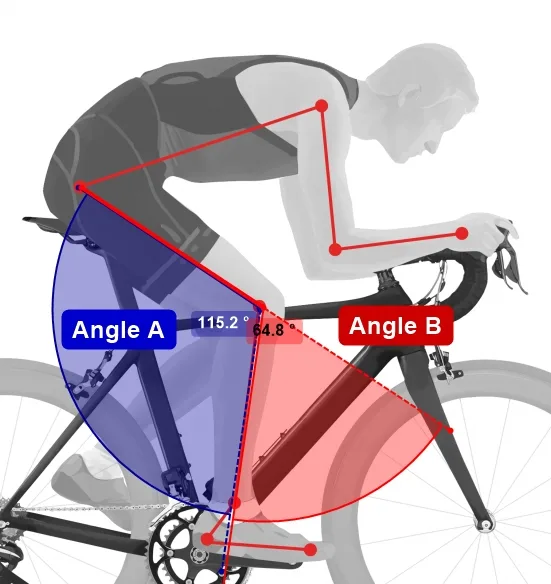
The image above shows the ideal knee extension angle of 25 to 35 degrees at the bottom of the pedal stroke. Per ISO 20957 stationary equipment standards, every clamp and quick-release lever must also sit fully locked before you ride. If you're new to indoor machines, correct form basics apply to bikes just as much as rowers.
Bike-Type Fit Adjustments: Spin, Upright, Recumbent
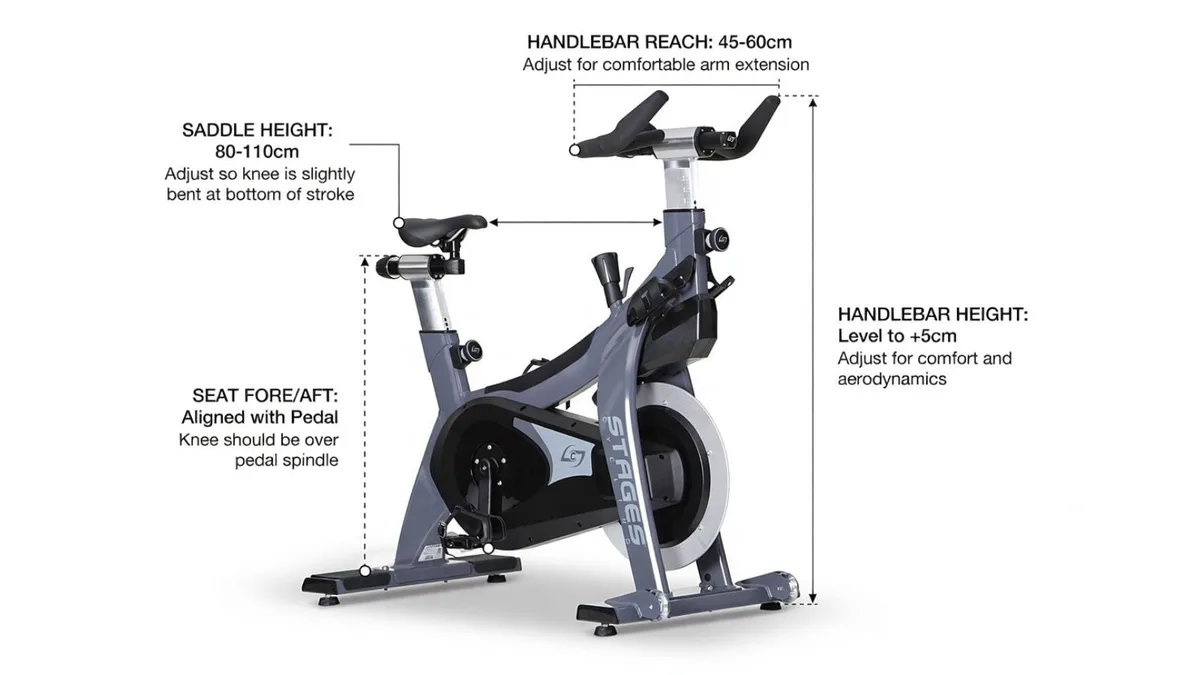
Spin bikes want a road-bike-like position. Set the saddle so your knee has a slight bend at the bottom of the stroke, closer to 25 degrees. Handlebars sit lower than the saddle for a forward-leaning torso.
This position supports hard sprints and climbing out of the saddle.
Upright bikes are the opposite. They favour comfort over aerodynamics. Raise the handlebars close to saddle height so your torso stays mostly upright.
This reduces lower-back strain and makes it easier to watch TV or read while riding.
Recumbents change the workflow completely. Start with the backrest angle, usually between 100 and 110 degrees. Then adjust the seat distance so your knee is softly bent at full leg extension.
There's no saddle height to worry about, but the seat sliders are just as important.
The image above shows a typical spin bike layout. Notice the dropped handlebars relative to the saddle. If you set up a spin bike for someone coming from upright bikes, keep the reach shorter and the bars higher at first.
Whatever bike you ride, the fit principles stay the same. That's also true on other indoor machines, like rowers with different resistance technologies.
Common Setup Mistakes and How to Fix Them
Most setup problems show up as pain. The table below maps symptoms to causes.
| Symptom | Likely Cause | Fix |
|---|---|---|
| Front-of-knee pain | Saddle too low | Raise the saddle |
| Back-of-knee pain | Saddle too high | Lower the saddle |
| Hips rocking side to side | Saddle too high | Lower it and re-check |
| Numb hands | Handlebars too far forward | Bring the bars closer |
| Lower-back strain | Handlebars too low | Raise the bars |
| Saddle discomfort | Nose tilted up | Level the saddle |
The most dangerous mistake isn't comfort. It's raising the seat post beyond the minimum insertion mark printed on the post. The clamp can fail under load, which can send you hard onto the frame.
Check the mark before every ride if you share the bike.
Another common miss is skipping the test ride. A two-minute spin at 70 to 90 rpm reveals most issues quickly. Wiggle your hips, hold the bars loosely, and pay attention to your knees.
If you're dealing with back pain specifically, the same spinal-loading concerns apply on other equipment. Many riders find lower-back safety guidance useful before committing to long sessions.
Also check CPSC exercise equipment notices if you're buying a used bike and want to confirm its structural integrity.
Exercise Bike Setup FAQs
These are the questions riders actually ask after the first few rides.
How long does it take to set up an exercise bike?
A full fit takes about ten minutes. The first-time setup runs longer, since you're measuring everything and making the initial adjustments. Once you know your numbers, re-fitting a shared bike takes under two minutes per rider.
Keep your measurements written down and stored near the bike.
Why does my knee hurt after riding an exercise bike?
The most common culprit is a saddle that sits too low. That position forces your knees through a deeper bend and puts extra stress on the kneecap. Raise the saddle and re-test with the heel-on-pedal method.
If pain persists, lower the resistance and keep your cadence smooth for a few rides.
Should handlebars be higher than the saddle?
For comfort-focused upright bikes, yes. Set the bars level with or slightly above the saddle.
Spin bikes want a lower bar position for power and aerodynamics. Your flexibility decides how low you can go. If your lower back rounds or your shoulders bunch up, the bars are too low.
What tools do I need to adjust an exercise bike?
Most bikes accept a set of Allen keys, usually 4mm, 5mm, and 6mm. A spirit level helps check saddle tilt. A tape measure handles height checks.
Quick-release models skip tools entirely for the saddle clamp. Keep the manufacturer's manual nearby for torque specs.
How often should I re-check my setup?
Check the clamps and quick-release levers before every ride. Re-measure your saddle height every few weeks, especially if the bike gets heavy use. Fasteners settle and seats slip over time.
A quick two-minute inspection prevents most problems before they show up as pain.
Can my partner and I share one bike?
Yes, if the bike has quick-release adjustments. Write down both riders' measurements and re-fit before each session. That's a two-minute job per rider.
If the bike uses bolts instead, mark positions with a grease pen so re-setting is quick and repeatable.
Final Setup Checklist: What to Verify Before Every Ride
Run through this list in under two minutes. It catches the small issues that turn into big discomfort later. Use it before your first ride and after any adjustment.
| Check | What to Look For | Fast Fix |
|---|---|---|
| Seat post clamp | Insertion line above frame | Lower to the mark |
| Saddle tilt | Level or slight nose-down | Loosen and re-level |
| Handlebar clamp | Fully tightened, no play | Tighten the Allen bolt |
| Quick-release levers | Locked firm, no movement | Click fully closed |
| Pedals | Spinning smoothly, no wobble | Tighten the pedal axle |
| Resistance knob | Turns smoothly | Wipe and re-lubricate |
If your front-of-knee pain shows up, raise the saddle by a quarter inch. If your hips rock, lower it a quarter inch. If hands tingle, shorten the handlebar reach.
Small changes fix big problems.
Your bike should also sit level on the floor. Use a mat underneath to absorb sweat and vibration. Check for frame wobble before every ride.
Tighten any loose lever now, not after a sprint session.
If you share the bike, the checklist matters even more. Each rider should verify these points before starting. A quick check prevents the most common setup complaints we've covered.
Clean the rails and posts every few weeks. Sweat corrodes metal quickly. Wipe the frame with a damp cloth and dry it completely.
This kind of regular upkeep keeps any home gym equipment dependable.


One Comment