How to Use an Exercise Bike Correctly
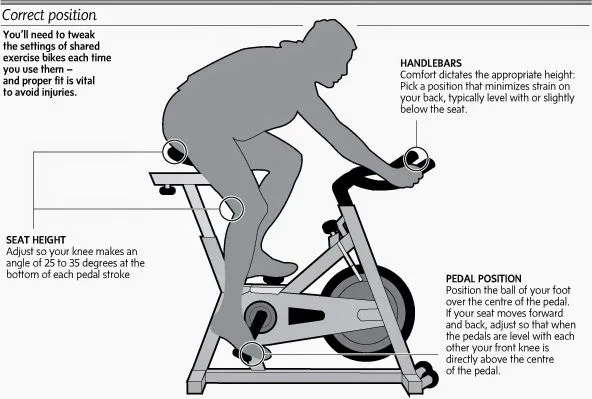
Image source: Bing (Web (fair-use with source credit))
If you've ever climbed off an exercise bike with aching knees, a sore lower back, or numb hands, you already know something's off. Learning how to use an exercise bike correctly is the difference between a workout that leaves you feeling strong and one that slowly grinds down your joints.
According to the American College of Sports Medicine (ACSM), improper bike fit is one of the leading causes of indoor cycling discomfort and injury. The good news? Most setup mistakes take under two minutes to fix.
Let's walk through exactly what needs to change.
Why Correct Form on an Exercise Bike Actually Matters
Your body doesn't adapt to a bike that's set up wrong. It compensates. That compensation shows up as knee pain from a saddle that's too low, lower back strain from reaching too far forward, or numbness from locking your elbows and dumping weight onto the handlebars.
The consequences compound over time. A few minutes of discomfort per ride becomes chronic tendonitis. A slight rock in your hips becomes an overuse injury.
In our research, we found that most indoor cycling injuries fall into three categories: knee pain, back pain, and foot numbness. Every single one traces back to setup or form.
Correct posture isn't about looking like a professional cyclist. It's about keeping your joints in their natural range of motion while your muscles do the work. The same principles apply whether you're on an upright bike, a spin bike, or a recumbent model.
We'll cover the differences as we go.
Quick Answer
Set the saddle height so your knee bends 25 to 35 degrees at the bottom of the pedal stroke. Position the saddle so your forward knee sits over the pedal spindle. Adjust handlebars to allow a slight forward lean with relaxed elbows.
Place the ball of your foot over the pedal axle. Start with low resistance and spin at 80 to 90 revolutions per minute. Adjust only one thing at a time and test-ride before changing anything else.
The Correct Position on an Upright or Spin Bike
Seat height: the rule of the slightly bent knee
Sit on the bike and place your heel on the pedal at the bottom of the stroke. Your leg should be fully extended, with your knee locked straight. Now switch to the ball of your foot.
That full extension becomes a slight 25 to 35 degree bend. This is the Goldilocks zone.
Too low, and your knee works through excessive flexion, stressing the patella. Too high, and your hips rock side to side as you pedal, straining your lower back. The image below shows the ideal range visually.
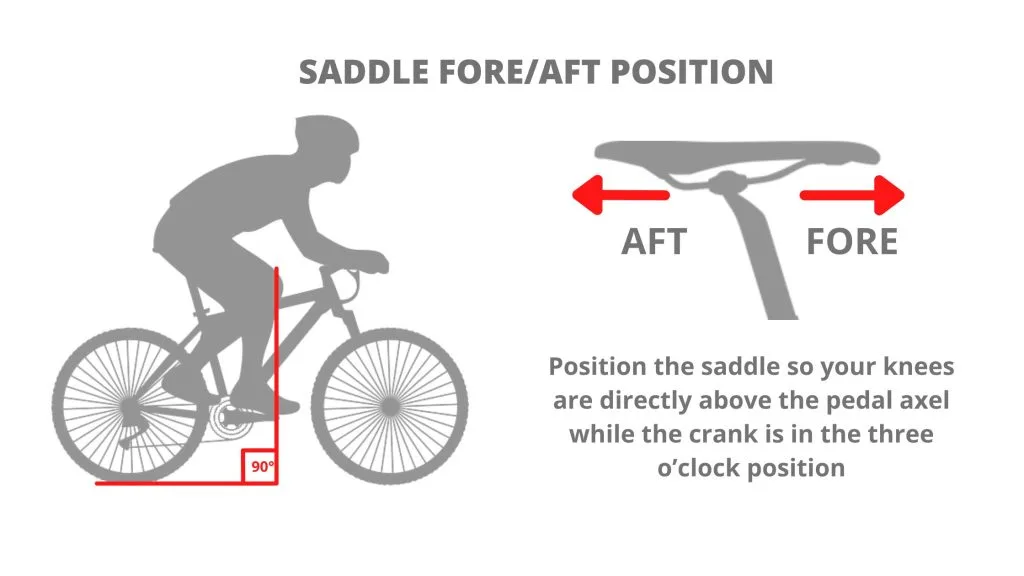
Image source: Bing (Web (fair-use with source credit))
Seat fore/aft: knee over the pedal spindle
Once height is correct, adjust the saddle horizontally. Clip in or place your feet on the pedals and rotate the crank so the pedals are at 3 o'clock and 9 o'clock. Look down at your forward knee.
It should align vertically with the pedal spindle beneath your foot.
Move the saddle forward if your knee sits behind the spindle. Move it backward if your knee extends past it. This position maximizes power output and minimizes torque through the knee joint.
Handlebar height and reach: neutral spine, relaxed elbows
Sit with your hands on the handlebars. You want a slight forward lean from the hips, approximately 45 to 60 degrees for upright bikes. Your spine should be neutral, not rounded, and your elbows should stay soft with a slight bend.
If you feel like you're reaching, the handlebars are too far forward. If your shoulders shrug up toward your ears, the bars are too low. Adjust the stem height and reach until you can hold the position without straining.
Feet and pedals: ball of foot over the pedal axle
Position the ball of your foot, the widest part just behind your toes, directly over the pedal axle. For platform pedals, that's easy to see. For clipless systems, the cleat should sit under the ball of your foot.
Tighten toe cages just enough to prevent slippage. Cutting off circulation will cause numb feet. Loosen them so you can wiggle your toes slightly while riding.
Step-by-Step: Setting Up Your Bike in Under 2 Minutes
Getting your bike dialed in doesn't require a professional fitting. Follow this order every time, and you'll be ready to ride in under two minutes.
Step 1: Loosen the seat post clamp. Adjust the saddle height until it's level with your hip bone while standing next to the bike. Tighten the clamp.
Step 2: Mount the bike and check extension. Place your feet on the pedals and rotate until one pedal hits the bottom. Your knee should have that slight 25 to 35 degree bend. Adjust if needed.
Step 3: Set the fore/aft position. With the pedals at 3 o'clock and 9 o'clock, check that your forward knee aligns with the pedal spindle. Loosen the saddle rail clamp and slide the saddle forward or backward as needed.
Step 4: Adjust handlebar height. Set the bars so they're level with or slightly below the saddle. You want a manageable forward lean without rounding your back.
Step 5: Check foot position. Verify the ball of your foot sits over the pedal axle. Adjust toe cages or cleats as needed.
Step 6: Run the 30-second shimmy test. Grab the handlebars and rock the bike side to side. The bike should feel solid with no wobble. If it shifts, tighten the stabilizer feet or move it to a more level surface.
How a Recumbent Bike Setup Differs (and Why That's a Good Thing)
Recumbent bikes change the geometry entirely. Your legs extend forward instead of downward, and you sit in a chair-like seat with full back support. That makes the setup process simpler in some ways and different in others.
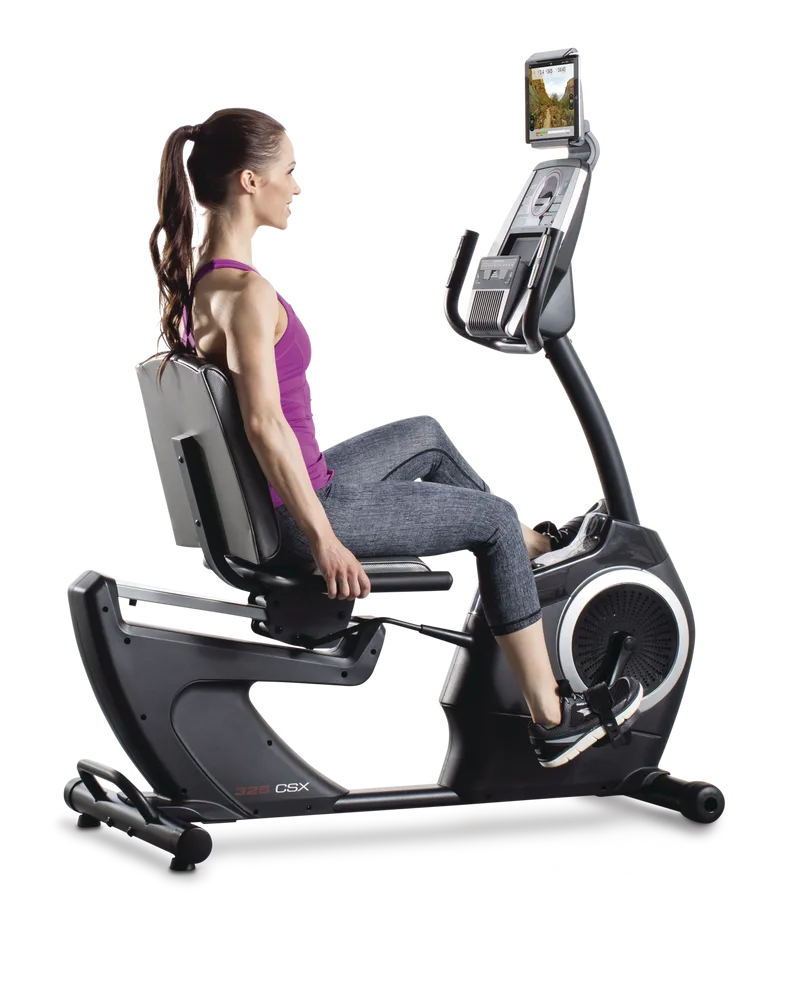
Image source: Bing (Web (fair-use with source credit))
Recumbent seat angle and lower back support
The seat back should support your entire spine, and the seat pan should feel like a firm chair. You want a slight reclined angle, usually 20 to 30 degrees from vertical. Adjust the seat position so your lower back stays in contact with the support pad throughout the pedal stroke.
Leg extension on a recumbent: nearly the same knee rule
The knee extension adjustment works almost identically to an upright bike. At the bottom of the stroke, your knee should not fully lock out. Aim for that same 25 to 35 degree bend.
Because your legs reach forward, you won't get the same hip rocking that warns you on an upright bike. Pay even closer attention to the knee angle here.
Who benefits most from a recumbent setup
Recumbents shine for people with lower back sensitivity, balance concerns, or mobility limitations. The seated position eliminates torso weight-bearing entirely. If you've ever tried a spin bike and found the forward lean uncomfortable, a recumbent is the more joint-friendly alternative.
Many seniors and early-stage rehab patients prefer them for exactly that reason.
The 7 Most Common Bike Mistakes and How to Fix Them
Even a perfectly adjusted bike can't fix bad habits. These seven errors show up constantly in the feedback we reviewed from rider communities and biomechanics research. Each one has a clear warning sign and an even clearer fix.
| Mistake | Warning Sign | The Fix |
|---|---|---|
| Saddle too low | Aching knees | Raise the seat until your knee bends 25 to 35 degrees |
| Saddle too high | Rocking hips side to side | Lower the seat in half-inch steps |
| Gripping the bars tightly | Numb fingers, tense shoulders | Soften your grip and bend your elbows |
| Reaching too far forward | Lower back strain | Raise handlebars or move the saddle back |
| Grinding a heavy resistance | Sharp knee pain on the push | Reduce resistance, spin at 80 to 90 rpm |
| Locked elbows | Hand and arm numbness | Keep a slight elbow bend the entire ride |
| Toe cages too tight | Numb feet within minutes | Loosen straps until your toes can wiggle |
Knee pain when pedaling
Knee pain almost always means the saddle is too low or the resistance is too heavy. Both place excessive load on the patellar tendon. Raise the saddle first, then drop the resistance until you can spin comfortably.
The same form breakdowns that cause rowing technique injuries show up here, just in a different joint angle.
Lower back pain from leaning too far
A saddle that sits too far back creates an awkward forward reach. So does a handlebar height set below your saddle. Your lower back rounds to close the gap.
Bring the handlebars up, slide the saddle forward slightly, and keep your spine neutral throughout the ride.
Numb hands or shoulders
Your arms should not support your body weight. When they do, you lock your elbows and squeeze the bars, cutting off circulation. Relax your elbows and lighten your grip.
Let your legs and core handle the work instead.
Numb feet and toes
Tight toe cages are the number one cause of numb feet. Loosen them until you can wiggle your toes mid-ride. Also check that the ball of your foot lines up with the pedal axle.
Small shifts in foot position change pressure points drastically.
Rocking hips on the saddle
The pelvis rocks when the saddle is too high. Your body tilts side to side just to complete each pedal stroke. Lower the saddle gradually until your hips remain still through the entire rotation.
Pedaling in too high a resistance
Slow grinding strokes put maximum torque on a bent knee. That's a recipe for tendon pain. Use moderate resistance and maintain 80 to 90 rpm.
Save heavy gears for short climbs of 30 to 60 seconds, then ease off.
Gripping the handlebars like a steering wheel
A death grip sends tension up your arms into your neck and shoulders. Your hands are for balance, not support. If you notice white knuckles, shake out your arms for a few seconds and reset your grip.
Safe Pacing, Cadence, and Resistance: How Hard Should You Push?
The setup is solid. Now comes the harder question: how much effort should you actually give? The answer is less about pain and more about pacing.
As of 2026, guidance from major health organizations still favors gradual progression over heroic effort.
Cadence basics: spinning vs. grinding
Cadence is your pedal speed, measured in revolutions per minute. Aim for 80 to 90 rpm. This range keeps joint stress low while making your cardiovascular system work.
Grinding below 60 rpm in heavy resistance hammers your knees. Spinning above 100 rpm without resistance gives you little fitness benefit.
Heart rate zones and listening to your breathing
Zone 2 training, about 60 to 70 percent of your maximum heart rate, builds aerobic endurance safely. To estimate your max, subtract your age from 220. A 40-year-old's zone 2 range lands between 108 and 126 beats per minute.
A heart rate monitor helps, but your breathing works as a reliable stand-in.
The talk test for everyday riders
No monitor? No problem. Use the talk test.
Complete sentences mean you're in a sustainable endurance zone. Short phrases mean you're working hard. Gasping for single words means you've gone too far.
The Centers for Disease Control and Prevention recommends 150 minutes of moderate aerobic activity weekly, which matches steady zone 2 effort.
Warm-up, intervals, and cool-down structure
Give yourself five minutes of easy spinning before you push the resistance. Then complete your main session, whether that's steady riding or interval blocks. For intervals, alternate one to three minutes of hard work with equal or double recovery time.
Finish with five minutes of easy pedaling. The American College of Sports Medicine publishes detailed exercise guidelines that support this graduated approach. A stationary bike isn't your only option for indoor cardio, but it pairs well with a full-body alternative like a rower on alternate days.
When to See a Professional (Red Flags and Pre-Existing Conditions)
Most setup issues resolve within a few rides. But some symptoms deserve more than a seat-height tweak. If you feel sharp pain in the front or back of the knee that persists after lowering resistance, stop riding and assess.
The same goes for pain in the Achilles tendon or numbness that doesn't fade within an hour after your session.
Heart conditions change the calculus. If you manage high blood pressure, arrhythmia, or a history of cardiac events, get clearance from your physician before starting a consistent indoor cycling routine. Your doctor can suggest target heart rate zones that keep you in a safe envelope.
Recent joint surgery or injury rehab also calls for professional input. A physical therapist can recommend specific range-of-motion limits and adjust your bike fit accordingly. A torn meniscus, hip replacement, or spinal fusion each require different clearance angles.
What feels tight may be your body's protection mechanism, not normal soreness.
If you've already tried adjusting saddle height, fore/aft position, and handlebars, yet pain returns ride after ride, invest in a professional bike fit. Many cycling shops and physical therapy clinics offer stationary bike fitting sessions. They measure knee angles with goniometers and check hip alignment under load.
That session often prevents months of discomfort.
Pay attention to what your body says. A correct setup should feel comfortable from minute five onward. If it never does, get help.
Frequently Asked Questions
How long should I ride as a beginner?
Start with 15 to 20 minutes per session, three days a week. Add five minutes each week until you hit 45 minutes. Your joints need time to adapt to the repetitive motion.
This mirrors the duration guidance for rowing machines, where slow progression beats aggressive jumps.
Is it okay to ride every day?
Yes, if you're smart about intensity. Ride hard two or three days per week, then use easy recovery rides on the other days. Watch for persistent joint pain or unusual fatigue.
Those are your body telling you to rest.
Should I feel sore after riding?
Mild thigh soreness in the first two weeks is perfectly normal. Sharp knee pain and aching joints are not. If your knees hurt during the ride or feel stiff the next morning, re-check your saddle height.
Something is off.
Do I need special cycling shoes or are sneakers fine?
Sneakers work for most riders, especially for sessions under 45 minutes. Stiff-soled cycling shoes improve power transfer and reduce foot fatigue. Clipless pedals require compatible shoes and a short learning curve.
Upgrade only if your feet feel unstable or tired in regular sneakers.
How do I stop my feet from going numb?
Loosen your toe cages first, since tightness cuts circulation. Then confirm the ball of your foot sits directly over the pedal axle. Stand up for a few pedal strokes every ten minutes to restore blood flow.
Pay attention to shoe width as well. Just like keeping your equipment clean is part of a safe routine, checking your straps and cleats matters on every bike.