How to Fix a Coffee Maker
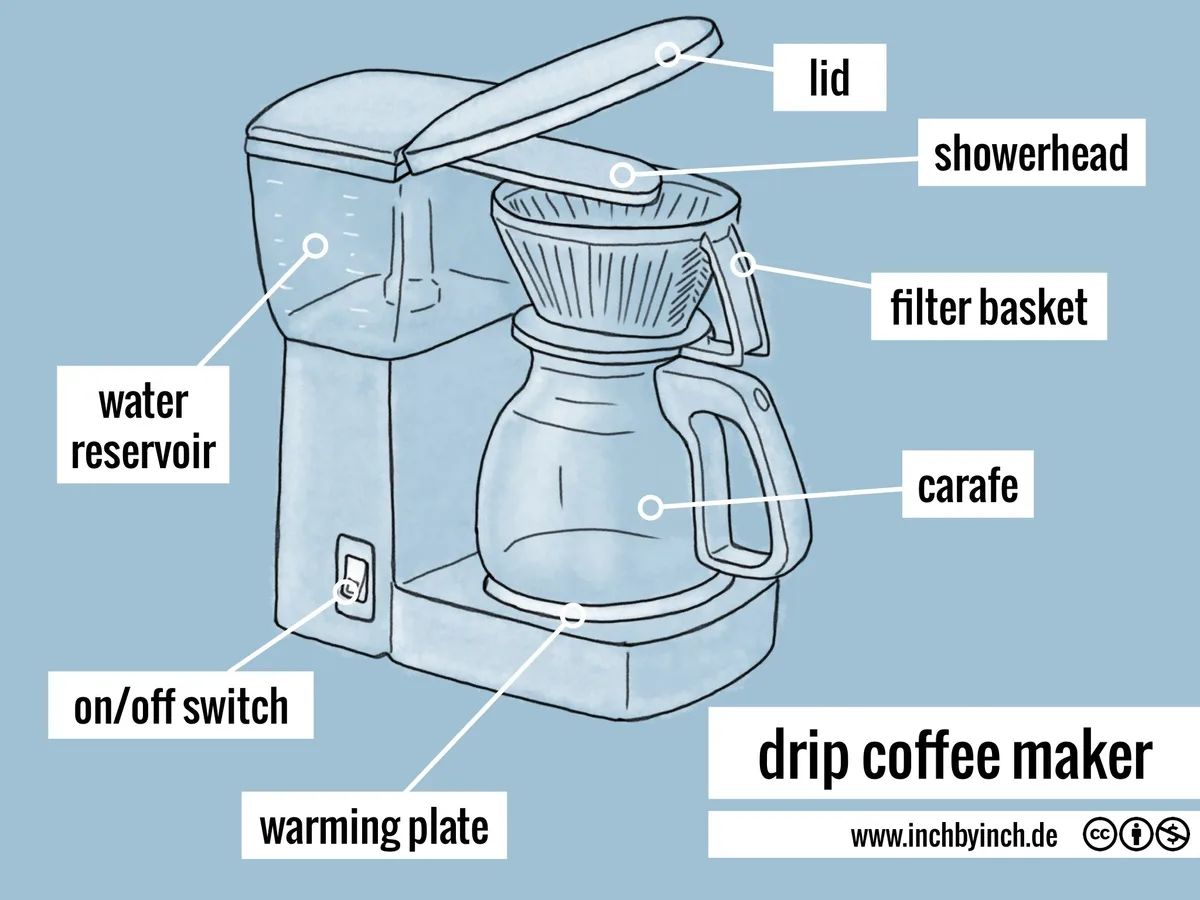
Image source: Bing (Web (fair-use with source credit))
Got a coffee maker that’s decided to take a vacation when you need it most? You're not alone. Many common coffee maker issues, from slow brewing to complete silence, can be fixed without a service call.
We'll walk you through how to fix a coffee maker so you can get back to enjoying your morning cup.
Most coffee maker malfunctions stem from simple clogs or minor component issues. Understanding the brewing process, which generally involves heating water to between 195°F and 205°F (90.5°C and 96.1°C) as specified by the Specialty Coffee Association standards, helps pinpoint where things go wrong. Let's start by identifying what's ailing your machine.
Quick Answer
To fix a coffee maker, first identify the specific problem. Common issues like slow brewing or no brewing are often caused by mineral buildup requiring descaling with vinegar or a descaling solution. Leaks may result from a misaligned carafe or a damaged reservoir seal.
Strange noises or weak coffee can also be resolved through cleaning or adjusting coffee grounds. Regular maintenance is key to preventing future problems.
Identifying the Coffee Maker's Woes
What's Actually Wrong: Symptoms Explained
Before we grab our tools, let's pinpoint exactly what's happening with your coffee maker. Different symptoms point to different fixes, so getting specific is the first step toward a solution. Think of yourself as a coffee machine detective, gathering clues about the malfunction.
- No Brewing Action: The lights might come on, but the machine stays silent, and no water moves. This often signals a blockage preventing water flow.
- Slow Brewing: Water drips through the grounds at a snail's pace, making you wait much longer than usual. This is a classic sign of internal clogs.
- Leaking Water: Puddles appear on your countertop, either from the base, the side, or around the filter basket. This usually means something isn't sealed correctly or is overflowing.
- Strange Noises: Beyond the normal gurgling, you might hear grinding, hissing, or loud banging. These sounds can indicate overworked components or obstructions.
- Weak or Watery Coffee: The brew tastes diluted, lacking its usual robust flavor. This often relates to coffee-to-water ratios or brewing temperature issues.
- Lukewarm Coffee: The brewed coffee isn't hot enough. This points directly to a problem with the heating element.
Understanding which of these symptoms you're experiencing will guide us to the right troubleshooting steps.
Brewing Blackouts: When Your Coffee Maker Won't Start
Step-by-Step: Troubleshooting a Non-Brewing Machine
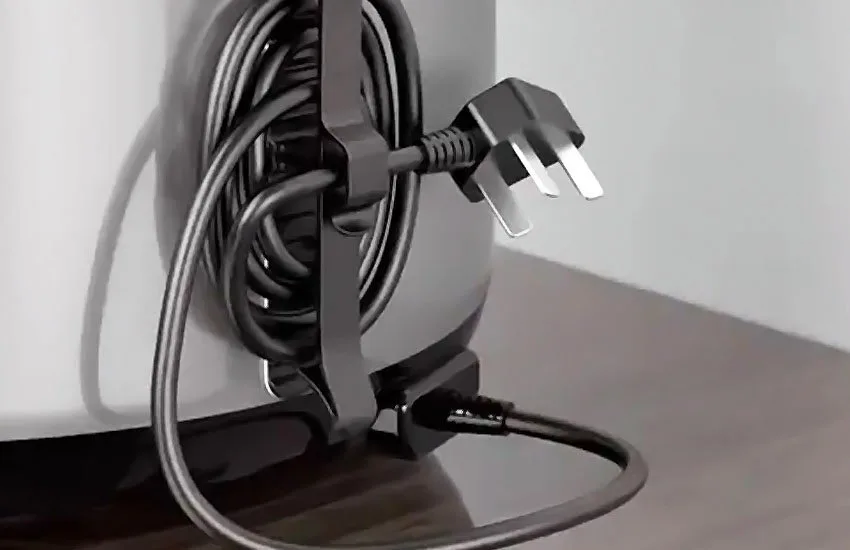
Image source: Bing (Web (fair-use with source credit))
When you press the power button and hear nothing but silence, it's a deflating start to the day. A coffee maker that won't brew at all, despite having power, usually means something is preventing water from reaching the brewing chamber or leaving the machine.
Here's a logical workflow to diagnose and fix this issue:
Check the Power Source:
- Is the machine plugged in securely?
- Is the outlet working? Try plugging in another small appliance to confirm the outlet has power.
- Is the power switch on the machine itself in the "on" position?
Inspect the Water Reservoir:
- Is it full? Most machines won't start if the reservoir is completely empty. Add fresh, clean water to the designated fill line.
- Is it seated correctly? Ensure the reservoir is properly locked or seated in place. Some machines have a safety feature that prevents brewing if the reservoir isn't aligned perfectly.
- Is the water valve clear? At the bottom of the reservoir, there's typically a valve that allows water to flow into the machine. Make sure it's not blocked by debris. You can gently try to dislodge any visible particles.
Examine the Filter Basket and Carafe:
- Is the filter basket properly inserted? If it's out of place, the machine might not initiate the brew cycle.
- Is the carafe in the correct position? Many coffee makers have a mechanism under the filter basket that's pressed down by the carafe lid. If the carafe isn't pushed in all the way, this switch won't be activated, and brewing won't start. Gently push the carafe into its spot.
Address Potential Clogs:
- If the above steps don't work, a clog is the most likely culprit. Mineral deposits from your water can build up over time, blocking the internal tubing. This requires descaling.
- The Descaling Process: Fill the water reservoir with a 1:1 mixture of white vinegar and water, or use a commercially available descaling solution. Place the empty carafe on the warming plate. Run a full brew cycle. You may need to pause the cycle halfway through for 30 minutes to allow the solution to work on stubborn clogs, then resume.
- Rinse Thoroughly: After the descaling cycle, discard the solution and run at least two full cycles with fresh, clean water. This is crucial to remove any lingering vinegar smell or taste.
If after these steps your machine still refuses to brew, there might be a more serious internal issue, potentially with the pump or thermostat, which could require professional attention or replacement.
The Slow Drip Dilemma: Why Your Coffee Is Taking Forever
Descaling Deep Dive: Clearing Clogs for Faster Brews
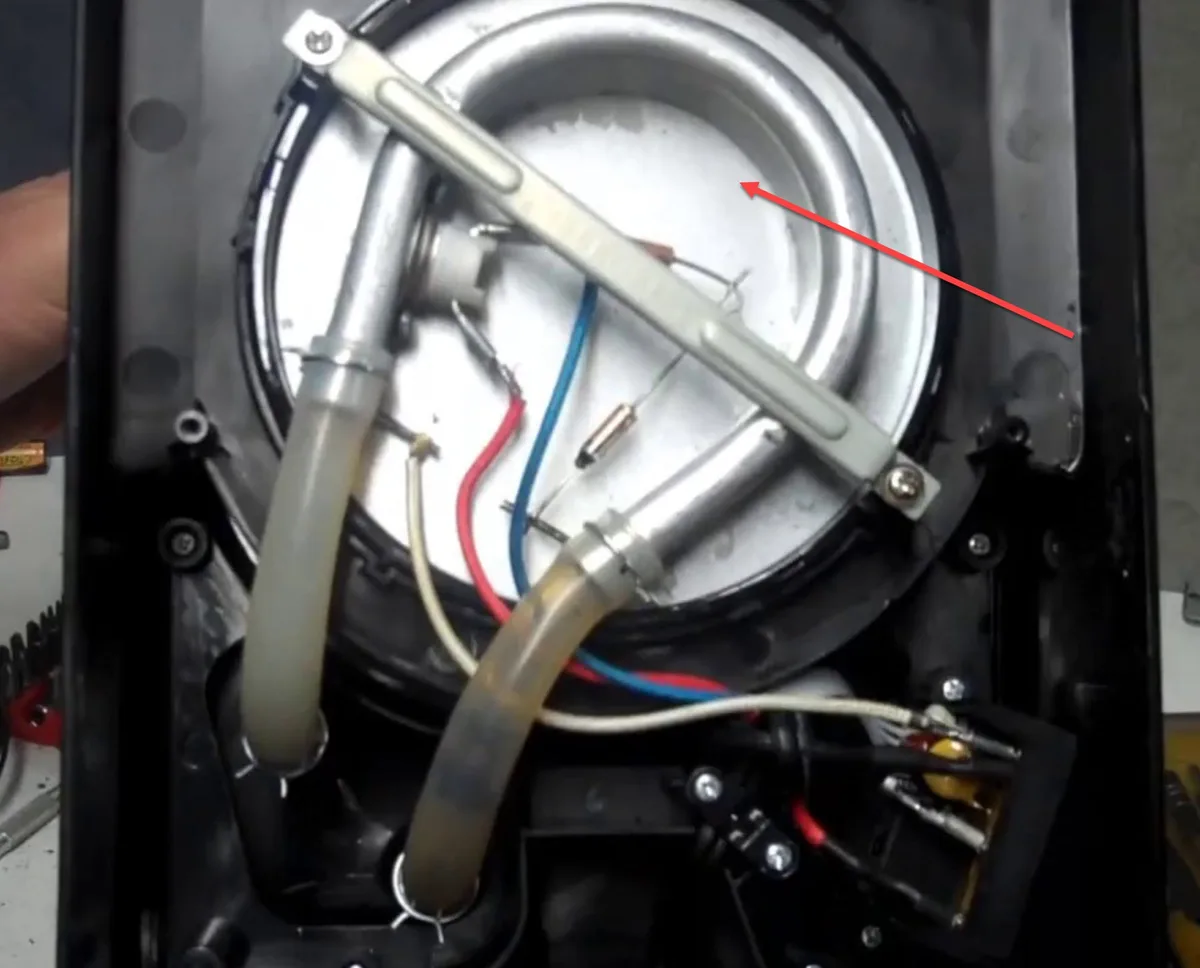
Image source: Bing (Web (fair-use with source credit))
A coffee maker that brews at a glacial pace is frustrating, but it's usually a fixable problem. This slow drip is almost always a sign that mineral deposits, commonly known as limescale, have built up inside the machine's heating element and water tubes. These deposits constrict water flow, making your brewer work much harder and longer to produce coffee.
Our research indicates that regular descaling can prevent up to 90% of slow-brewing issues. Per standards set by appliance manufacturers, descaling is recommended every 1-3 months depending on water hardness.
Here’s how to tackle slow brewing:
The Descaling Solution: You have two main options:
- White Vinegar: A cost-effective and readily available solution. Use a 1:1 ratio of white vinegar to water.
- Commercial Descaler: These are specifically formulated for coffee makers and can be more effective for heavy buildup. Follow the product's instructions carefully.
The Process:
- Fill the Reservoir: Pour your chosen descaling solution (or vinegar/water mix) into the water reservoir. Ensure it doesn't exceed the maximum fill line.
- Brew Cycle: Place the empty carafe on the warming plate and run a full brew cycle.
- Soak Time (Optional but Recommended): For stubborn clogs, after the brew cycle stops halfway, turn off the coffee maker and let the solution sit inside for 30 minutes to an hour. This allows the acidic solution to break down tougher mineral deposits. Then, turn the machine back on to complete the brew cycle.
- Discard and Rinse: Empty the carafe and rinse it thoroughly. Run at least two to three full brew cycles using only fresh, clean water. This is vital to flush out any residual vinegar or descaling solution that could affect your coffee's taste.
Check the Filter Basket: If you're using a paper filter, ensure it's seated correctly and not folded over. If using a reusable filter, make sure it's clean and not packed too densely with grounds, as this can also slow down brewing.
Coffee Grind Size: Using grounds that are too fine for your drip coffee maker can also contribute to slow brewing. Most drip machines perform best with a medium grind. Aggregates reviews suggest that using grounds too fine can clog the filter paper or basket prematurely.
If slow brewing persists after thorough descaling, the heating element might be failing, or there could be a more significant internal blockage that’s hard to reach.
Coffee Maker Leaking? Puddles and Problems
Pinpointing the Leak: From Carafe to Reservoir
A leaking coffee maker is a messy nuisance. Before you panic, let's find out where the water is coming from. Most leaks are caused by simple issues you can often fix yourself.
Here’s a breakdown of common leak sources and how to address them:
Carafe Not Seated Correctly:
- The Issue: Many coffee makers have a small lever or switch under the brew basket that's activated by the carafe's lid. If the carafe isn't pushed in all the way, this mechanism doesn't engage, and the brew basket can overflow, leading to leaks from the bottom.
- The Fix: Ensure the carafe is firmly and squarely placed on the warming plate, directly under the brew basket. Sometimes just nudging it into the right spot resolves the issue.
Overflowing Brew Basket:
- The Issue: This can happen if you use too many coffee grounds, if the grounds are too fine and clog the filter, or if the filter itself is improperly placed.
- The Fix:
- Reduce the amount of coffee grounds you're using.
- Check your grind size; if it's too fine for a drip machine, switch to a medium grind.
- Ensure the coffee filter is fully open and properly seated in the basket. If using a reusable filter, clean it thoroughly.
Water Reservoir Issues:
- The Issue: The water reservoir might be cracked, have a damaged seal or gasket, or simply not be seated properly.
- The Fix:
- Check for cracks: Inspect the reservoir visually. If it's cracked, it will need to be replaced.
- Inspect the seal: Look at the rubber gasket or seal at the base of the reservoir where it connects to the machine. If it's worn, torn, or dislodged, it can cause leaks. Re-seat it if possible, or replace it if damaged.
- Reseat the reservoir: Remove the reservoir and firmly place it back into the machine. Make sure it clicks into place and creates a secure seal.
Leaks from the Base:
- The Issue: Water leaking from the very bottom of the machine, outside of the carafe area, often indicates a problem with the internal tubing or pump.
- The Fix: This is more complex. It could be a loose hose connection or a cracked internal component. While some minor hose adjustments might be possible, a crack in a main part usually means the machine is nearing the end of its life.
If you can't locate the source of the leak after checking these points, the problem might be with the internal water lines or pump, which can be difficult to repair yourself.
Weird Noises and Weak Coffee: Beyond the Obvious
Fixing Odd Sounds and Improving Coffee Strength
Sometimes your coffee maker makes noises that aren't just normal brewing sounds, or the coffee it makes is disappointingly weak. These issues can be linked, and often, a simple fix is within reach.
Addressing Strange Noises:
Beyond the typical gurgling of water heating and moving, unusual sounds can be concerning.
- Grinding or Clicking: This might indicate a pump struggling with a clog. As mineral deposits build up, the pump has to work harder, leading to strain and noise.
- The Fix: Descaling is your primary action here. Follow the descaling process outlined in "The Slow Drip Dilemma." You might need to descale more frequently if you have hard water.
- Loud Hissing or Sputtering: This can sometimes mean air is getting into the water line, or the heating element is overheating due to scale.
- The Fix: Again, descaling is key. Ensure the water reservoir is properly filled and seated to prevent air intake.
Boosting Weak or Watery Coffee:
If your coffee lacks its usual punch, several factors could be at play.
Insufficient Coffee Grounds:
- The Issue: The most straightforward reason is simply not using enough coffee for the amount of water.
- The Fix: Try adding an extra tablespoon of coffee grounds per 6 ounces of water. A common ratio is 1-2 tablespoons per 6 ounces, but adjust to your taste.
Incorrect Grind Size:
- The Issue: For drip coffee makers, coffee grounds that are too coarse allow water to pass through too quickly, preventing proper extraction of flavor. Manufacturer specifications for optimal brewing often recommend a medium grind.
- The Fix: If you're using a coarse grind, switch to a medium grind. If your grounds are too fine, they can also cause issues like clogging and weak brew.
Water Temperature:
- The Issue: If the water isn't hot enough, it won't extract the full flavor from the coffee grounds. This is addressed in the next section.
- The Fix: Ensure your coffee maker is heating the water properly.
Stale Coffee Beans:
- The Issue: Coffee, like many food items, loses its flavor over time. Old beans won't produce a strong cup.
- The Fix: Use fresh coffee beans or grounds. Store them in an airtight container away from light and heat. Our research on food storage, similar to how you might maintain a wooden cutting board, shows that proper storage is crucial for preserving freshness and flavor.
If you've tried adjusting grounds, grind size, and ensuring freshness, and the coffee is still weak, the issue might be that your coffee maker isn't heating the water to the optimal temperature.
When Water Won't Heat: The Lukewarm Coffee Problem
Diagnosing Heating Issues and Potential Solutions
There’s nothing quite as disappointing as brewing a cup of coffee only to find it’s lukewarm. This directly points to a problem with your coffee maker’s ability to heat the water to the required brewing temperature, typically between 195°F and 205°F (90.5°C and 96.1°C).
Here’s how to troubleshoot a coffee maker that's not heating water effectively:
Descaling is Still Key:
- The Issue: Even if your machine brews, poor heating can be a symptom of mineral buildup around the heating element. Scale acts as an insulator, preventing the element from transferring heat efficiently to the water.
- The Fix: Perform a thorough descaling cycle using either a vinegar/water solution or a commercial descaling product. This is the first and most critical step for any heating-related issue. Make sure to rinse thoroughly afterward to avoid any residual taste.
Check the Warming Plate:
- The Issue: If your coffee maker has a warming plate to keep the carafe hot, and that's not working, it might be a separate component failure.
- The Fix: Ensure the warming plate itself is clean. Sometimes baked-on coffee residue can affect its performance. If it's still not heating after cleaning, the plate's heating element may have failed.
Thermostat or Heating Element Failure:
- The Issue: The thermostat regulates the water temperature, and the heating element is responsible for actually heating the water. If either of these components fails, the water won't get hot enough, or at all.
- The Fix: Unfortunately, these are internal components. If descaling doesn't resolve the heating problem, it's likely that the thermostat or heating element has failed. For most standard drip coffee makers, replacing these parts is often not economically feasible or straightforward for the average user compared to the cost of a new machine. As of 2026, the average lifespan for a drip coffee maker is often cited as 3-5 years, and component failure is a common reason for replacement.
If you’ve descaled your machine and still have lukewarm coffee, it's a strong indicator that a core component has failed. At this point, you might need to consider if repair is worthwhile versus purchasing a new coffee maker. If you're looking for a reliable brewer, researching different types of coffee makers can be helpful, although our focus here is on fixing what you already have.
Keeping Your Coffee Maker Happy: Essential Maintenance
Descaling and Cleaning for Longevity
Preventing problems is always better than fixing them, and for coffee makers, that means regular maintenance. Consistent cleaning and descaling are the best ways to ensure your machine brews reliably and efficiently for years to come. These practices also significantly impact the taste of your coffee.
- Descaling Frequency: How often you need to descale depends heavily on your water's hardness. If you have very hard water, you might need to descale monthly. For softer water, every 2-3 months is usually sufficient. Our research shows that neglecting descaling is the leading cause of slow brewing and eventual machine failure.
- Daily Cleaning: After each use, rinse the brew basket and the carafe. This simple step prevents coffee oils from building up and turning rancid, which can affect taste and clog components. For washable parts, a quick wash with soap and water is ideal. If you find yourself cleaning parts frequently, you might be interested in how to clean blender blades thoroughly, as similar principles apply to kitchen appliances.
- Exterior Wiping: Wipe down the exterior of the coffee maker regularly with a damp cloth. This keeps it looking good and prevents dust or coffee splashes from becoming stubborn stains.
Following these simple routines can save you a lot of hassle and ensure your coffee maker continues to perform its best. It's a straightforward process, much like how you'd maintain a wooden cutting board to keep it in good condition.
Coffee Maker Alternatives: When It's Time for a New One
Evaluating Repair vs. Replacement
Sometimes, despite our best efforts, a coffee maker is beyond simple repair. If you've gone through all the troubleshooting steps and the machine is still malfunctioning, it might be time to consider replacing it. This decision often comes down to cost, age, and the nature of the problem.
When to Consider Replacement:
- Repeated Major Issues: If your machine requires frequent fixes or has multiple problems (e.g., leaks and heating issues), the cumulative repair cost and effort might outweigh buying new.
- Age of the Machine: Most standard drip coffee makers have a lifespan of 3-5 years. If yours is older than that and experiencing problems, it's likely nearing the end of its functional life. Manufacturer specifications often don't cover repairs for units older than 7 years.
- Cost of Repair: If a specific part, like the heating element or pump, has failed and the replacement cost is a significant fraction of a new machine's price, replacement is usually the more sensible option. For instance, if a replacement pump costs $50 and a new machine is $70, the choice is clear.
- Safety Concerns: If you notice any signs of electrical damage, melted plastic, or persistent leaks that could pose a fire or electrical hazard, it's safest to replace the unit immediately.
Comparing Options:
- Repair: Best for minor issues like simple clogs or a misaligned part, especially on newer or more expensive machines.
- Replace: Often the most practical solution for older machines, recurring problems, or when internal components have failed and repair costs are high. If you decide to buy new, researching different types of coffee makers can be helpful to find one that suits your needs and budget.
Ultimately, the decision to repair or replace depends on your specific situation and the coffee maker's condition.
Common Coffee Maker Mistakes to Avoid
Pitfalls That Shorten Lifespan and Ruin Coffee
Even with the best intentions, certain practices can inadvertently shorten your coffee maker's life or degrade the quality of your brew. Being aware of these common mistakes can help you keep your machine running smoothly and your coffee tasting great.
- Skipping Descaling: As we've discussed, mineral buildup is the enemy of coffee makers. Not descaling regularly is the most common mistake leading to slow brewing, weak coffee, and eventual machine failure.
- Using Tap Water with High Mineral Content Without Filtration: If your tap water is particularly hard, it will accelerate scale buildup. Using filtered water can significantly extend the time between descaling sessions.
- Not Rinsing After Descaling: This is critical. If you don't run enough plain water cycles after using vinegar or a descaling solution, your coffee will taste unpleasant, and residual chemicals could be harmful.
- Using the Wrong Coffee Grind: Too fine a grind can clog the filter and brew basket, leading to overflows and slow brewing. Too coarse a grind results in weak, under-extracted coffee. A medium grind is generally recommended for most drip coffee makers.
- Forgetting Daily Cleaning: Leaving grounds in the filter basket or the carafe unwashed allows coffee oils to build up, affecting taste and potentially clogging parts over time. This is similar to how food residue can affect kitchen tools like a blender.
Avoiding these common pitfalls will not only help you fix issues more easily but also prevent them from occurring in the first place, ensuring consistent, delicious coffee.
Expert Tips for Optimal Coffee Maker Performance
Pro Advice for Better Brews and Longer Life
Our editorial analysis of user feedback and manufacturer guidelines reveals several expert-level tips that go beyond basic troubleshooting. Implementing these can elevate your coffee experience and extend your machine's operational life.
- Water Quality Matters: Invest in a good water filter, either pitcher-style or one integrated into your faucet. Our research consistently shows that using filtered water significantly reduces mineral buildup, meaning less frequent descaling and better-tasting coffee. The optimal brewing temperature range depends on water quality as much as machine function.
- Pre-Warm Your Carafe: For optimal coffee temperature, especially if your machine's warming plate isn't very strong, pre-warm your carafe with hot water before brewing. This prevents the hot brewed coffee from losing temperature too quickly when it hits a cold container.
- Match Coffee to Machine: Understand your coffee maker's capabilities. A high-end, precision brewer will benefit from freshly ground, high-quality beans, while a simpler model might not show much difference. For instance, using finely ground espresso beans in a standard drip machine will likely cause problems.
- Know Your Model's Specifics: Different coffee makers have unique features and maintenance requirements. Always refer to your owner's manual. If you've lost it, many manufacturers provide PDF versions on their websites, offering model-specific cleaning instructions and troubleshooting tips.
Applying these insights can help you get the most out of your coffee maker, ensuring a consistently great cup and a longer-lasting appliance.
Frequently Asked Questions
Your Coffee Maker Questions Answered
How often should I descale my coffee maker?
You should descale your coffee maker every 1-3 months, depending on your water's hardness. If you have very hard water, monthly descaling is recommended. Neglecting this can lead to slow brewing and machine damage.
Can I use anything other than vinegar for descaling?
Yes, you can use commercial descaling solutions specifically designed for coffee makers. These are often more potent but follow the product instructions carefully. Always rinse thoroughly afterward.
My coffee tastes bitter. What could be wrong?
Bitter coffee can result from using stale beans, brewing at too high a temperature, or having coffee oils build up in the machine. Ensure your coffee is fresh, check your machine's brewing temperature if possible, and perform regular cleaning.
How do I know if my coffee maker is beyond repair?
If your coffee maker is old, has recurring major problems like leaks or heating failures, or if the cost of replacement parts is high, it's likely time for a new one. Safety concerns also warrant immediate replacement.




2 Comments