How to Make Espresso at Home
Making espresso at home can feel like a magic trick, but it’s more about understanding a few key principles and practicing them. You’ve probably dreamt of that rich, velvety shot you get at your favorite cafe, and the good news is, you can recreate that experience without leaving your kitchen. This guide breaks down how to make espresso at home, focusing on the visual cues that tell you you’re doing it right.
We’ll cover everything from picking the right gear to the precise steps that turn coffee beans into liquid gold. The Specialty Coffee Association (SCA) sets standards for brewing equipment and parameters, emphasizing consistency to achieve optimal flavor extraction, and understanding these can elevate your home brewing game. Get ready to transform your mornings.
Quick Answer
To make espresso at home, you need an espresso machine and a quality grinder. Grind fresh beans fine, dose them into a portafilter, tamp evenly, and then lock it into the machine to pull a shot. Watch the extraction time and the stream's color.
Aim for about 25-30 seconds for a 1:2 brew ratio.
Seeing Your Espresso Shot: A Visual Guide to Home Brewing
Espresso making is as much an art as it is a science, and the visual aspect is where much of the learning happens. Forget just following timers; your eyes are your best guide to understanding if you're on the right track. What you see as the coffee streams from the portafilter, the color, the speed, and the texture, all tell a story about the extraction happening inside.
When you're learning how to make espresso at home, paying close attention to these visual cues will help you troubleshoot and consistently pull delicious shots. We’ve all seen those beautiful diagrams and photos, and that’s exactly what we’re aiming for in practice.
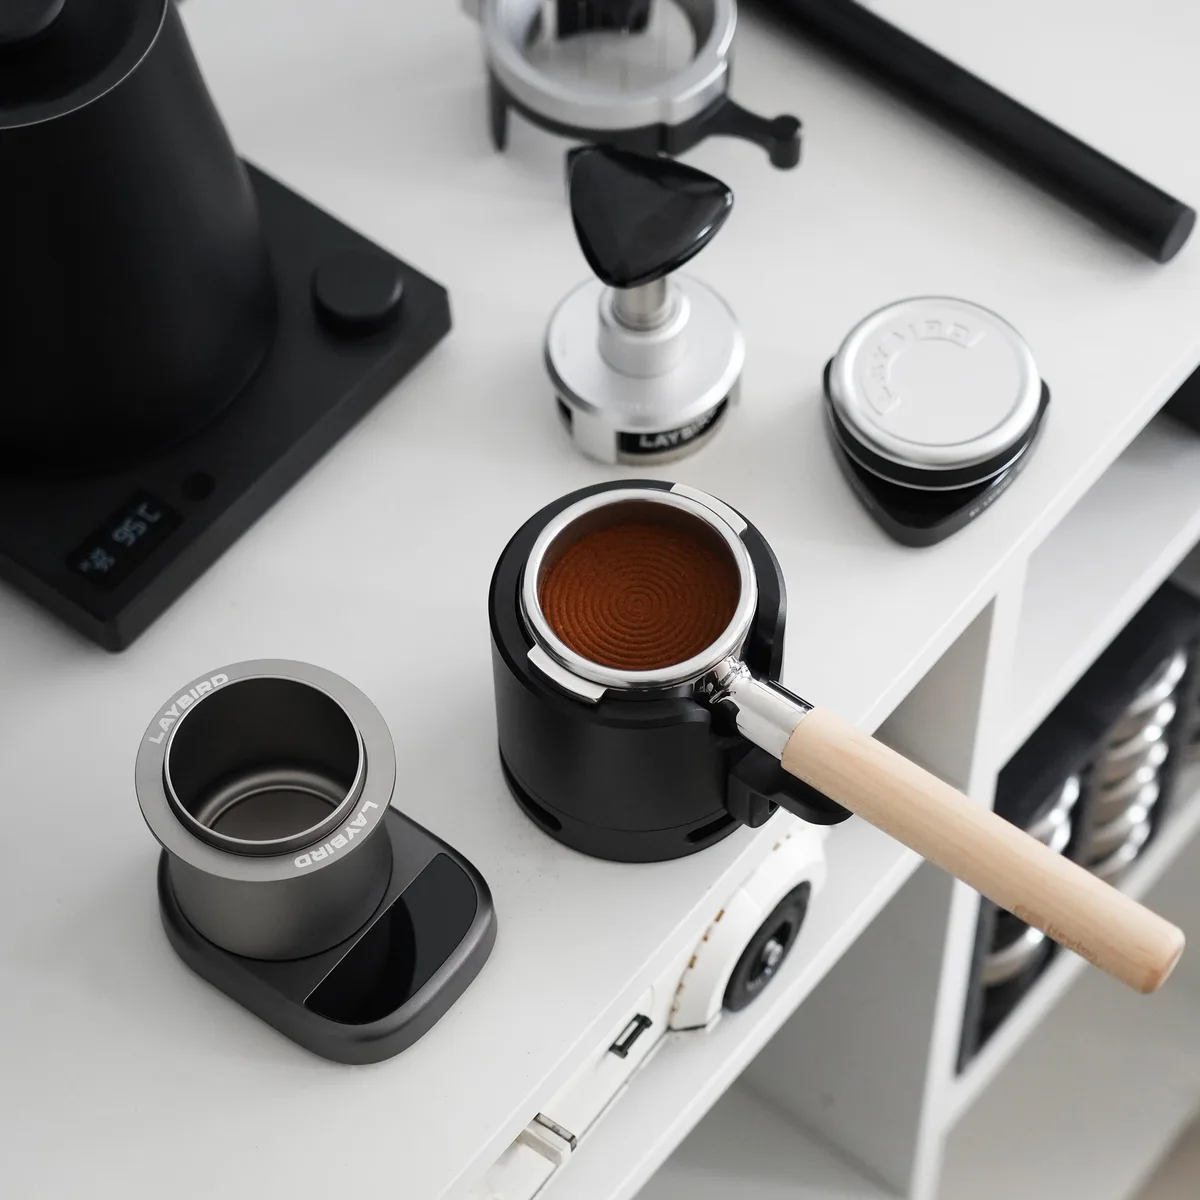
Image source: Bing (Web (fair-use with source credit))
What You'll Need to Make Great Espresso at Home
Getting started with home espresso means gathering essential tools. While machines vary in price, investing in a good espresso machine and grinder is key. These are the workhorses that produce your delicious shots.
The Machine: Your Espresso Engine
An espresso machine is the heart of your home brewing setup. These machines use pressure, typically around 9 bars as recommended by industry standards, to force hot water through finely-ground coffee. Three main types exist:
- Manual Lever Machines: Require you to physically pull a lever to generate pressure. They offer maximum control but have a steep learning curve.
- Semi-Automatic Machines: Most common for home use. You control grind, dose, and tamp, then start and stop the pump to control shot duration.
- Super-Automatic Machines: Handle grinding, tamping, and brewing at the touch of a button. They’re convenient but offer less control over extraction details.
The Grinder: Your Grind Game Changer
This is arguably the most important piece of equipment after the machine. You need a grinder capable of producing a very fine, consistent grind, much finer than for drip coffee.
- Burr Grinders: Essential for espresso. They use two revolving abrasive surfaces (burrs) to grind beans to a uniform size. Blade grinders, which chop beans unevenly, are unsuitable.
- Adjustability: Look for a grinder with a wide range of fine settings. You’ll need to precisely dial in the grind size for the right extraction time, typically 25-30 seconds for a 1:2 brew ratio.
The Essentials: Portafilter, Tamper, Scale, and More
Beyond the machine and grinder, other items are crucial:
- Portafilter: The handle that holds coffee grounds, locking into the machine's group head. Many machines include one, but some prefer a bottomless portafilter for better extraction visibility.
- Tamper: Used to compress coffee grounds evenly in the portafilter. A good tamper fits snugly and has a comfortable handle. Even tamping prevents channeling.
- Scale: A digital scale measuring in grams is vital for consistency. You'll weigh your coffee dose (e.g., 18 grams) and espresso yield (e.g., 36 grams for a 1:2 ratio). This removes guesswork.
- Dosing Ring/Funnel: Sits on top of the portafilter during dosing, preventing spills.
- Knock Box: A container with a bar to knock out used coffee pucks.
- Milk Pitcher and Frother: Needed for milk-based drinks like lattes or cappuccinos. Some espresso machines have a steam wand; others require a separate frother.
The Espresso Extraction Process: A Step-by-Step Visual Workflow
This is where the magic happens, and your eyes are your best tool. Mastering espresso extraction relies on observing the coffee as it flows from the portafilter into your cup.

Image source: Web (Bing) / homedecoranddesignswithstyle.blogspot.com (Web image (fair-use with source credit))
Grinding, Dosing, and Distributing: Getting the Grounds Right
- Grind Fresh: Grind espresso beans just before brewing. The grind should be fine enough to resist water flow but not so fine it chokes the machine. Your burr grinder's adjustability is key here.
- Dose Accurately: Place your portafilter on the scale, tare it, and add freshly ground coffee. For a double shot, typically 16-20 grams, depending on basket size and preference. Use a dosing ring to contain grounds.
- Distribute Evenly: Gently tap the portafilter to settle grounds, then use a distribution tool or your finger to level the surface. This ensures even water flow, preventing channeling. Uneven distribution is a common pitfall leading to poor shots.
Tamping Technique: The Foundation of Your Shot
Tamping compresses coffee grounds into a dense, even puck. This resistance allows water pressure to build and extract coffee properly.
- Apply Firm, Even Pressure: Use your tamper to press down firmly and evenly on the grounds. Aim for consistent pressure each time; aggregate user feedback suggests around 30 pounds is a good starting point, but consistency is more critical.
- Polish and Level: After pressing, give the tamper a gentle twist (a "polish") to smooth the surface. Ensure the puck is perfectly level. A crooked tamp causes water to find the path of least resistance, leading to uneven extraction.
Pulling the Shot: Watching the Extraction Unfold
Lock the portafilter into the group head and start the brew.
- Flush the Group Head: Before locking in the portafilter, run a little hot water through the group head. This cleans old grounds and stabilizes water temperature. Manufacturer specifications often indicate a short flush (2-3 seconds) is ideal.
- Lock and Brew: Insert the portafilter firmly, start the brew cycle immediately, and place your scale and cup underneath.
- Observe the Flow: This is the most critical visual stage. Initially, you might see a few dark drops. Then, the stream should turn a rich, caramel-like brown, flowing steadily. If it gushes out immediately, it’s likely too coarse or not tamped enough. If it’s just a slow drip, it’s probably too fine or tamped too hard.
Judging the Shot: What a Good Espresso Looks Like
Visual cues during and after extraction tell you everything.
- Color: The ideal stream starts dark, then transitions to a reddish-brown or "tiger-stripe" appearance before becoming lighter blonde. A shot that goes from dark to blonde too quickly is likely under-extracted. If it stays dark and thick throughout, it might be over-extracted.
- Flow Speed: Aim for a steady, consistent flow resembling warm honey.
- Crema: A well-pulled shot should have beautiful, thick, reddish-brown crema on top. This signals good extraction and fresh beans. It should be persistent, not dissipate instantly.
- Yield and Time: Use your scale to measure output. A common target is a 1:2 ratio: for every gram of coffee dosed, aim for two grams of liquid espresso. For 18 grams of coffee, look for about 36 grams of liquid espresso. This should ideally take 25-30 seconds from pump start. If your shot finishes too quickly or slowly, adjust your grind size. This principle is detailed in guides from the Specialty Coffee Association.
Common Espresso Brewing Mistakes (And How to Spot Them Visually)
Even with good gear, mistakes are easy when learning home espresso. Many errors show clear visual cues, allowing for quick correction.
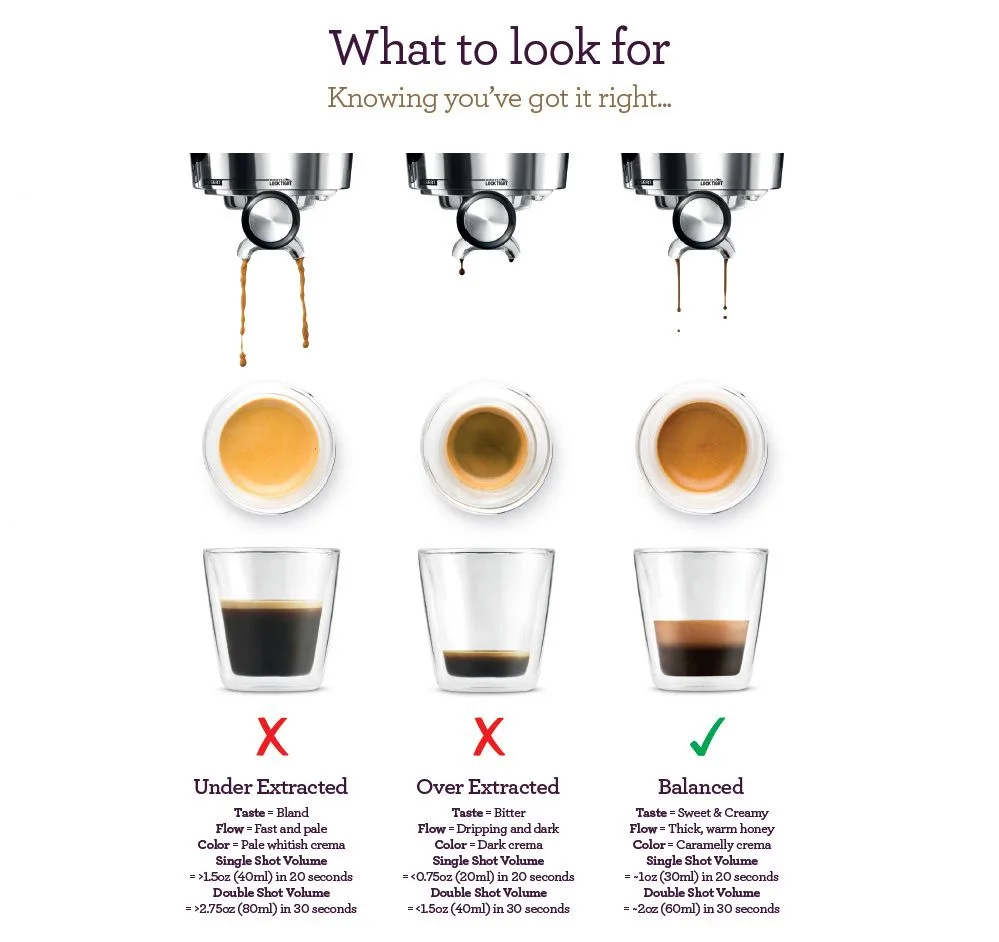
Image source: Bing (Web (fair-use with source credit))
Sour Shots: The Under-Extraction Clues
If espresso tastes sour, tart, or thin, it's likely under-extracted. Not enough soluble compounds dissolved into the water.
- Visual Indicator: The shot streams out too quickly, often in a thin, watery, light-brown or even pinkish-yellow stream. Crema might be thin, foamy, and dissipate rapidly, looking almost like a weak Americano immediately.
- The Fix: Increase resistance to slow extraction. This usually means grinding finer. You might also increase dose slightly or tamp more firmly, but grind adjustment is typically the first step.
Bitter Shots: Recognizing Over-Extraction Signs
Conversely, if espresso is overwhelmingly bitter, astringent, or harsh, it's probably over-extracted. Too many compounds, including bitter ones, dissolved.
- Visual Indicator: The shot streams out very slowly, perhaps in a dark, thick, almost syrupy flow that barely drips. Color can be very dark, and crema might be dark brown or blackish, often with large bubbles.
- The Fix: Decrease resistance to speed extraction. The primary adjustment is to grind coarser. You could also try reducing dose slightly or tamping less forcefully, but grind adjustment is most effective.
Channeling: The Uneven Flow Problem
Channeling occurs when water finds paths of least resistance through the coffee puck, leading to uneven extraction. Some parts over-extract (bitter), others under-extract (sour).
- Visual Indicator: You’ll see two or more distinct streams from the portafilter spouts, or one stream much faster than the other. One stream might be dark and weak, the other lighter and watery. In a bottomless portafilter, you might see spurts of coffee or clear water shooting from one side of the puck.
- The Fix: Often caused by poor distribution or tamping. Ensure grounds are perfectly flat and level before tamping. Make sure your tamp is firm and perfectly perpendicular. Some users find a WDT (Weiss Distribution Technique) tool to break up clumps before tamping helps significantly.
Steaming Milk Like a Pro: Visualizing the Perfect Texture
Perfectly steamed milk is key for many espresso drinks, though not directly related to pulling the shot itself. The goal is microfoam: milk with tiny, uniform bubbles for a glossy, velvety texture, perfect for latte art.
- The Visual Goal: Milk that looks like wet paint – smooth, shiny, with a slight sheen, no large airy bubbles. When swirled, it moves like a cohesive liquid, not bubbly foam.
- The Process: Start with cold milk in a metal pitcher. Position the steam wand tip just below the milk's surface. Open the steam valve fully. You should hear a gentle "kissing" or "tearing paper" sound – air being introduced for foam. Keep the tip near the surface for a few seconds to create enough foam.
- Heating and Integrating: Once enough foam is created, submerge the wand slightly deeper. Angle the pitcher to create a vortex, pulling milk down and integrating the foam. This heats the milk while creating smoothness. Monitor pitcher temperature by touch; it should be hot but briefly comfortable, around 140-155°F (60-68°C). Overheating milk destroys sweetness and leads to bubbly, scorched flavor.
If milk texturing is difficult, general advice in guides on how to fix a coffee maker and how to troubleshoot a coffee maker might help if your steam wand underperforms, though specific steam wand issues are usually distinct.
Maintaining Your Espresso Setup for Consistently Great Coffee
Keeping your espresso machine and grinder clean is vital for consistently good shots and a long-lasting setup. Coffee oils and mineral deposits clog machines. Manufacturer specifications from brands like Breville or Rancilio emphasize regular cleaning and descaling.
Essential maintenance tasks:
Daily Cleaning:
- Backflushing: After each use, flush the group head with water. Periodically, use a cleaning solution and a blind basket to backflush. This forces water and cleaner through internal mechanisms. Many manufacturers recommend this daily or after a set number of shots.
- Portafilter and Basket: Rinse and wipe down thoroughly.
- Steam Wand: Always purge and wipe down immediately after use to prevent milk drying inside.
- Drip Tray: Empty and rinse.
Weekly Cleaning:
- Group Head Shower Screen: Unscrew or clean the shower screen. Trapped grounds affect water flow.
- Grinder Burrs: A quick brush of the burrs can remove residual grounds if accessible.
Monthly/As Needed Descaling:
- Descaling: Removes mineral buildup, especially with hard water. Follow your machine’s manual for the correct solution and procedure. Using filtered water significantly reduces descaling frequency. General principles in guides like how to descale a coffee maker apply here.
Regular maintenance ensures machine efficiency and prevents stale flavors from old coffee oils or mineral deposits. It’s a crucial, often overlooked, step in home espresso.
Espresso Alternatives: When Home Espresso Isn't the Right Fit
While home espresso is appealing, it's not the only path to an intense, concentrated coffee drink. If equipment investment or the learning curve feels daunting, several alternatives offer satisfying coffee. Understanding these helps you choose what fits your lifestyle and cravings.
- Moka Pot: This stovetop brewer uses steam pressure to push water through coffee grounds, producing strong, espresso-like coffee. It’s compact and affordable. The result is concentrated but lacks the crema and intense flavor of true espresso, as it operates at lower pressure (around 1-2 bars). It’s a great middle ground for stronger coffee without a full espresso setup. For manual brewing techniques, check guides on how to use a French press.
- AeroPress: This versatile manual brewer makes espresso-style concentrated coffee or a more traditional cup. It uses air pressure to force water through coffee, offering fast brews and easy cleanup. The coffee is rich and full-bodied but not true espresso due to lower pressure. Its simplicity and portability make it a travel or small kitchen favorite.
- French Press: Primarily for fuller-bodied, less concentrated coffee, you can use a finer grind and less water for a stronger brew some find "espresso-like." However, it lacks characteristic crema and intense pressure extraction. If interested, learning how to clean a French press is as important as brewing.
- Pour Over: Methods like V60 or Chemex produce clean, nuanced coffee with precise control over water flow and temperature. This highlights delicate flavor notes but doesn't yield a concentrated shot. Learning how to use a pour over coffee maker is rewarding for appreciating coffee clarity.
Each method offers a different approach to home coffee enjoyment, with varying investment, complexity, and final beverage characteristics.
Who is Home Espresso For? Matching the Process to Your Lifestyle
Deciding to pursue home espresso depends on your habits, budget, and dedication. It’s not one-size-fits-all. Our research indicates potential home baristas fit into distinct categories.
- The Dedicated Enthusiast: Sees espresso making as a hobby. Enjoys the ritual, learning, and fine-tuning. Willing to invest in quality equipment and dedicate time daily to brewing and cleaning. The pursuit of the "perfect shot" is the main draw. Likely to invest in machines with precise temperature and pressure control.
- The Daily Drinker: Loves their cafe latte or americano and wants to replicate it at home to save money and time. Values convenience but wants good quality. Might opt for a forgiving, easy-to-learn semi-automatic machine, or a super-automatic for speed. Seeks consistency without a steep learning curve.
- The Curious Beginner: Intrigued by espresso but hesitant about cost and complexity. Seeks a starting point that offers a taste of true espresso without massive commitment. Might begin with an entry-level or manual lever machine to understand mechanics. Likely to explore resources like how to use a coffee maker for basic brewing principles first.
- The "Espresso-Like" Seeker: Enjoys strong, concentrated coffee but isn't chasing technical perfection. May be perfectly happy with a Moka pot or AeroPress, which are less expensive and simpler than full espresso setups. Prioritizes ease of use and affordability over pressure and crema nuances.
Ultimately, home espresso is for anyone who enjoys crafting a delicious coffee drink from scratch, provided they have the time, space, and desire to engage with the process.
Frequently Asked Questions About Home Espresso
How long does it take to make an espresso shot?
From grinding to shot finishing, a single espresso shot typically takes about 1 to 2 minutes. This includes grinding, dosing, tamping, and the 25-30 second extraction.
Can I use pre-ground coffee for espresso?
Technically yes, but it's highly discouraged for true espresso. Espresso requires a very specific, fine, consistent grind that deteriorates quickly. Pre-ground coffee is usually not fine enough and loses freshness rapidly, leading to poor shots.
Grinding fresh beans just before brewing is essential.
What is "dialing in" an espresso?
"Dialing in" is adjusting your grinder settings to achieve the perfect espresso shot for a given coffee bean. This involves finding the right grind size, dose weight, and yield to hit your target extraction time and taste profile. It’s an iterative process of trial and error, adjusting one variable at a time.
How much does a home espresso setup cost?
Entry-level machines and grinders range from $150-$400. Mid-range setups are $500-$1500. High-end machines and grinders can exceed $2,000.
Factor in accessories like a good tamper and scale, adding another $50-$150.