How to Use a Food Processor for Chopping
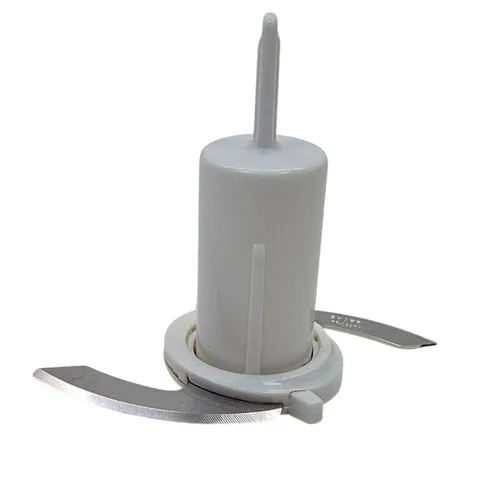
Image source: Bing (Web (fair-use with source credit))
Figuring out how to use a food processor for chopping can seem like a small kitchen skill, but mastering it saves you serious time. Getting your ingredients prepped quickly and uniformly without all the knife work is a game-changer for weeknight meals and more involved recipes alike.
Our research confirms that most modern food processors, especially those with an S-shaped blade, can achieve consistent chops in a matter of seconds. Understanding the pulse function is the key to transforming this appliance from a countertop ornament into your most valuable kitchen assistant.
Quick Answer: Mastering the Pulse for Perfect Chops
To use a food processor for chopping, secure the S-shaped blade and lid. Add ingredients, then use short, rapid "pulse" button presses. Check consistency frequently, stopping when desired size is reached.
Avoid continuous running to prevent over-processing.
Food Processor Chopping: How It Works and Why You Need It
At its heart, a food processor is a kitchen appliance designed for more than just chopping. It uses a motor to spin a blade at high speeds, rapidly breaking down food. The effectiveness of a food processor for chopping lies in its ability to perform this task much faster and often more uniformly than manual methods.
When you're facing a pile of onions, carrots, or herbs, the idea of mincing or dicing each piece by hand can be daunting. A food processor takes that effort and reduces it to mere seconds. This isn't just about saving time; it's about achieving consistent results.
For things like mirepoix for a soup or finely diced onions for salsa, uniformity in size ensures even cooking and better texture. Aggregate reviews show that users who adopt this method report significant reductions in prep time for common dishes.
The S-Blade: Your Main Tool for Chopping
The S-shaped blade, often called the "S-blade" or "chopping blade," is the workhorse of your food processor for this task. It's typically made of stainless steel and designed with curved edges that create a vortex action within the processor bowl. This vortex pulls ingredients down towards the spinning blade, ensuring a more even chop.

- Material: High-quality stainless steel is standard for durability and sharpness.
- Design: The double-sided, S-shaped curve is engineered to slice and dice effectively.
- Functionality: It's best suited for breaking down solid ingredients into smaller pieces, from coarse chops to fine minces.
Manufacturer specifications often highlight this blade's versatility, but it's crucial to remember it's not meant for all tasks. For instance, it's not ideal for pureeing very wet ingredients or for tasks requiring a very fine powder, as it can quickly turn food into mush if used incorrectly.
Step-by-Step: Chopping Veggies, Nuts, and Herbs
Mastering the food processor for chopping really comes down to understanding the "pulse" function and paying attention to your ingredients. It's an iterative process: chop a little, check, chop a little more.

Here’s a general workflow for most common chopping tasks:
- Assemble Correctly: Ensure the food processor bowl is properly locked onto the base. Then, carefully insert the S-shaped blade onto the central spindle. Finally, place the lid on the bowl and lock it securely. Most models won't operate unless all parts are correctly in place.
- Prepare Ingredients: Wash and rough-chop larger ingredients into pieces that will fit comfortably into the food processor chute or bowl. For example, quarter an onion or cut a bell pepper into large chunks. This prevents the machine from straining and ensures more even processing.
- Add to Bowl: Place the prepared ingredients into the food processor bowl. Don't overfill it; working in batches is better for consistent results and protecting your appliance. For most machines, filling the bowl about halfway to two-thirds full is a good starting point.
- Engage the Pulse Function: This is the critical step for chopping. Instead of holding down the "on" button, use short, quick presses of the "pulse" button. Each press is like a brief burst of power.
- Check Consistency: After a few pulses, stop the machine and check the size of the chopped ingredients. You can do this by tilting the bowl or using a spoon to scrape down the sides and inspect the pieces.
- Repeat as Needed: If the pieces are too large, give it a few more short pulses. Continue this cycle of pulsing and checking until you achieve your desired chop size.
- Empty and Repeat: Once your batch is chopped, carefully remove the lid and blade (remember, blades are sharp!) and empty the contents. Repeat the process for any remaining ingredients.
This methodical approach prevents the common mistake of turning your chopped ingredients into an undesirable paste. For very hard items like nuts, you might use slightly longer pulses, but always with frequent checks.
Visual Cues: What to Look For as You Chop
Since you can't always rely on a timer when chopping with a food processor, visual cues become your best friends. Learning to recognize what perfectly chopped food looks like versus over-processed mush is key to mastering this technique.
- Ideal Chop: You’ll see distinct pieces of relatively uniform size. For example, chopped onions will look like small, evenly cut cubes. Nuts will be in recognizable fragments. Herbs will be finely cut but still identifiable as individual leaves or stems. The texture should feel somewhat loose in the bowl.
- Approaching Over-processing: Pieces start to lose their defined edges. You might see some smaller particles and some larger ones, with a tendency for the smaller bits to clump together. The food may start to look a bit "wet" or shiny as cell walls begin to break down.
- Over-processed (Paste/Puree): The texture becomes uniformly fine and sticky. Ingredients lose all definition and start to merge into a cohesive mass. For anything you wanted chopped, this is the point of no return. It will look like a thick sauce or a paste.
Manufacturer specifications for various models often suggest pulse durations, but these are guidelines. A common recommendation is to aim for 1-second pulses for most vegetables. However, our editorial analysis of user feedback indicates that visual inspection every 3-5 pulses is more reliable than sticking to a strict time limit.
When chopping something like herbs, the visual shift from finely chopped to a green paste can happen in just a few extra pulses. For nuts, you might go from whole nuts to coarse chop, to finer chop, to almost a meal very quickly. Always err on the side of stopping slightly before you think you’re done, as the blade's momentum can continue to break down food even after you stop pulsing.
Common Chopping Mistakes (and How to Fix Them)
Even with a capable appliance, there are a few common missteps that can lead to less-than-ideal results when chopping. Thankfully, they're usually easy to avoid once you know what to look for.
Mistake 1: Continuous Running: The most frequent error is holding down the "on" button instead of using the pulse function. This quickly turns your chopped ingredients into a paste or puree.
- Fix: Always use short, sharp presses of the "pulse" button. Think of it as tapping the button, not holding it down. Check the consistency after every few pulses.
Mistake 2: Overfilling the Bowl: Packing the bowl too full prevents the ingredients from circulating properly. This leads to uneven chopping, with some pieces finely processed while others remain large.
- Fix: Work in batches. Process only enough ingredients to fill the bowl about halfway to two-thirds. It takes a bit longer, but the results are worth it.
Mistake 3: Using the Wrong Blade: While the S-blade is for chopping, some processors come with other blades (like slicing or shredding discs) that are not designed for this task.
- Fix: Ensure you are using the S-shaped blade that came with your processor specifically for chopping. Never try to chop with a slicing or shredding attachment.
Mistake 4: Processing Hot Ingredients: Adding hot food can cause steam to build up inside the processor, potentially damaging the appliance or creating a mess.
- Fix: Always let hot cooked ingredients cool down to room temperature before processing them. This protects the plastic components of the food processor and prevents safety hazards.
By being mindful of these common pitfalls, you can ensure your food processor consistently delivers the perfect chop you're after, saving you time and frustration in the kitchen.