How To Use A Foam Cannon: Easy Car Wash Guide
Using a foam cannon is simple: mix soap, connect it to a pressure washer, spray, and rinse.
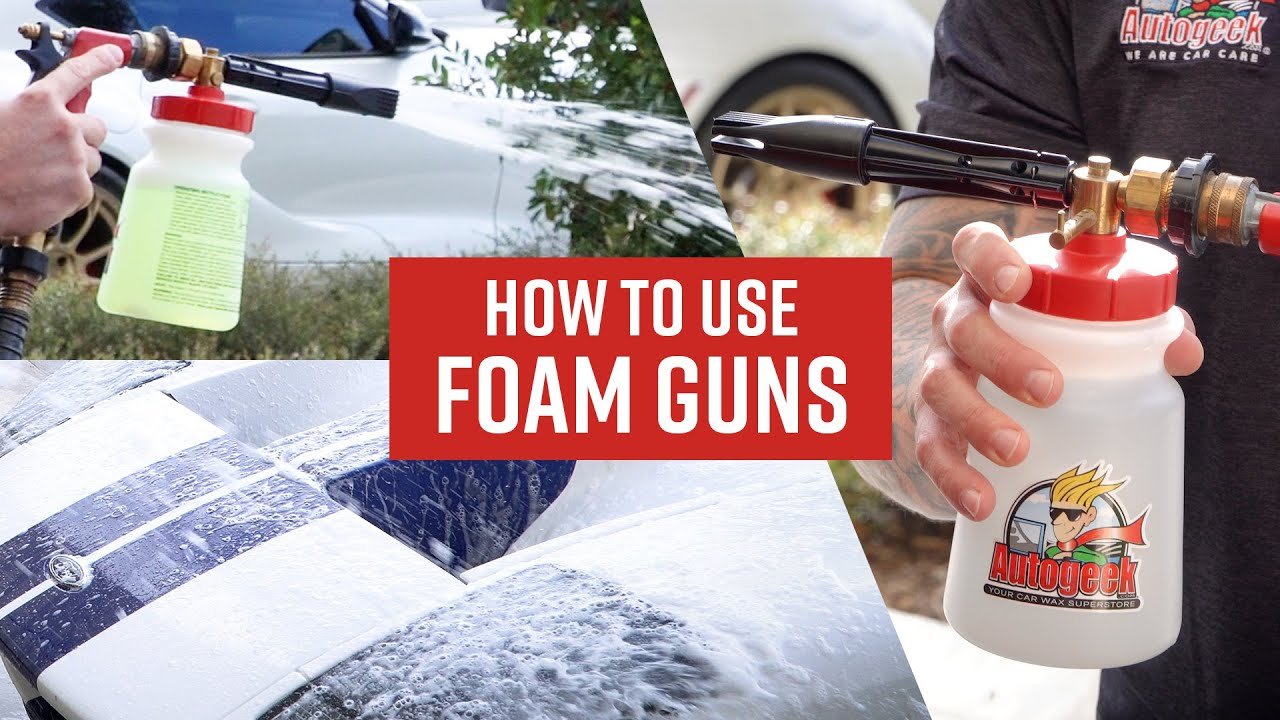
If you want thicker suds, fewer wash marks, and a safer way to clean your car, a foam cannon is one of the best tools you can add to your wash routine. I’ve used foam cannons on everything from daily drivers to neglected weekend cars, and the difference is easy to see right away: the foam clings, loosens grime, and makes the whole wash feel smoother and more controlled. In this guide, I’ll walk you through exactly how to use a foam cannon the right way, what soap and pressure settings matter, and the small mistakes that can ruin the results.
What a foam cannon does and why it works
A foam cannon is an attachment for a pressure washer that mixes car wash soap with water and air. The result is a thick layer of foam that sticks to the surface of your vehicle instead of sliding off right away. That foam helps lift dirt and grit so you can wash with less rubbing and lower the chance of swirl marks.
In my experience, people often expect the foam itself to do all the work. It doesn’t. Think of it like softening dried mud before wiping it away. The foam helps prepare the surface, but you still need a proper wash mitt, two buckets if possible, and a careful rinse.
A good foam cannon setup can help with:
• Safer washing by reducing friction on paint
• Better soap coverage on large vehicles
• Easier loosening of road film, dust, and light grime
• A more even and satisfying wash process

What you need before you start
Before using a foam cannon, gather the right tools. Having everything ready makes the wash faster and helps avoid weak foam or wasted soap.
You will need:
• A pressure washer with a compatible quick-connect fitting
• A foam cannon that matches your washer’s setup
• Car wash soap made for foam cannons or pressure washers
• Clean water
• A wash mitt or wash pad
• Two buckets if you want to do a proper hand wash
• A microfiber drying towel
It also helps to check the pressure washer specs. Many foam cannons perform best around 1,200 to 2,000 PSI and with adequate water flow. Too little flow can make the foam thin and watery. Too much pressure can waste soap and make the spray harder to control.
One mistake I made early on was using regular dish soap. It created some suds, but the foam broke down fast and left the paint feeling stripped and dry. A pH-balanced car wash soap is usually the safer choice because it cleans well without being harsh on wax, sealant, or ceramic coatings.
How to use a foam cannon step by step
Using a foam cannon is not hard, but the order matters. A clean process gives you better foam and better cleaning results.
1. Pre-rinse the vehicle
Start by rinsing the car with plain water. This removes loose dirt, sand, and debris before the foam goes on. If you skip this step, you can trap heavy grit under the foam and make the wash less safe.
Focus on wheel wells, lower doors, rocker panels, and the rear bumper. Those spots usually hold the most grime. If the car is very dirty, a longer rinse can make the whole wash easier.
2. Fill the foam cannon bottle
Add the soap according to the product directions. Many foam cannon soaps call for a small amount of concentrate mixed with water, but the exact ratio depends on the brand and the foam cannon bottle size.
A common starting point is:
• 1 to 3 ounces of soap in the bottle
• Fill the rest with warm water
• Shake gently before connecting it
Warm water can help the soap mix better in some cases. I’ve found that overfilling the bottle with soap does not always create better foam. Sometimes it just makes the rinse harder and wastes product.
3. Connect the foam cannon to the pressure washer
Attach the foam cannon to the pressure washer wand or gun using the correct quick-connect fitting. Make sure it locks in securely before turning the washer on.
If your cannon has adjustment knobs, set them before spraying:
• The top knob usually controls soap dilution
• The nozzle tip often controls spray pattern
A wider spray is usually better for covering a car evenly. A tighter spray can be useful for spot cleaning, but it is not ideal for full-panel coverage.
4. Spray the car from bottom to top
Apply the foam starting from the lower panels and move upward. This helps you see where you have already covered the car and reduces streaking. Then let the foam sit for a few minutes, but do not let it dry on the paint.
The dwell time matters. In cool weather, foam can sit longer. In hot sun, it dries fast and loses its cleaning benefit. On a warm day, work in sections and rinse sooner if needed.
A good foam coat should look thick and cling to the surface like shaving cream. If it looks runny, you may need more soap, better pressure, or a different soap formula.
5. Wash with a mitt or pad
After the foam has loosened the dirt, use a clean wash mitt to gently wash the surface. Start at the top and work downward. Rinse the mitt often in a separate rinse bucket if you are using the two-bucket method.
This is where foam cannon use really pays off. The foam helps reduce friction, but the mitt still does the actual contact cleaning. If you rush here, you can still create swirls.
6. Rinse thoroughly
After washing, rinse the car fully with plain water. Make sure no soap is left in seams, mirrors, trim, or badges. Leftover soap can leave spots or haze if it dries.
A final rinse from top to bottom helps water sheet off the paint. If your water is hard, drying quickly with a microfiber towel can help prevent water spots.
7. Dry the vehicle
Use a clean microfiber drying towel or a car drying aid. Blot or drag the towel lightly across the paint. Avoid rough towels or old bath towels, since they can scratch the finish.
If you want extra protection, this is also a good time to apply a spray sealant or drying aid. I like doing that after a foam cannon wash because the surface is already clean and ready.
How to get thicker foam
Not all foam is equal. Some people want a mountain of thick foam, but the real goal is cling and cleaning power. Still, if your foam looks thin, a few changes can help.
Try these tips:
• Use a foam cannon soap designed for pressure washers
• Adjust the dilution ratio slightly toward more concentrate
• Use warmer water in the bottle
• Check that your pressure washer has enough flow rate
• Clean the foam cannon filter and nozzle regularly
• Use the correct orifice size for your machine if your cannon allows it
Also, be realistic. A lower-powered electric pressure washer may never create the same dense foam as a strong gas model. That does not mean the tool is bad. It just means you may need to tune your expectations and focus on wash safety and coverage instead of pure foam volume.
Best soap for a foam cannon
The best soap for a foam cannon is usually a pH-balanced car wash soap made to foam well and rinse clean. These soaps are designed to break down road grime without stripping wax or sealant too aggressively.
Look for these traits:
• High lubrication
• Easy rinsing
• Good foam production
• Safe for wax, sealant, and ceramic coating
• Low streaking after rinse
Avoid using household cleaners, dish soap, or degreasers unless the product label clearly says they are safe for automotive use. Strong cleaners can dull trim, dry out protection layers, and harm delicate finishes.
From a practical standpoint, I’ve found that the “best” soap depends on the goal. If I’m washing a coated car, I want a slick, gentle soap. If I’m cleaning a truck after a muddy week, I want something with stronger cleaning power but still paint-safe.
Common mistakes to avoid
A foam cannon is easy to use, but a few common mistakes can hurt results.
• Using too much soap, which can leave residue and waste product
• Letting foam dry on the paint, especially in hot weather
• Spraying on a dusty car without a pre-rinse
• Using too much pressure too close to badges, emblems, or trim
• Skipping a proper wash mitt after foaming
• Using dirty buckets or towels, which can scratch the finish
One lesson I learned the hard way: foam is not a magic shield. If the car has heavy mud, sand, or road salt, you still need to rinse carefully before touching the paint. Foam helps, but it does not replace smart washing habits.
Foam cannon tips for better results
If you want your foam cannon wash to feel more professional, small details matter.
• Wash in the shade when possible
• Work on a cool surface
• Keep your mitt clean during the wash
• Use separate tools for wheels and paint
• Dry the car right away to avoid water spots
• Clean the foam cannon after each use so soap does not clog it
I also recommend testing your foam cannon on one panel first. That gives you a quick read on the mix, spray pattern, and cling. It is much easier to adjust early than to finish the whole car and realize the foam was too thin.
How often should you use a foam cannon
Most people can use a foam cannon every time they wash the car. It is especially helpful for regular maintenance washes, because it makes the process safer and easier.
That said, frequency depends on your climate and driving habits. If you drive through rain, salt, dust, or tree sap often, you may need more frequent washes. In cleaner conditions, a foam cannon wash every one to two weeks is often enough.
For heavily contaminated vehicles, foam alone may not be enough. You may need iron removal, tar removal, clay bar treatment, or a stronger decontamination routine before the car feels truly clean.
Frequently Asked Questions
How much soap do I put in a foam cannon?
Start with the manufacturer’s recommended amount, since ratios vary by brand and soap type. A common range is 1 to 3 ounces of soap topped off with water, but the best mix depends on your pressure washer and the foam you want.
Can I use a foam cannon without a pressure washer?
Most foam cannons are made for pressure washers, so they need that water pressure to work well. There are hose-end foam sprayers, but they do not usually create the same thick foam or cleaning effect.
Does a foam cannon remove scratches?
No, a foam cannon does not remove scratches. It helps reduce the chance of new swirl marks by lifting dirt and lowering friction during washing, but existing scratches need polishing or paint correction.
Can I use a foam cannon on a ceramic-coated car?
Yes, and many people do. Use a coating-safe, pH-balanced soap so you do not shorten the life of the coating or leave residue behind.
Why is my foam cannon making watery foam?
Thin foam usually means the soap mix is off, the pressure washer flow is too low, or the nozzle needs cleaning. Try adjusting the dilution, using the right soap, and checking for clogs in the filter or nozzle.
Is a foam cannon worth it?
If you care about safer washing and easier soap coverage, yes, it is worth it. It will not do the whole job for you, but it can make your wash routine cleaner, faster, and less risky for the paint.
Conclusion
Learning how to use a foam cannon is one of the easiest upgrades you can make to your car wash routine. With the right soap, a proper rinse, and a careful hand wash afterward, you can clean your vehicle more safely and get better results with less effort.
The key is to treat foam as the first step, not the whole process. Once you understand dilution, spray pattern, dwell time, and washing technique, the foam cannon becomes a simple tool that saves time and helps protect your paint. Try it on your next wash, refine your mix, and you will quickly see why so many detailers rely on it.
If this guide helped you, explore more detailing tips, share your own foam cannon setup, or leave a comment with your best wash routine.