How to Maintain an Exercise Bike
Your exercise bike probably doesn't need a mechanic. It needs a routine. How to maintain an exercise bike comes down to two questions: what kind of drive sends power to the flywheel, and what kind of resistance system slows it down.
As of 2026, most home bikes use one of two drivetrain types and one of two resistance types. Manufacturer specifications and fitness equipment standards such as EN ISO 20957 set the safety baseline. The standard doesn't tell you when to grease a chain.
That part is on you. Once you know those two details, the maintenance plan basically writes itself.
Quick Answer
Wipe the bike down after every ride. Lubricate a chain drive monthly. Inspect a friction resistance pad every few weeks.
Tighten loose bolts and leveling feet quarterly. Belt drives run dry. Magnetic resistance bikes need no pad replacement.
Use your owner's manual for torque specs and part intervals.
What Maintenance Does Your Exercise Bike Actually Need? Start With These Two Things
Look at your bike's drivetrain first. This single detail drives every maintenance decision you'll make.
Belt Drive vs Chain Drive: Different Care Rules
Chain drives are the older design. They're reliable and cheap to fix, but they need regular attention. Chains gather dust, lose lubricant, and rust in humid spaces.
Belt drives are quieter and run clean. They don't need lubrication at all. Their weak spot is wear.
A belt can crack, glaze, or stretch over time.
Belt drives are standard on many mid-range and premium indoor cycles as of 2026. Plenty of chain-driven bikes are still out there. If you're not sure which one you own, check the model sticker on the frame.
Manufacturer specifications list the drivetrain. Or just look inside the pulley cover.
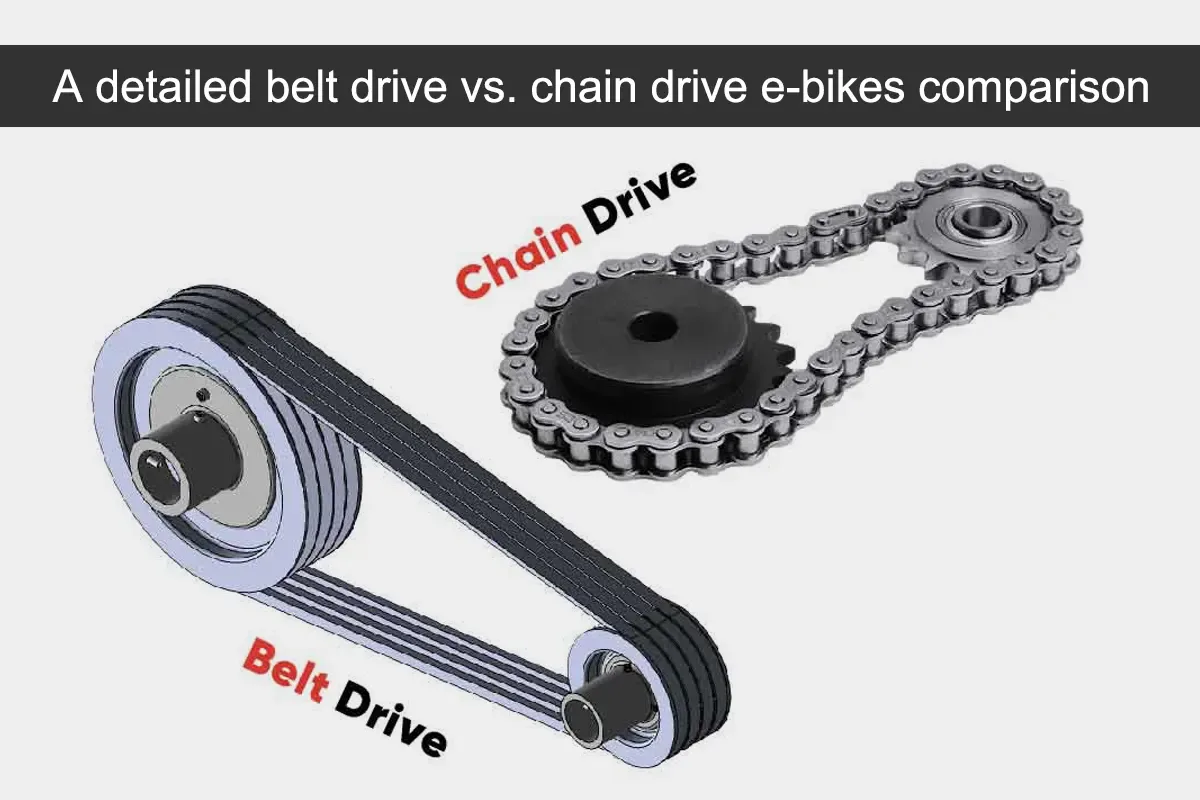
Image source: Bing (Web (fair-use with source credit))
| Drive type | Lubrication | Rust risk | Noise | Main upkeep |
|---|---|---|---|---|
| Chain | Monthly oil | High | Moderate | Clean and lube |
| Belt | None | Low | Quiet | Inspect for cracks |
Friction Pads vs Magnetic Resistance: What Wears Out
Your resistance system is the second big fork in the road. Friction resistance uses a pad pressed against the flywheel. It gives you the gritty feel of a spin bike.
It also creates wear. The pad gets thinner, the brake hoods need adjustment, and dust builds up.
Magnetic resistance works without contact. Magnets ride close to the flywheel, and the gap controls the effort. Nothing touches, so nothing wears out the same way.
The trade-off is electronic. Magnetic systems depend on a console, wiring, and sometimes a motor.
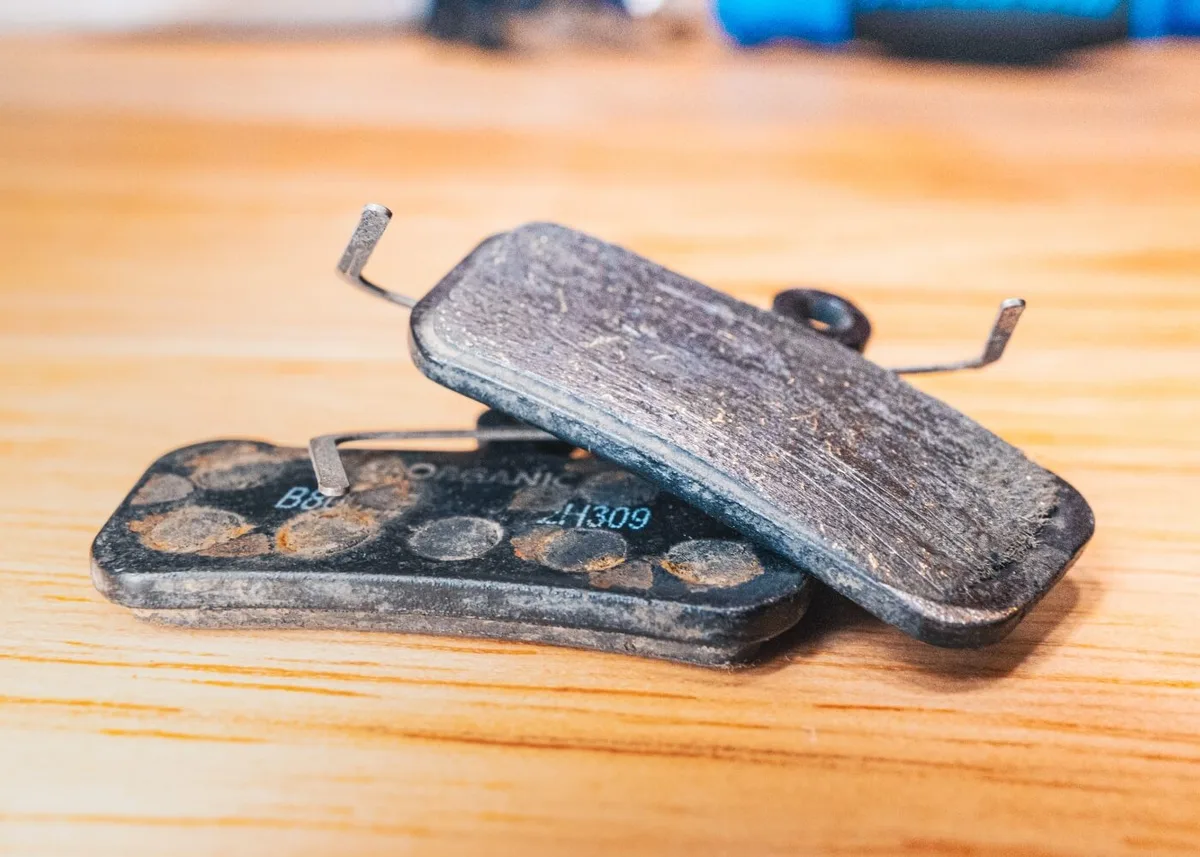
Image source: Bing (Web (fair-use with source credit))
One rule holds true: chain plus friction pad equals the most work. Belt plus magnetic equals the least. If you own the high-maintenance combo, don't worry.
The workflow below covers both.
The Step-by-Step Maintenance Workflow: Weekly, Monthly, and Quarterly
Stop overthinking the schedule. Three tiers are enough. Each one takes less time than a warm-up.
After Every Ride: Wipe Down and Quick Visual Check
Keep a microfiber cloth near your bike. After every ride, wipe the frame, seat, and handlebars. Sweat is acidic.
Left alone, it eats paint and rusts exposed metal. This one habit prevents more damage than any other step. The same rule applies to cleaning a rowing machine after hard sessions.
Then take ten seconds to check for problems. Look for loose pedals, a wobbly seat, or exposed wires. Catching these early turns a small issue into a two-minute fix.
Also check the floor under the bike. Sweat pools on the stabilizer feet. Wipe that area too.
It keeps the leveling caps from rusting.
Monthly: Lube, Tighten, and Inspect the Brake Pad
Once a month, spend ten minutes on a proper tune-up. If you have a chain, apply a dedicated chain lubricant. Wipe off the excess.
Too much lube attracts dust and turns into a gritty paste.
Then go down the bike and check every bolt that catches your eye. Crank arms, pedals, seatpost clamp, handlebar clamp. A snug quarter-turn with an Allen key is enough.
Don't wrench on them like you're changing a tire.
If you have a friction pad, inspect the contact surface. A worn pad looks rounded, shiny, or thin. Compare it to the curve of the flywheel.
When more than half the thickness is gone, replace it. If you also own a rower, keeping its drivetrain serviced follows the same monthly cadence.
Quarterly: Deep Clean the Flywheel, Drivetrain, and Console
Every three months, go deeper. Remove the flywheel cover if your model allows it. Vacuum or blow out the dust inside.
This keeps the resistance smooth and stops squeaks from working their way into the frame.
Check the belt tension now too. A belt should flex slightly, but not feel loose or sloppy. If it slips, manufacturer specifications will show the exact adjustment process.
Tension systems vary from bike to bike.
Finally, open the console battery compartment. Look for corrosion on the terminals. Change the batteries before they leak.
A leaking battery can ruin the console for good.
Troubleshooting by Symptom: Squeaks, Wobbles, and Weak Resistance
Instead of guessing, match the symptom to the likely cause. Most bike issues fall into one of these four buckets.
Squeaky Chain or Pedals
If the squeak follows the pedal stroke, start with the pedals. Loose threads make a click or a creak. Tighten them first.
If the noise stays, the chain is the usual suspect. A dry chain squeaks under load, especially when you push hard.
Lubricate the chain and spin the pedals backwards for a minute. If the squeak disappears, you're done. If it doesn't, check the bottom bracket.
Wobble in the crank means the bracket or its bearings need service.
Weak or Inconsistent Resistance
On a friction bike, weak resistance usually means a worn brake pad or a stretched cable. Open the resistance housing and look. A paper-thin pad needs replacing.
A slack cable needs tightening per the owner's manual.
On a magnetic bike, the problem is often electronic. Unplug the power or remove the batteries for a minute. Let the console reset.
Then recalibrate the resistance range following the manufacturer's instructions. If it still feels weak, you're looking at a wiring or sensor issue.
Wobbling or Rocking Frame
A rocking bike is a safety issue. Check the stabilizer feet first. Adjust them until the frame feels solid on the floor.
Then check the bolts where the main frame connects to the rear stabilizer. Loose joints are common after heavy rides.
If the bike rocks even when stable, add a rubber mat underneath. This absorbs movement and protects the floor. If the frame still flexes after all bolts are tight, inspect the welds.
Stop using the bike if you see a crack. The same need for a stable setup applies if you're working out on a rower with adjustable foot straps and a sliding rail.
Slipping Seatpost or Loose Handlebars
A slipping seatpost usually means a dry clamp or a dirty post. Clean the post with a cloth, then apply a light coat of grease or carbon paste. Grease for metal frames, carbon paste for carbon posts.
Tighten the clamp firmly.
Loose handlebars are simpler. Tighten the stem bolts evenly, side to side. That stops most rocking and creaking.
If a bolt keeps coming loose, remove it and add a drop of thread locker.
The Biggest Exercise Bike Maintenance Mistakes to Avoid
Even careful owners mess these up. Here's what not to do.
- Lubricating a belt drive. Belt drives run dry. Oil makes the belt slip and can ruin the pulleys. If you hear a squeak from a belt, check tension instead of adding grease.
- Treating WD-40 like chain lube. WD-40 is a solvent. It strips existing oil and leaves the chain dry. Use a synthetic chain lube from a bike shop instead.
- Over-tightening bolts. Snug is safe. Stripped threads are a headache. Use a torque wrench on crank bolts if you can. Manufacturer specifications give the exact number.
- Ignoring sweat. This is the biggest silent killer of home gym equipment. A two-minute wipe-down is all it takes. Sweat left on steel will rust, and rust spreads fast.
- Waiting for a total failure. Squeaks are warnings. Wobbles are warnings. The sooner you address them, the cheaper they are.
- Skipping the owner's manual. It has torque values, adjustment ranges, and maintenance intervals that match your exact model. Use it.
When to Fix It Yourself vs Call a Technician
Some maintenance is clearly in your lane. Other jobs need real tools and experience. Here's how to know the difference.
The Easy DIY Wins
You can handle cleaning, chain lubrication, friction pad replacement, brake pad adjustment, seatpost grease, and most bolt tightening. These tasks only need basic hand tools. An Allen key set, a wrench, and a screwdriver cover nearly every home bike.
Replacing a friction pad is a 30-minute job. Swapping console batteries takes five minutes. Doing these yourself keeps money in your pocket and teaches you how the bike actually works.
If you hit a stuck bolt, stop. Do not force it. Penetrating oil helps sometimes, but some bolts need the right tool and patience.
When It's Smarter to Call a Pro
Some repairs are worth paying for.
- Bottom bracket replacement. This needs bearing pullers and a press. DIY attempts can damage the frame.
- Electrical and console faults. If the display glitches or the resistance motor stops, a circuit board is likely involved. That's technician territory.
- Structural damage. Cracks, bends, or a broken flywheel are safety hazards. Stop riding and get a professional assessment.
- Warranty coverage. Opening the drivetrain can void your warranty. Check the owner's manual before you grab a wrench.
The same service threshold applies to other home cardio gear. If you need a replacement part for a rower or want to fine-tune its resistance, a little research goes a long way. But complex repairs stay with the pros.
Exercise Bike Maintenance FAQs
How often should I lubricate the chain on my exercise bike?
Lubricate a chain-driven bike about once a month. If you ride daily or live in a dusty room, switch to every two weeks. Apply lube sparingly, then wipe off the excess.
A wet, dripping chain collects grit and speeds up wear.
Why does my exercise bike squeak when I pedal?
Squeaks usually come from three places. A dry chain, loose pedals, or a worn bottom bracket. Tighten the pedals first because they are the quickest fix.
Then lubricate the chain. If the noise stays, inspect the bottom bracket for play. Catching that early saves you a costly repair.
Can I use WD-40 on my exercise bike chain?
No. WD-40 is a solvent, not a lubricant. It cleans away old grease and then leaves the chain unprotected.
Use a bike-specific chain lube instead. It is thicker, clings to the metal, and survives the heat and pressure of pedaling.
Do magnetic resistance bikes need maintenance?
Yes, even with no pad to replace. Wipe down the frame after every ride to stop sweat corrosion. Check the console batteries quarterly.
Vacuum the flywheel housing every few months. Magnetic systems last a long time, but they are not maintenance-free.
The Bottom Line: A 15-Minute Habit That Saves You Money
You don't need to be a mechanic. You need a schedule. Wipe the bike after every ride.
Lube the chain monthly if it has one. Replace a worn friction pad before it scores the flywheel. Check the frame bolts and leveling feet.
That is the whole job.
The math backs this up. A felt brake pad costs far less than a flywheel. A tube of chain lube costs less than a technician's visit.
Skipping maintenance turns small wear into expensive failures. If you own both an exercise bike and a rower, the same care rhythm keeps both machines running smoothly.
Check the space around the bike too. Sweat pooling on the floor can rust the stabilizer feet. A mat fixes that.
Planning the floor space for a rower is worth doing before you add one to the room. The simpler your setup, the easier the upkeep.
Before you ignore a squeak or a wobble, think about this. A loose bolt can strip the frame threads. A cracked frame is a safety hazard.
If you ever spot structural damage, stop riding and contact a professional. You can also check the Consumer Product Safety Commission for recall notices and safety warnings. It only takes a minute.
A 15-minute weekly habit keeps your workout safe and smooth. It also makes the bike last years longer. Treat it like you'd treat any tool.
A little care now beats a big repair later.