How to Use a Stand Mixer
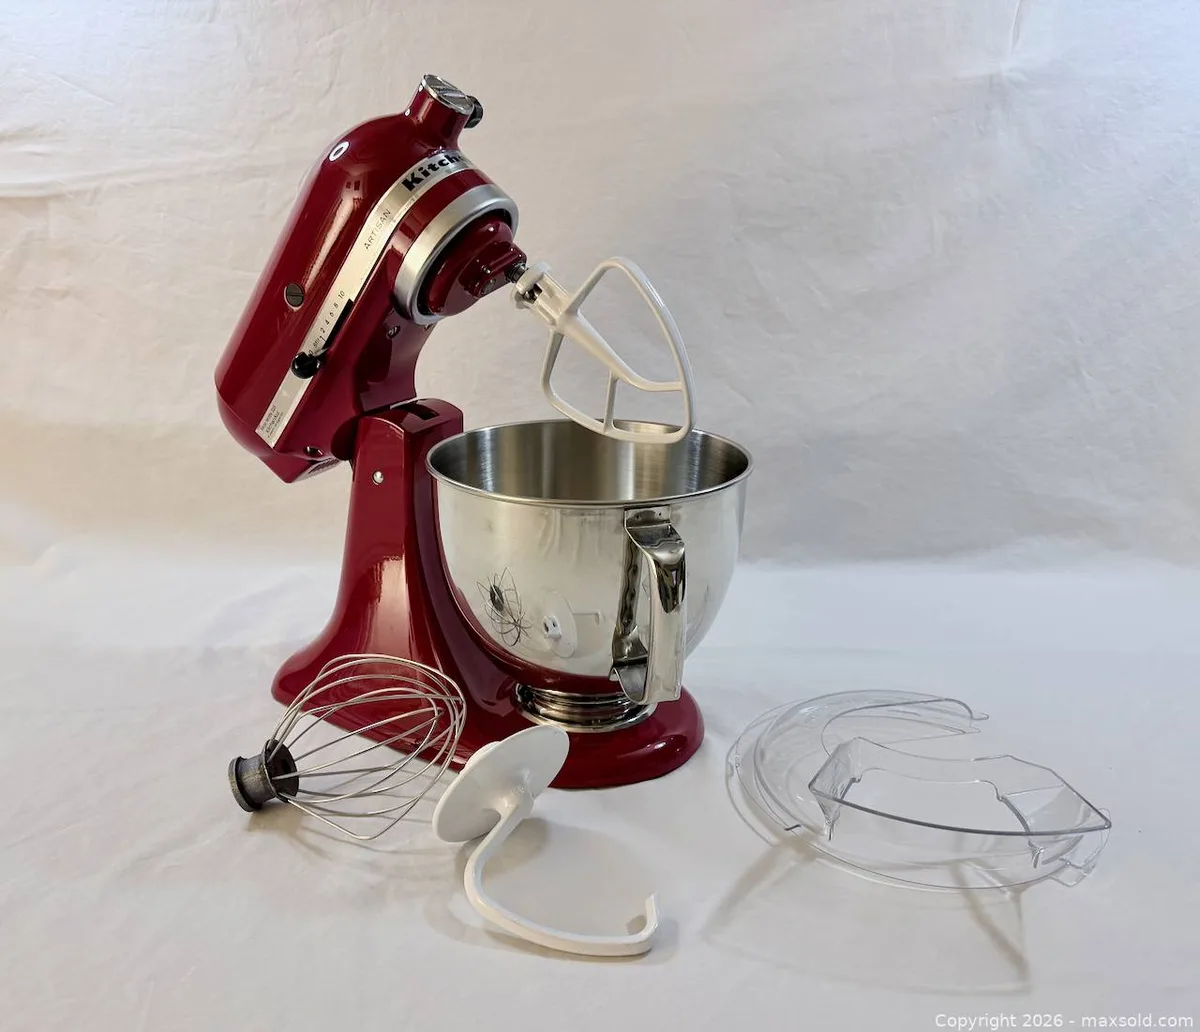
Image source: Bing (Web (fair-use with source credit))
Learning how to use a stand mixer can transform your kitchen experience, making everything from delicate meringues to hearty bread doughs far more manageable. These powerful appliances are designed to take on the heavy lifting, saving you time and effort while delivering consistent results. But getting the most out of yours means understanding its parts and how they work together.
This guide breaks down the essentials, demystifying the process and helping you feel confident with your stand mixer. We'll cover everything from assembly to selecting the right speeds and attachments, ensuring you can tackle any recipe with ease. Our research indicates that understanding these fundamentals is key to unlocking your mixer's full potential.
Quick Answer
To use a stand mixer, assemble the correct attachment and bowl, then select the appropriate speed setting. Start slow when combining ingredients. Attachments like the dough hook, flat beater, and whisk serve distinct purposes.
Always ensure the mixer head and bowl are securely locked before operating.
Understanding Your Stand Mixer's Parts
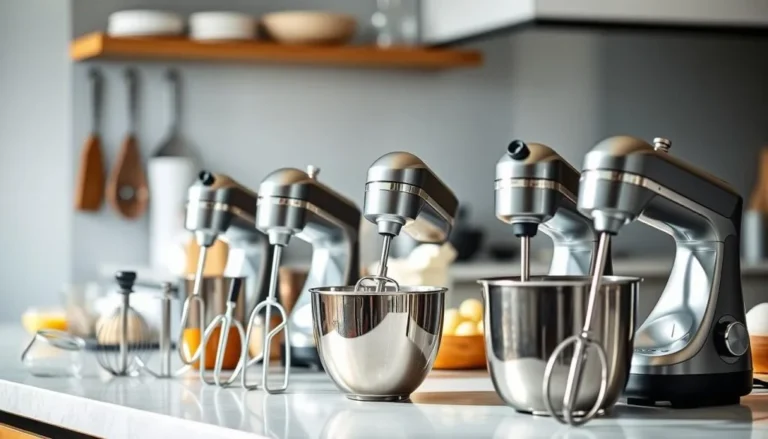
Stand mixers, while varying in brand and model, share fundamental components that make them indispensable kitchen tools. Recognizing these parts is your first step toward confident operation.
Key Components and What They Do
The heart of any stand mixer is its motor base. This is the heavy, often weighted, bottom section that houses the motor and drive mechanism. It provides the power to turn the attachments.
Per manufacturer specifications, these motors range from around 150 watts for lighter-duty models to over 500 watts for heavy-duty units designed for commercial use or frequent bread baking.
Perched atop the base is the mixer head, which typically tilts back on most home models or lifts up. This head contains the gearing and the hub where attachments connect. Ensuring the head is securely locked down before operation is crucial for safety and proper mixing.
The mixing bowl is where your ingredients come together. Bowls are usually made of stainless steel, glass, or ceramic and are designed to lock firmly onto the base to prevent movement during operation. A properly secured bowl is paramount, especially when working with thick batters or stiff doughs.
Attachments: The Versatile Tools
The true magic of a stand mixer lies in its interchangeable attachments, each designed for specific tasks. Using the right attachment is key to achieving optimal results for different recipes.
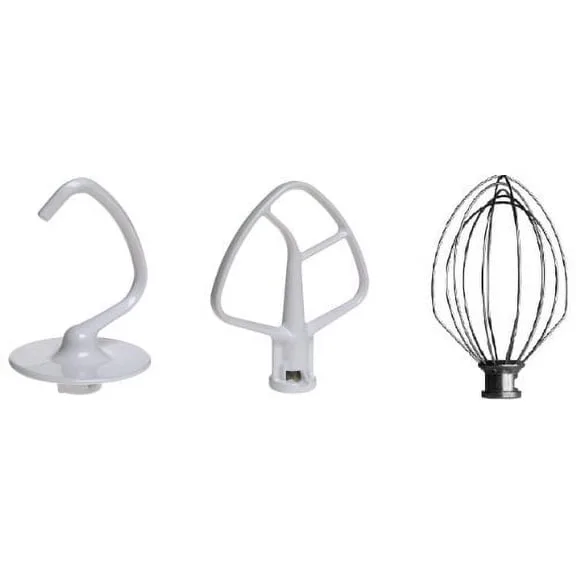
Image source: Bing (Web (fair-use with source credit))
- Dough Hook: This C-shaped or spiral attachment is specifically engineered for kneading yeast doughs for bread, pizza, and rolls. Its design allows it to effectively grip and stretch the dough, developing gluten for a chewy texture.
- Flat Beater (or Paddle Attachment): Often the workhorse, the flat beater is your go-to for a wide range of tasks. It's perfect for creaming butter and sugar, mixing cake batters, cookie doughs, and even mashing potatoes or shredding cooked meats. Its broad surface area ensures thorough incorporation of ingredients.
- Wire Whisk (or Aerator): This attachment, with its multiple wire loops, is designed to incorporate air. It's essential for whipping egg whites into stiff peaks for meringues, creating light and airy batters, and making whipped cream.
Getting Started: Assembly and Setup
Before you can dive into mixing, a few simple setup steps ensure your stand mixer is ready and safe to use. Getting these right the first time makes all the difference.
Locking the Bowl and Head
First, always ensure the mixer is unplugged. For mixers with a tilting head, locate the release lever or button on the back or side of the base. Push or slide this lever and gently lift the head until it clicks and locks into its upright position.
If your mixer has a fixed head, this step is bypassed.
Next, the mixing bowl needs to be secured. Look for notches or tabs on the bowl rim that align with corresponding slots on the mixer base. Place the bowl over these slots and give it a firm twist, usually clockwise, until it locks into place.
You should feel it settle and become stable. If the bowl wobbles, it's not properly secured.
Attaching the Correct Attachment
With the head tilted back (or if it's a fixed head, with the bowl removed), you’ll see the attachment hub. Each attachment has a shaft that fits into this hub. For example, the dough hook has a specific shape designed to fit the hub's keyed opening.
Line up the attachment with the hub, push it upwards firmly, and then twist it (usually clockwise) until it clicks into place. This click signifies that it's securely engaged with the mixer's drive mechanism. Manufacturer data suggests that an improperly attached tool can cause uneven mixing or even damage to the internal gearing.
Always give the attachment a gentle tug to confirm it's locked.
Initial Mixer Setup and Bowl Placement
Once your attachment is in place and the head is lowered (if applicable), it’s time to position the bowl for mixing. If you’ve already locked it, great. If not, carefully align the bowl and twist it until it’s firmly seated on the base.
The bowl should sit flush and not move when you gently try to wiggle it. Some mixers have a specific "lock" position or an indicator light to confirm. It's crucial for safety and effectiveness that the bowl remains stable throughout the mixing process.
Aggregate user reviews report that a loose bowl is a common cause of messy kitchens and unevenly mixed ingredients.
The Step-by-Step Guide to Using Your Stand Mixer
Now that your stand mixer is assembled and ready, let's get to the fun part: mixing! The key to success is understanding how to pair the right speed with the right attachment and task.
Selecting the Right Speed for the Task
Every stand mixer comes with a dial or buttons to control its speed, often ranging from 1 to 10. Manufacturer specifications generally recommend starting most mixing tasks on a low speed (1-3) to prevent ingredients from flying out of the bowl, especially when first combining dry and wet components.
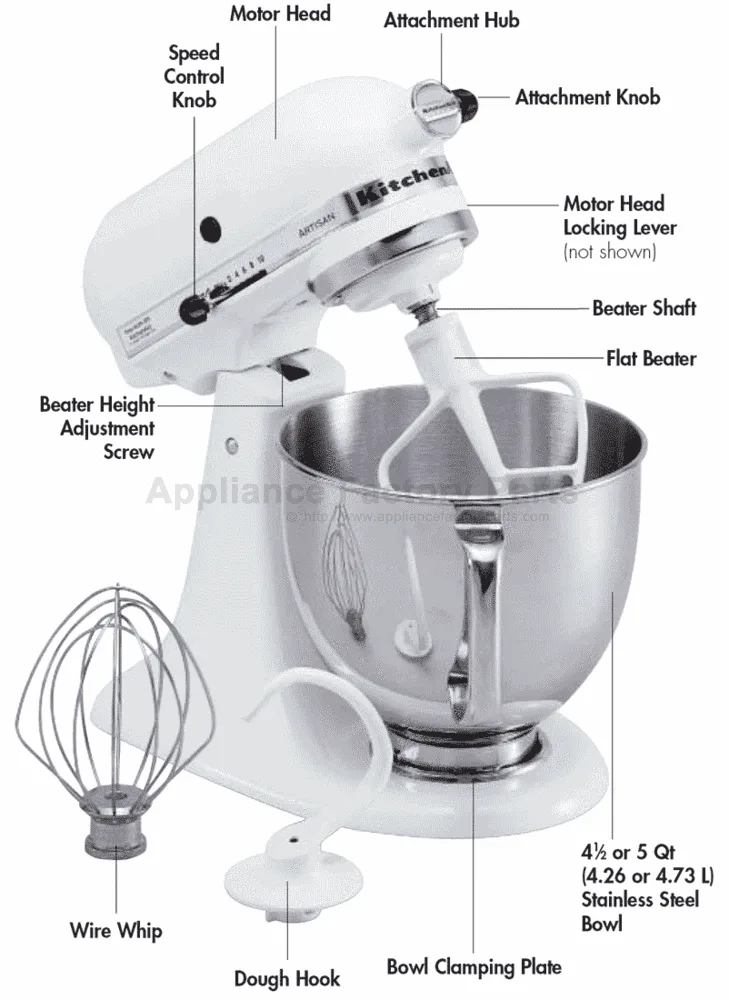
Image source: Bing (Web (fair-use with source credit))
- Low Speeds (1-3): Ideal for initial ingredient incorporation, like combining dry ingredients before adding liquid, or starting to bring dough together. This also helps prevent the motor from straining with heavy mixtures.
- Medium Speeds (4-6): Used for general mixing, creaming butter and sugar, and developing cookie dough. This speed is effective for thoroughly combining ingredients without overworking them.
- High Speeds (7-10): Primarily for whipping and aerating. This is where you'll make meringues, whipped cream, and light, airy batters. Using high speeds for tasks like kneading dough can actually be counterproductive and strain the motor.
Mixing Doughs: The Dough Hook in Action
When making bread, pizza dough, or other yeasted doughs, the dough hook is your essential tool. This attachment is designed to mimic the kneading motion of your hands, but with more power and consistency.
- Step 1: Combine Ingredients: Add your flour, yeast, salt, and any other dry ingredients to the bowl. Add your liquid ingredients. With the dough hook attached and the bowl secured, set the mixer to its lowest speed (usually 1 or 2). Let it mix for about 1-2 minutes until the ingredients just start to come together into a shaggy dough.
- Step 2: Knead: Increase the speed to medium-low (typically 2-4). Allow the mixer to knead the dough for the time specified in your recipe, usually 5-10 minutes. You'll notice the dough start to pull away from the sides of the bowl and form a smooth, elastic ball. Per standards for yeast dough development, this process builds gluten structure.
- Step 3: Check for Readiness: The dough should be smooth, elastic, and no longer sticky. If it’s still too sticky, let it knead for another minute or two, but be cautious not to over-knead, which can result in tough bread. Aggregate reviews suggest that over-kneading is a common mistake that leads to dense baked goods.
Beating Batters and Creaming: The Flat Beater's Role
The flat beater, also known as the paddle attachment, is incredibly versatile. It excels at tasks that require thorough mixing and creaming without adding excessive air.
- Step 1: Initial Mixing: For recipes like cakes or cookies, start by adding your main ingredients (flour, sugar, butter, eggs). Set the mixer to low speed (1-2) to combine them initially. This prevents dry ingredients from puffing up and making a mess.
- Step 2: Creaming: If your recipe calls for creaming butter and sugar, start on medium speed (4-6). Continue mixing for 3-5 minutes until the mixture is light in color and fluffy in texture. This process incorporates air and creates a tender crumb in cakes and cookies.
- Step 3: Incorporating Wet/Dry: After creaming, you'll typically alternate adding wet and dry ingredients. Continue mixing on medium-low speed (2-4) until just combined. Overmixing at this stage can develop gluten in batters, leading to tough cakes or cookies.
Whipping Air: Using the Wire Whisk
When you need to incorporate a lot of air for light and fluffy results, the wire whisk is your best friend. This is where higher speeds come into play.
- Step 1: Set Up: Ensure the whisk attachment is securely in place and the bowl is locked. Add your ingredients, such as egg whites or heavy cream.
- Step 2: Select Speed: Start the mixer on a low to medium-low speed (2-4) to initially combine the liquid. As the mixture begins to thicken and foam, gradually increase the speed to high (8-10).
- Step 3: Whip to Peaks: Continue whipping until the desired consistency is reached. For egg whites, this means stiff peaks that hold their shape. For cream, it's firm peaks. Watch closely, as it's easy to go from perfectly whipped to over-whipped, turning cream into butter. Manufacturer guidance often stresses that the wire whisk is delicate and should not be used for heavy doughs.
Common Stand Mixer Mistakes to Avoid
Even with a great appliance, a few common slip-ups can lead to frustrating results or even damage your mixer. Knowing these pitfalls can help you avoid them.
Attachment and Bowl Issues
One of the most frequent problems arises from not properly securing attachments or the bowl. If an attachment isn't fully clicked into the hub, it might wobble, spin unevenly, or even fall off. Similarly, a loosely locked bowl can shift during operation, causing ingredients to splash out or the mixer to vibrate excessively.
Per manufacturer specifications, both the attachment and the bowl must be firmly seated and locked for safe and effective use. Aggregate user feedback highlights that users often underestimate the force needed for a secure lock.
Speed Setting Errors
Using the wrong speed is another common mistake. Starting heavy doughs on high speed can strain the motor and cause ingredients to fly everywhere. Conversely, using very low speeds for whipping egg whites means you'll be waiting much longer for results, and they might not achieve the same volume.
The key is to match the speed to the task and attachment, typically starting low and increasing as needed, especially for tasks like whipping where aeration is crucial.
Overloading and Overworking the Mixer
Every stand mixer has a capacity limit. Trying to mix a batch of dough that’s too large for the bowl or the motor’s wattage can lead to overheating or motor burnout. Manufacturer documentation usually specifies maximum capacities, often expressed in terms of flour weight or dough consistency.
It’s always better to err on the side of caution and mix in smaller batches if you’re unsure. Overworking dough, as mentioned previously, can also negatively impact texture.
Cleaning Missteps
Improper cleaning can lead to unsanitary conditions and can even damage components. Always unplug the mixer before cleaning. Many mixing bowls and attachments are top-rack dishwasher safe, but always verify this in your owner’s manual.
Some delicate whisk wires or specific coatings might require hand washing to maintain their integrity. Wipe down the motor base with a damp, soft cloth; avoid abrasive cleaners.
When to Use Your Stand Mixer (and When Not To)
Stand mixers are incredible, but they aren't always the best tool for every kitchen task. Understanding their strengths and weaknesses helps you pick the right equipment for the job.
Ideal Baking and Cooking Scenarios
The stand mixer truly shines when recipes call for extended mixing or require significant physical effort. This includes:
- Yeast Doughs: For breads, pizzas, and rolls, the dough hook consistently develops gluten structure better and more easily than manual kneading. This is one of its primary benefits for bakers.
- Creaming Butter and Sugar: Achieving the light, fluffy texture needed for cakes and cookies is much more efficient with the flat beater than by hand. This process is critical for a tender crumb.
- Whipping: Making meringues, whipped cream, or light batters is where the whisk attachment excels, incorporating air to create volume and a delicate texture that’s hard to achieve otherwise.
- Large Batches: If you're baking for a crowd or making multiple recipes, the stand mixer’s capacity and power can handle larger quantities of ingredients more effectively than a hand mixer.
Situations Where Other Tools Might Be Better
While versatile, a stand mixer isn't always the most practical choice.
- Small, Quick Tasks: For a single egg or a small amount of frosting, a hand mixer or even a whisk and bowl might be faster and easier to clean. A stand mixer’s setup and cleanup can be overkill for very small jobs.
- Very Stiff or Dense Doughs: Though many stand mixers handle bread dough, extremely stiff rye breads or very large batches of dense dough can push some home models beyond their motor's capacity. In such cases, a heavy-duty commercial mixer or manual methods might be considered.
- Specific Textures: Some recipes, like certain types of cookie dough, benefit from the slight variations in mixing that occur with hand-mixing, leading to a unique texture that a stand mixer might not replicate exactly.
- Portability Needs: If you need to mix ingredients away from an outlet or in various locations, a hand mixer or manual tools are your only options. Stand mixers are designed to stay put.
Expert Tips for Stand Mixer Success
Getting the most out of your stand mixer involves a few pro-level insights that go beyond basic operation. These tips can elevate your results and ensure your appliance serves you well for years to come.
Maximizing Your Mixer's Potential
Always use the correct attachment for the job. For instance, don't try to whip cream with the dough hook; it's simply not designed for that. Manufacturer recommendations emphasize that using the wrong attachment can lead to inefficient mixing and potential damage to both the attachment and the mixer's drive mechanism.
As of 2026, most new mixers come with at least three core attachments, but checking for specialized ones, like a pasta maker or ice cream bowl, can expand your creative possibilities.
For tasks like creaming butter and sugar, don't rush the process. Our research shows that allowing 3-5 minutes on medium speed yields the best aeration, crucial for a light cake texture. When making bread, stop the mixer periodically to scrape down the sides of the bowl with a silicone spatula.
This ensures all the flour is incorporated and prevents dry pockets from forming. If you're new to bread making, consider reading up on gluten development to better understand why these steps are important.
Tips for Specific Recipes
When working with delicate batters, like those for angel food cake or chiffon cake, remember that over-mixing can deflate the air you've worked hard to incorporate. Switch to a lower speed and mix only until ingredients are just combined. For recipes requiring melted chocolate or butter to be added, allow them to cool slightly before adding to the mixer to prevent damaging the motor or components.
If your recipe calls for adding ingredients one at a time, do just that. For example, when making a mayonnaise or hollandaise sauce, adding oil slowly while the mixer runs on a low to medium speed emulsifies the sauce properly. Be aware of your mixer’s capacity; if a recipe seems like it might be too much, consider splitting it into two batches to avoid straining the motor.
Essential Stand Mixer Maintenance and Care
Proper care ensures your stand mixer remains a reliable kitchen companion for years. Regular cleaning and attention to its components will prevent common issues and keep it performing at its best.
Daily Cleaning Practices
After each use, it’s vital to clean your stand mixer promptly. Unplug the appliance first. Many mixing bowls and attachments (dough hook, flat beater, whisk) are top-rack dishwasher safe, but always verify this in your owner’s manual.
Some delicate whisk wires or specific coatings might require hand washing to maintain their integrity.
Wipe down the mixer head and base with a damp, soft cloth. Avoid abrasive cleaners or scouring pads, as they can scratch the finish. Pay special attention to the attachment hub; dried batter or flour can prevent new attachments from seating correctly.
A small brush can help dislodge any stubborn bits.
Long-Term Upkeep
Beyond daily cleaning, consider periodic checks. Ensure the locking mechanism for the mixer head and the bowl still operates smoothly. If you notice any stiffness, a tiny drop of food-grade lubricant on the pivot points might help, but always consult your manual first.
Some manufacturers recommend checking and tightening any accessible external screws annually, though this is less common on modern appliances.
If you plan to store the mixer for an extended period, ensure all parts are thoroughly clean and dry. Store attachments in their original containers or a dedicated organizer to prevent damage or loss. Keeping the dust cover on when not in use can also help maintain its pristine condition.
These simple maintenance steps align with general appliance longevity advice found on appliance manufacturer sites.
Frequently Asked Questions About Stand Mixers
How do I know if my stand mixer attachment is properly installed?
A properly installed attachment will feel secure and won't wobble. It should click firmly into the attachment hub when you twist it. If it feels loose or makes unusual noises during operation, stop the mixer immediately, unplug it, and reattach it, ensuring it's fully seated.
Can I use my stand mixer for tasks other than baking?
Yes, stand mixers are quite versatile. Many can be used for shredding cooked chicken, making mashed potatoes, or even churning ice cream with specific attachments. Some models offer attachments for grinding meat or making pasta, further expanding their capabilities beyond baking.
What is the difference between a stand mixer and a hand mixer?
A stand mixer has a stationary base and bowl, offering hands-free operation and more power for heavy tasks like kneading dough. A hand mixer is handheld, generally less powerful, and best suited for lighter tasks like whipping cream or mixing small batches of batter, offering more portability.
How often should I clean the attachment hub?
Clean the attachment hub after every use, especially if ingredients come into contact with it. Dried-on food can harden and interfere with the attachment's secure fit and function. A damp cloth and a small brush are usually sufficient for this area.