How to Use a Stand Mixer Whisk
So, you've got a stand mixer, and you're ready to whip up some magic. That whisk attachment is your secret weapon for anything needing a light, airy texture. But how do you actually use it to get those perfect peaks every single time?
Understanding how to properly attach and operate your stand mixer whisk is key. You'll want to know the right speeds and watch for visual cues, as manufacturer specifications often point to specific speed ranges for optimal aeration. Getting this right makes a world of difference in your baking results.
Quick Answer
To use a stand mixer whisk, attach it securely to the mixer. Start on a low speed, then gradually increase to medium-high or high. Watch the mixture for desired volume and texture, stopping promptly once achieved.
Ensure the bowl and whisk are clean for best results.
Understanding Your Stand Mixer Whisk
What's the Whisk For, Anyway?
The whisk attachment for your stand mixer is specifically designed to do one thing really well: incorporate air. It's built with numerous thin wires, often in a balloon-like shape, that rapidly spin to create a vortex and whip air into your ingredients. This makes it indispensable for recipes that require a light, voluminous base.
Think fluffy whipped cream, delicate meringues, or even just making your batters a little airier for lighter cakes and pancakes. If your recipe calls for "whipped" or "foamy," this is the attachment you’ll reach for.
Why Visuals Matter for Using Your Whisk
While you can read about how to use a stand mixer whisk, many of the critical indicators for success are visual. For instance, the difference between soft peaks and stiff peaks in whipped cream or egg whites is best understood by seeing it. Similarly, how the whisk sits in the bowl, the way ingredients move, and the gradual build-up of volume are all visual cues that help you achieve perfect results.
Without seeing these stages, it's easy to over or under-mix, leading to less-than-ideal outcomes.
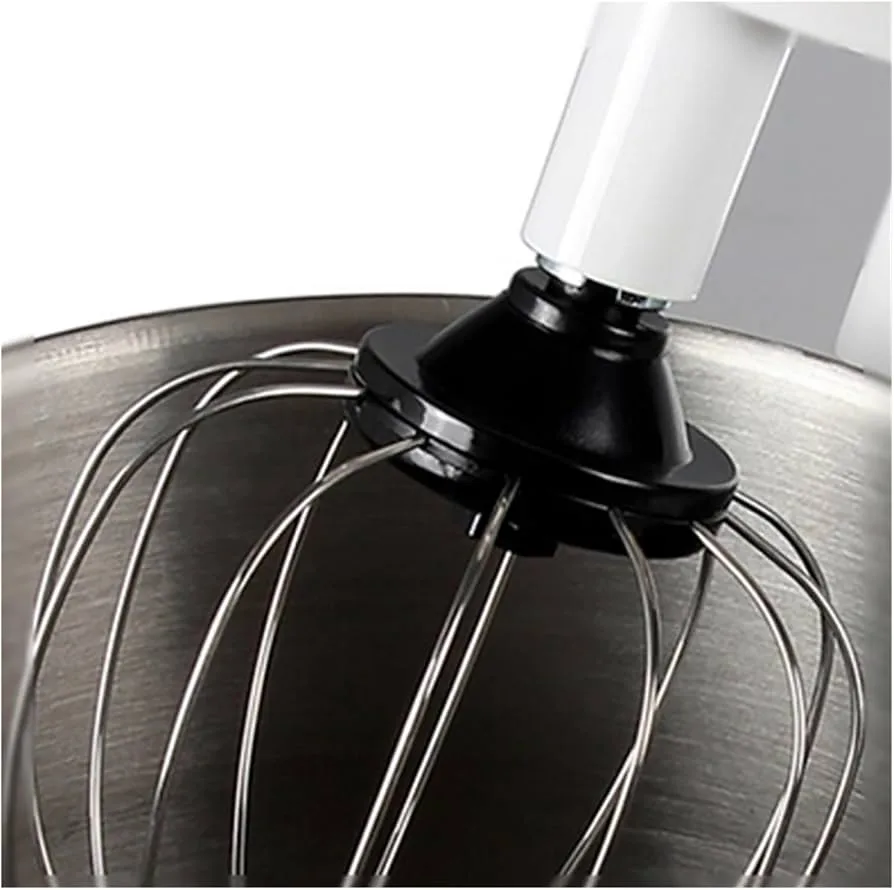
Image source: Bing (Web (fair-use with source credit))
Attaching Your Whisk: The First Step
Getting the whisk attachment onto your stand mixer is straightforward, but doing it safely and correctly is important. Most manufacturers design their attachments to click into place easily, but always make sure the mixer is powered off and unplugged before you begin. This prevents accidental starts and keeps you safe.
How to Safely Attach the Whisk
Here’s the process, which is pretty universal across most major stand mixer brands:
- Power Down: Ensure your stand mixer is completely unplugged from the wall outlet or that the power switch is in the OFF position. This is non-negotiable for safety.
- Access the Drive Shaft: Tilt the mixer head back if your model has a tilt-head design. If it's a bowl-lift model, lower the bowl mechanism so you have clear access to where the attachment connects.
- Align and Insert: Take your whisk attachment and find the corresponding slot or keyway on the mixer's drive shaft. These are shaped to only allow the attachment to go in one way. Push the whisk straight up into the shaft until it locks. You might hear or feel a click.
- Secure (If Applicable): Some mixers have a small screw or locking mechanism that secures the attachment. Consult your mixer's manual to see if this applies to your model and tighten it gently if needed.
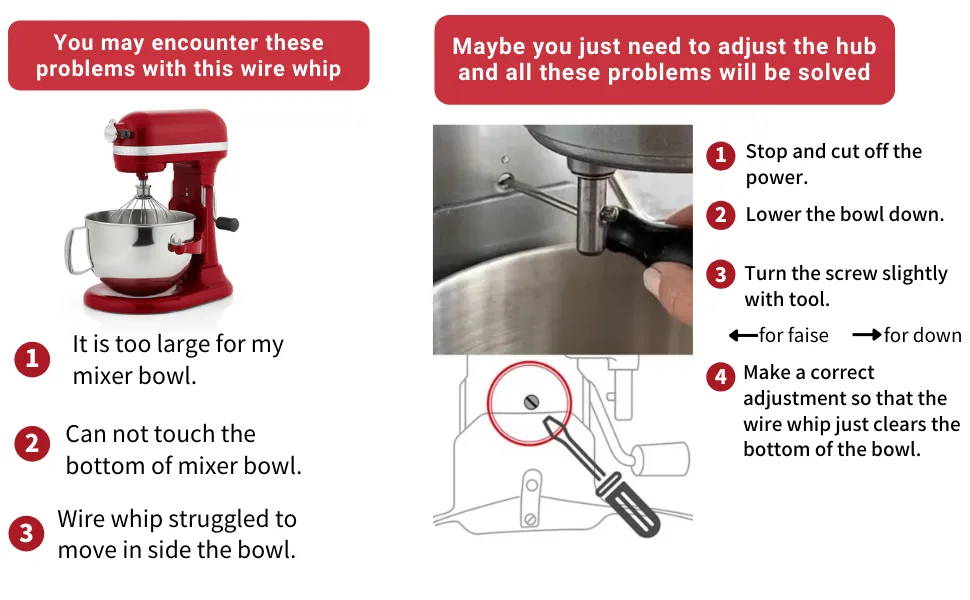
Image source: Bing (Web (fair-use with source credit))
Whipping Like a Pro: The Step-by-Step Process
Once the whisk is attached, it's time to get to work. The key to successful whipping with a stand mixer lies in using the correct speeds and knowing when to stop. This isn't a "set it and forget it" kind of operation; it requires a bit of attention.
Start Slow, Then Speed Up
Always begin by attaching the bowl and setting your mixer to its lowest speed. This initial slow mix helps to evenly coat the ingredients with the whisk and prevents a sudden, messy explosion of liquid or powder. As the mixture starts to foam or thicken, you can then gradually increase the speed.
For most whipping tasks, like cream or egg whites, a medium-high to high speed is optimal for incorporating the maximum amount of air.
Monitoring Consistency: What to Look For
This is where visuals are critical. As you whip, pay close attention to how the mixture changes. It will go from liquid to foamy, then begin to thicken and hold its shape.
For whipped cream, you're looking for stages that range from soft, droopy peaks to stiff, upright peaks that don't fall out of the bowl when tilted. Egg whites follow a similar progression, but they can become dry and clumpy if over-whipped.
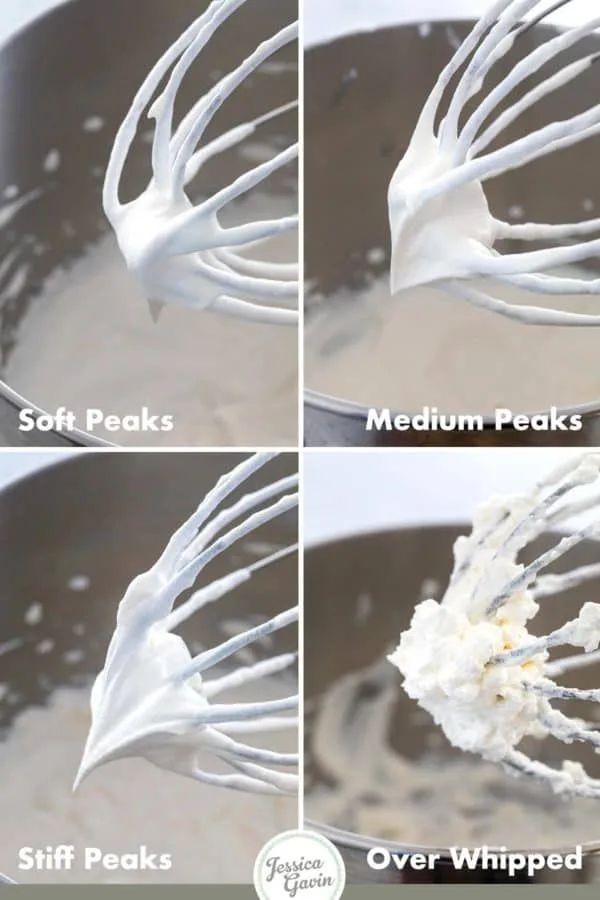
Image source: Bing (Web (fair-use with source credit))
Knowing When to Stop
This is the most common pitfall for home bakers. Over-whipped cream turns grainy and eventually separates into butter and buttermilk. Over-whipped egg whites become dry, brittle, and difficult to incorporate into other ingredients.
As of 2026, manufacturer guidelines typically recommend stopping as soon as the desired consistency is reached. For soft peaks, the whisk should leave a slight droop when lifted. For stiff peaks, the mixture should stand straight up without bending.
Trust your eyes; stopping at the right moment is crucial for texture.
Common Whisking Mistakes to Avoid
Even with the right attachment, a few common errors can derail your efforts. Being aware of these pitfalls can save you time, ingredients, and a lot of frustration.
The Splatter Zone
One of the biggest culprits for messy kitchens is starting the mixer on too high a speed with liquid ingredients. This causes immediate splattering all over your countertops and yourself. Always start on the lowest speed setting and only increase it once the ingredients have begun to combine and thicken.
This gives the whisk a chance to work without flinging everything out of the bowl.
The Over-Whipped Trap
As mentioned, over-whipping is a major issue, particularly with whipped cream and egg whites. It's easy to get distracted and let the mixer run a minute too long.
- Whipped Cream: Goes from fluffy to grainy and buttery.
- Egg Whites: Become dry, clumpy, and can weep liquid.
- Meringues: If over-whipped, they can result in a brittle, dense texture rather than a light, airy one.
It's better to stop slightly before you think you're done, then check the consistency. You can always whip for another 30 seconds, but you can't un-whip.
Best Uses for Your Stand Mixer Whisk
The versatility of the whisk attachment extends across several popular baking and dessert applications, making it a frequently used tool for many home cooks.
Perfecting Whipped Cream
Achieving beautifully whipped cream from scratch is one of the whisk attachment's most celebrated uses. Start with cold heavy cream (at least 30-35% fat content). As the mixer runs on a medium-high speed, the whisk incorporates air, increasing the cream's volume and creating a stable foam.
You'll transition from liquid to foamy, then to soft peaks (which hold a shape but curl over), and finally to stiff peaks (which stand straight up). It's crucial to stop at the right moment to avoid creating butter. This process typically takes only a few minutes, far quicker than hand-whipping.
Airy Egg Whites and Meringues
Whipping egg whites is another prime task for the stand mixer whisk. For optimal volume, ensure the egg whites are at room temperature and that your bowl and whisk are spotlessly clean and free of any grease. Even a tiny bit of fat can prevent egg whites from reaching their full volume.
As the mixer works, the whites will go from clear and watery to foamy, then opaque, forming soft peaks, and finally stiff peaks. This forms the airy base for everything from angel food cakes to classic meringues.
Lightening Up Batters
Beyond just whipping, the whisk attachment can be used to add a bit of lightness to certain batters. For example, when making pancake or waffle batter, you might use the whisk for a short period after adding the wet and dry ingredients. This helps to combine everything without overdeveloping the gluten, which can lead to tough baked goods.
It introduces just enough air to give your finished product a tender crumb.
Caring for Your Whisk Attachment
Keeping your whisk attachment in good shape is pretty simple, and it ensures it performs well for years. The main things to focus on are proper cleaning and storage. Most whisk attachments are made from durable stainless steel or a similar material that's designed to be washed.
After each use, it's best to wash the whisk immediately. You can usually just rinse it under hot water with a little dish soap, using a soft brush to get into all the wires if needed. Some are also top-rack dishwasher safe, but it's always a good idea to check your specific model's manual.
Letting ingredients dry onto the wires can make them harder to remove later. Once it's clean and dry, store it in a dry place, often directly in the stand mixer's bowl or in a designated accessory compartment if your mixer has one.
Frequently Asked Questions About Stand Mixer Whisks
How long does it take to whip cream with a stand mixer whisk?
Typically, whipping heavy cream to stiff peaks takes anywhere from 2 to 5 minutes on a medium-high to high speed. The exact time depends on the cream's fat content, its temperature, and your mixer's power.
Can I use the whisk attachment for other ingredients besides cream and egg whites?
Yes, the whisk is great for making meringues and other airy foams. It can also be used to lightly aerate batters for things like pancakes or waffles. For thicker mixtures, like cookie dough or cake batter, you'll want to switch to the flat beater attachment instead.
What should I do if my whisk attachment isn't working correctly?
First, double-check that it's attached securely and that the mixer is powered on. If ingredients are still not whipping, ensure your bowl and whisk are clean and free of grease, especially for egg whites. If the mixer sounds like it's straining, you might have too much in the bowl, or the mixture is too thick for the whisk at that speed.
Refer to your mixer's troubleshooting guide for more specific issues.