How to Use a Hand Mixer
Figuring out how to use a hand mixer might seem straightforward, but a few key steps can make the difference between a perfectly blended batter and a kitchen disaster. Whether you're a seasoned baker or just starting out, understanding the basic functions and potential pitfalls is crucial for success. We'll walk you through everything you need to know to get the best results.
Manufacturer specifications confirm that most electric hand mixers offer variable speeds, typically ranging from 1 to 5 or even 1 to 10, allowing for precise control over mixing intensity. Knowing how to leverage these settings, along with the right attachments, is the first step toward confident and effective use. Let's dive into the details so you can whip up anything with ease.
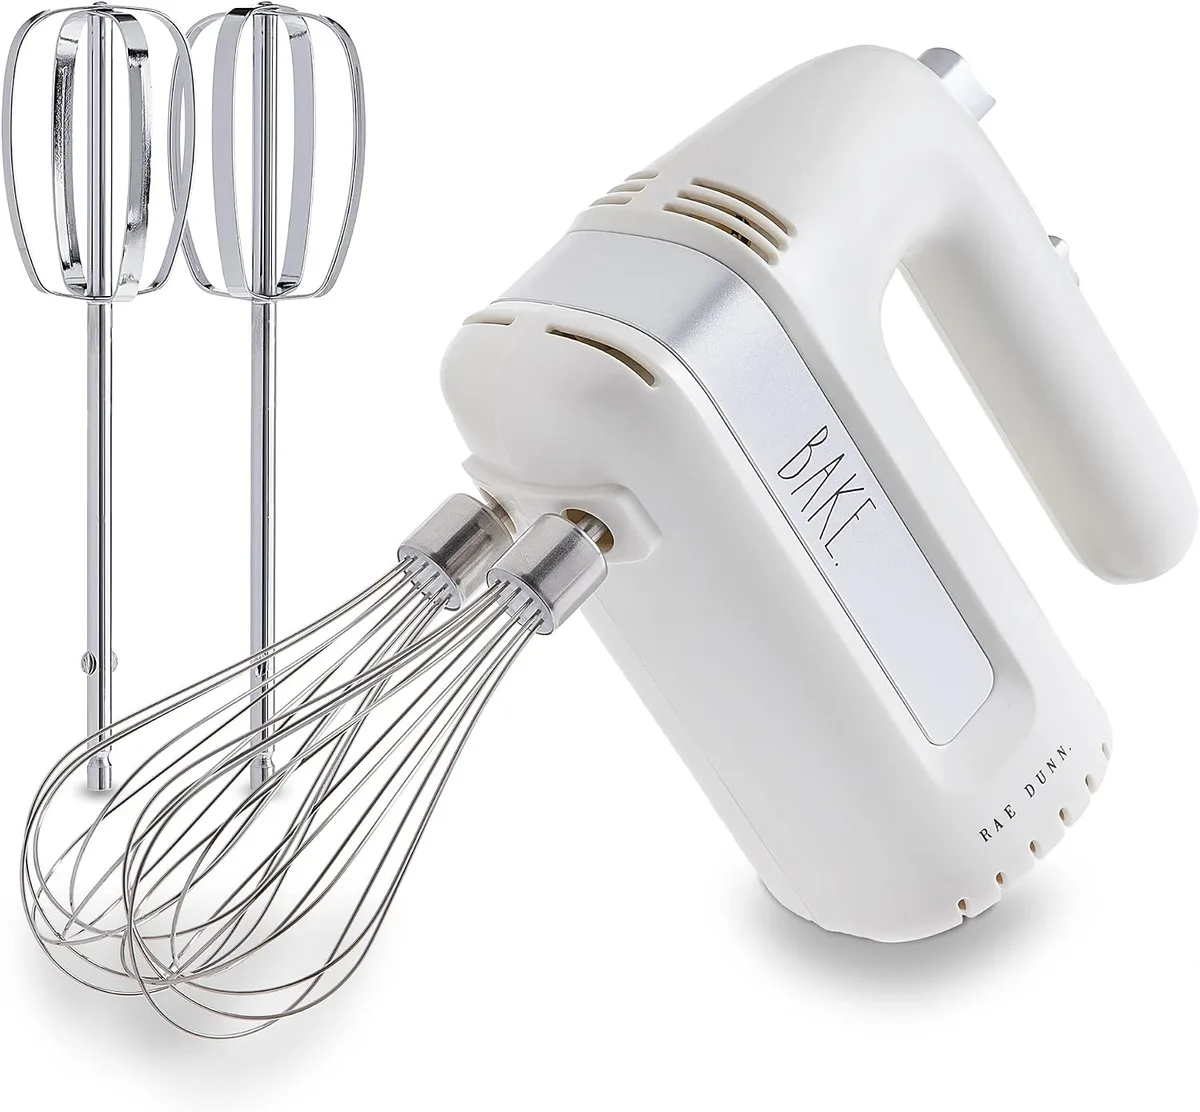
Image source: Bing (Web (fair-use with source credit))
Quick Answer
To use a hand mixer, attach the correct beaters, start on the lowest speed setting, and gradually increase. Always scrape down the bowl between mixing cycles and unplug before removing attachments. Proper cleaning prevents future issues.
Why Visuals Matter for Hand Mixer Mastery
When it comes to getting the most out of your kitchen gadgets, sometimes words just aren't enough. For a hand mixer, seeing how things work can really clear things up. Visuals help you understand the feel of the batter, the correct angle to hold the mixer, and the exact way attachments click into place.
Understanding the Beaters, Hooks, and Whisk
Your hand mixer likely comes with a few different attachments, each designed for a specific job. Knowing what each one does is key to picking the right tool for your recipe. This variety is what makes a hand mixer so versatile for different culinary tasks.
- Beater Attachments: These are the most common. They're typically made of metal and have a flat, paddle-like design with openings. Their primary role is in tasks like creaming butter and sugar, mixing cake batters, or combining dry and wet ingredients for cookies and muffins. They create a smooth, consistent blend without overworking the mixture.
- Dough Hook Attachments: If your mixer includes these, they're heavier and have a spiral or C-shape. Their purpose is to handle thicker, stiffer doughs, like those for bread or pizza. They knead the dough by pulling it down and folding it over, working the gluten more effectively than standard beaters.
- Whisk Attachment: Some models come with a balloon whisk, which features many thin wires forming a bulbous shape. This attachment is fantastic for incorporating air into liquids. It's ideal for whipping egg whites into stiff peaks for meringue, or for making whipped cream light and airy.
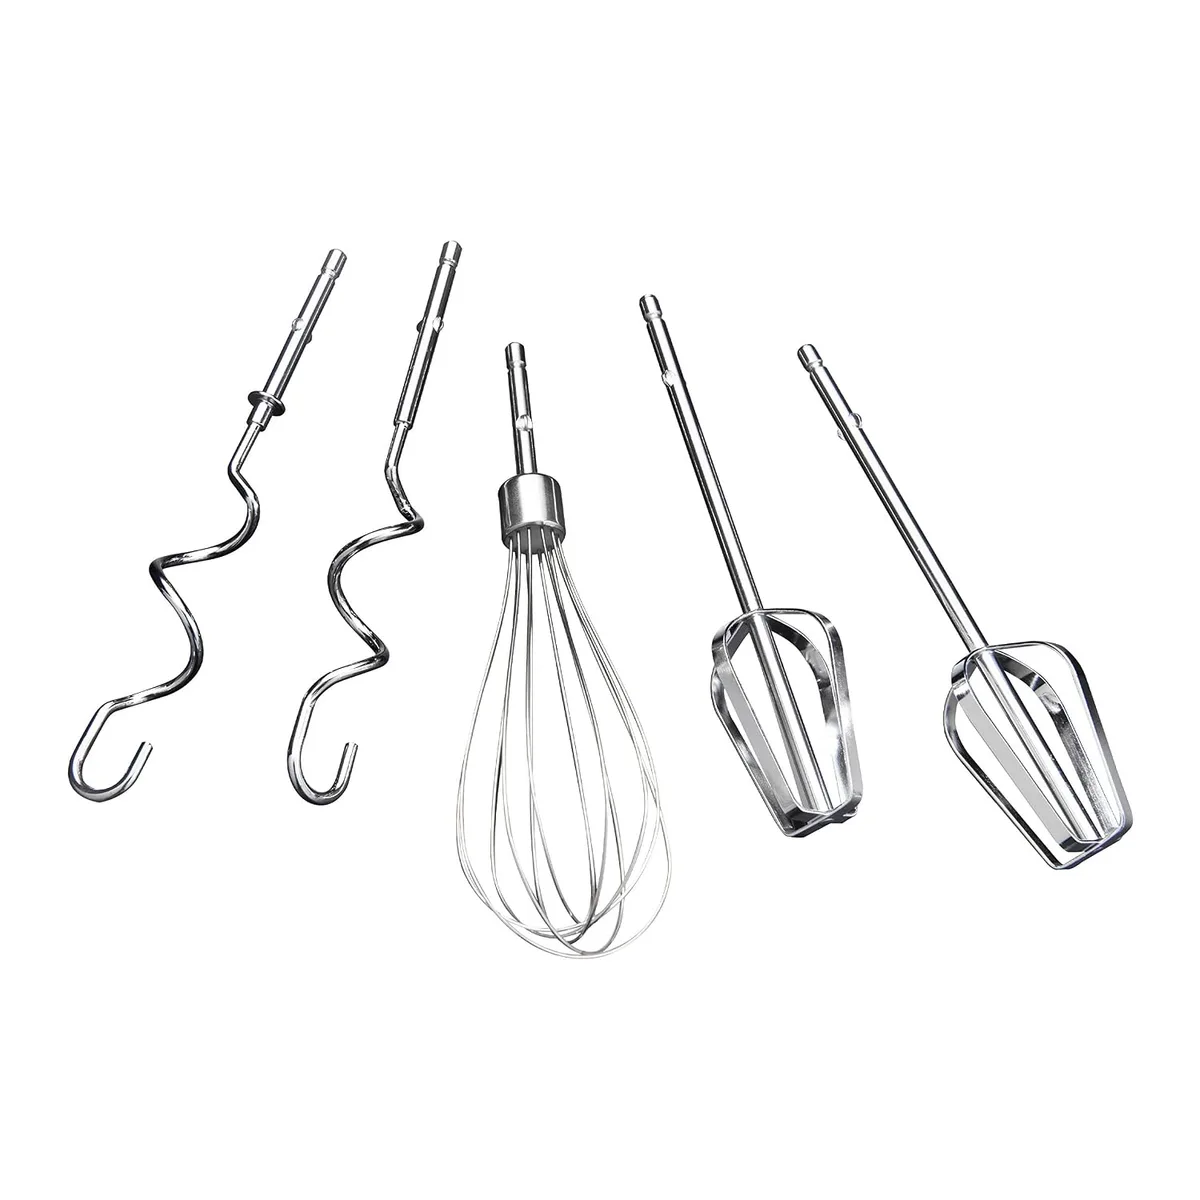
Image source: Bing (Web (fair-use with source credit))
Using the wrong attachment can lead to poor results or even damage your mixer. For example, attempting to knead bread dough with standard beaters will likely result in a mess and won't develop the gluten properly. Conversely, using dough hooks for delicate cake batter would likely be too aggressive and make the cake tough.
Step-by-Step: Getting Your Hand Mixer Ready
Preparing your hand mixer is a simple process, but doing it correctly ensures safety and efficiency. It's about making sure the right tool is in place and ready for action before you even think about turning it on. This initial setup is fundamental to avoiding common frustrations.
Attaching the Right Tools for the Job
First, identify which attachment your recipe requires. For most general baking, you'll use the standard beaters. If you're making bread, look for the dough hooks.
For something light like whipped cream or meringue, the whisk is your best bet.
- Locate the Slots: Examine the bottom of your hand mixer's motor unit. You'll see one or two slots designed to receive the attachment's shaft.
- Align and Insert: Take your chosen attachment and align its shaft with the corresponding slot on the mixer. They're usually designed to fit only one way, so if it doesn't slide in easily, try rotating it.
- Secure the Attachment: Gently push the attachment into the slot until you hear or feel a distinct "click." This indicates that the attachment is properly locked into place. It's vital that the attachment is fully secured before you power on the mixer; a loose attachment can fly out or cause damage.
Manufacturer specifications often highlight the importance of this secure locking mechanism for safe operation. For instance, some brands confirm that their ejector mechanisms require the attachment to be fully seated before they can be released.
Plugging In and Powering Up Safely
Once your attachments are securely in place, it's time to connect the mixer to a power source. This step also requires a bit of awareness to prevent accidents.
- Clear the Area: Ensure the area around your mixing bowl and the mixer itself is clear. You don't want the cord to get tangled with anything, especially the beaters.
- Plug In: Insert the mixer's plug into a grounded electrical outlet. Keep the cord routed so it doesn't hang where it could be easily pulled or snagged.
- Position the Mixer: Place the mixer and bowl on a stable, flat surface. Make sure the beaters are inside the bowl, resting on the bottom, before you turn it on.
Mastering the Mix: Speed, Technique, and Bowl Scraping
This is where the real action happens. Your hand mixer’s speed settings and how you move it around the bowl are crucial for achieving the perfect consistency. Don't underestimate the power of a slow start and a good scrape.
Starting Slow: Avoiding the Flour Cloud
This is probably the most critical piece of advice for anyone learning how to use a hand mixer. If you have dry ingredients in your bowl, especially flour, starting on a high speed is a recipe for disaster. You'll end up with a cloud of flour coating your kitchen and yourself.
- Always Begin at Low Speed: No matter what you're mixing, always start your hand mixer on its lowest speed setting. This allows the ingredients to begin combining gently without sending dry powders airborne.
- Gradual Increase: Once the ingredients have started to incorporate and there's no longer a significant risk of a flour explosion, you can then gradually increase the speed to what your recipe requires. This controlled approach ensures everything gets mixed evenly and efficiently.
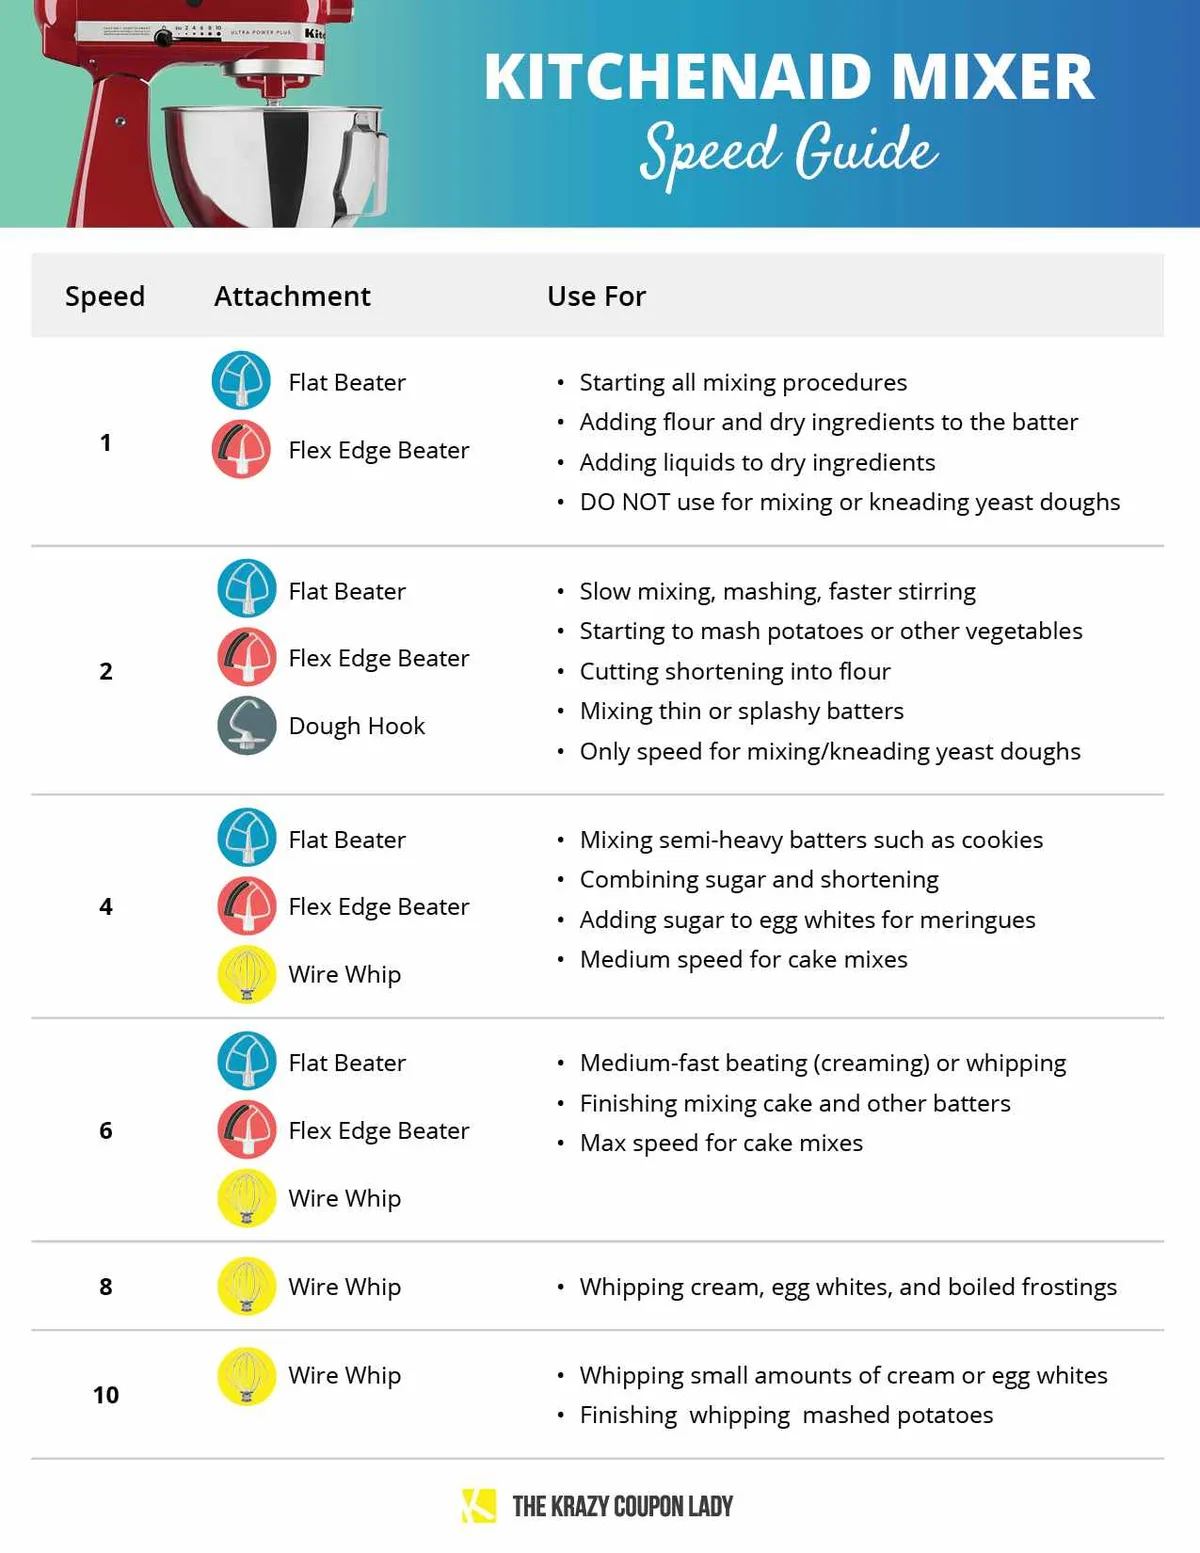
Image source: Bing (Web (fair-use with source credit))
Aggregate user reviews consistently report that beginners often overlook this step, leading to messy kitchens and unevenly mixed batters. Manufacturer guides also emphasize starting on low, citing it as a primary safety and performance recommendation. For example, typical user feedback indicates that it takes only a few seconds on high speed to disperse dry ingredients widely.
Finding the Sweet Spot: Speed and Movement
Hand mixers are designed to do more than just spin; they're meant to create a consistent blend. How you use that spinning power makes a big difference.
- Match Speed to Task: Different recipes call for different mixing intensities. Creaming butter and sugar often requires a medium to medium-high speed to create a fluffy base. Whipping cream or egg whites benefits from high speeds to incorporate air effectively. Always check your recipe for specific speed recommendations.
- Constant Motion: Don't just let the beaters sit in one spot. Move the mixer around the bowl, both horizontally and vertically. Tilt the bowl slightly to help the beaters reach all areas. This ensures no dry pockets remain and the mixture is uniform throughout. Think of it like a gentle massage for your batter, ensuring every part gets worked.
The Crucial Step: Scraping Down the Bowl
Even with careful movement, some ingredients tend to stick to the sides and bottom of the mixing bowl. This is where the often-overlooked but vital step of scraping down the bowl comes in.
- Turn Off and Unplug: Always turn off your hand mixer and unplug it before you reach into the bowl. Safety first!
- Scrape Thoroughly: Use a rubber or silicone spatula to scrape down the sides of the bowl, ensuring any accumulated batter or dry ingredients are brought back into the main mixture. Don't forget the bottom and any crevices where ingredients might hide.
- Resume Mixing: Once you've scraped, you can plug the mixer back in and continue mixing, often on a slightly higher speed, to incorporate these newly added ingredients.
You may need to repeat this scraping process a few times during mixing, especially as your batter thickens or as you approach the final stages of combining ingredients. This thoroughness guarantees that your final product is evenly mixed and free from unblended pockets.
Common Hand Mixer Mistakes and How to Sidestep Them
Even with the best intentions, it's easy to run into a few snags when using a hand mixer. These common issues usually stem from not following a few basic principles or understanding what the mixer is capable of. Learning to avoid these problems will save you time, mess, and potentially ruined recipes.
The Overmix Trap and Other Kitchen Calamities
One of the biggest pitfalls for bakers is overmixing, especially with ingredients like flour. Our research shows that overmixing can develop gluten too much in batters, leading to tough cakes, dense cookies, or rubbery muffins. It's a delicate balance, and sometimes less is more.
- Know When to Stop: Most recipes will tell you to mix "until just combined." This means you should stop as soon as you no longer see dry streaks of flour or unincorporated ingredients. A few small lumps are often better than overmixing.
- Avoid High Speeds with Dry Ingredients: As mentioned, starting on high speed with flour or other dry ingredients is a recipe for a mess. Always begin on the lowest setting and gradually increase as needed.
- Correct Attachment Usage: Using dough hooks for cake batter or beaters for thick bread dough can strain the mixer's motor and yield poor results. Ensure you're using the attachment designed for the specific task.
Trouble-Shooting: When Your Mixer Struggles
Sometimes, your hand mixer might seem to be working harder than it should. This usually indicates a mixture that's too thick or dense for the current speed setting, or perhaps the attachments aren't performing optimally.
- Mixture Too Thick: If the mixer is bogging down or making a strained noise, the mixture might be too dense for the current speed. Try reducing the speed, or manually scrape down the bowl and stir with a spatula to loosen things up before continuing to mix. If it's consistently too thick for the mixer's power, consider if the mixture is beyond what your particular hand mixer is designed for.
- Attachments Not Working Effectively: Ensure your attachments are clean and properly seated. Sometimes, buildup on the beaters can hinder their performance. If your mixer has variable speed, experiment with slight adjustments. For very dense doughs, a stand mixer might be a more suitable tool, as they are built with more powerful motors designed for heavy-duty tasks.
Keeping Your Hand Mixer in Top Shape: Cleaning and Care
Proper maintenance is key to ensuring your hand mixer lasts and continues to perform well. Cleaning it after every use prevents buildup and potential issues down the line, making your next baking session a breeze.
Ejecting and Washing Attachments Properly
The attachments are what do the work, so keeping them clean is paramount. It’s best to tackle this right after you’re done mixing.
- Eject Safely: Always turn off and unplug the mixer before you press the eject button. Hold the bowl or attachments steady as you press the button, as they can sometimes pop out with surprising force.
- Wash Promptly: Most beater and dough hook attachments are dishwasher safe, often on the top rack. However, a quick hand wash with warm, soapy water right after use is usually faster and prevents abrasive dishwasher cycles from dulling their finish. Use a soft sponge or cloth to avoid scratching.
- Dry Completely: Before storing, ensure all attachments are thoroughly dried. Moisture left on metal parts can lead to rust.
Protecting the Motor Unit
The main body of your hand mixer contains the motor and electronics, so it requires different care than the attachments. It should never be submerged in water.
- Wipe Down: Use a damp cloth to wipe the exterior of the motor unit. For stubborn spots, a little mild dish soap on the cloth can help, but be sure to wipe it clean with a second damp cloth afterward.
- Avoid Water Intrusion: Never immerse the main body of the mixer in water or place it under running water. Water can seep into the motor housing and cause irreparable damage. If you're struggling with stubborn residue on the mixer body, try using a slightly damp cloth with a bit of baking soda paste, then wipe clean.
- Storage: Store your hand mixer and its attachments in a dry place. Some mixers come with a storage case or a way to wrap the cord neatly around the base, which helps keep everything organized and protected.
Hand Mixer Use Cases: What's It Best For?
Your hand mixer isn't just a one-trick pony; it's a versatile tool that can tackle a surprising range of kitchen tasks. Understanding its strengths helps you choose when to reach for it versus other appliances. It excels at tasks that require quick, efficient blending or aeration without the bulk of a stand mixer.
Quick Baking Wins: Cakes, Cookies, and Cream
For everyday baking, a hand mixer is often the perfect choice. It's fantastic for incorporating ingredients quickly and evenly, which is crucial for consistent results. For instance, cream cheese frosting comes together in minutes, and whipping heavy cream to stiff peaks takes only a few moments.
This speed and efficiency are why hand mixers are so popular for smaller batches or when you don't need the heavy-duty power of a stand mixer. You can easily whip up a batch of cookies, prepare a simple cake batter, or make a quick dessert topping. It’s about getting delicious results without a lot of fuss.
Dough Duty: When to Reach for Dough Hooks
While often associated with batters and creams, many hand mixers can handle doughs thanks to specialized dough hook attachments. These hooks work differently than standard beaters, designed to knead by folding and pulling the dough, which develops gluten structure. This makes them suitable for recipes like pizza dough, bread, or even enriched doughs like brioche.
However, it's important to manage expectations. Hand mixers are generally best for smaller batches of dough, typically under 2 pounds total weight. Trying to knead larger or very stiff doughs can overwork the mixer's motor, leading to overheating or damage.
For substantial bread-making projects, a powerful stand mixer with dedicated dough hooks is a more appropriate tool. Always check your mixer’s manual for its dough-handling capacity.
Frequently Asked Questions About Using a Hand Mixer
Can I use a hand mixer for tough doughs?
Yes, but with limitations. Hand mixers equipped with dough hook attachments can handle smaller batches of moderately tough doughs for items like bread or pizza crusts. However, they are not designed for large quantities or extremely stiff doughs.
If your mixer sounds strained or overheats, it's a sign to stop and consider a more powerful appliance, like a stand mixer.
How do I clean my hand mixer attachments?
Most hand mixer attachments, including beaters and dough hooks, are dishwasher safe. You can usually place them on the top rack. For quicker cleaning and to preserve their finish, hand washing with warm, soapy water and a soft sponge is recommended.
Always ensure they are completely dry before storing to prevent rust.
What's the difference between beaters and dough hooks?
Beaters are typically flat and paddle-shaped, designed for blending lighter mixtures like cake batter, cookie dough, and whipped cream. Dough hooks have a spiral or C-shape and are specifically engineered to knead heavier doughs by folding and stretching the gluten strands. Using the wrong attachment can lead to poor results or strain the mixer's motor.
Why is my batter not mixing evenly?
Uneven mixing often occurs if the mixer isn't moved around the bowl sufficiently, or if the bowl isn't scraped down properly. Ensure you're moving the mixer in a consistent pattern, reaching all areas of the bowl, and using a spatula to scrape down the sides and bottom frequently. Also, always start on the lowest speed to avoid scattering dry ingredients before they can be incorporated.
When should I use the lowest speed setting?
You should always start your hand mixer on its lowest speed setting when introducing dry ingredients like flour into a wet mixture. This prevents a mess and allows the ingredients to combine gradually. Low speed is also ideal for initial mixing of any ingredients and for tasks requiring very gentle incorporation.