How to Toast Bread in a Toaster Oven
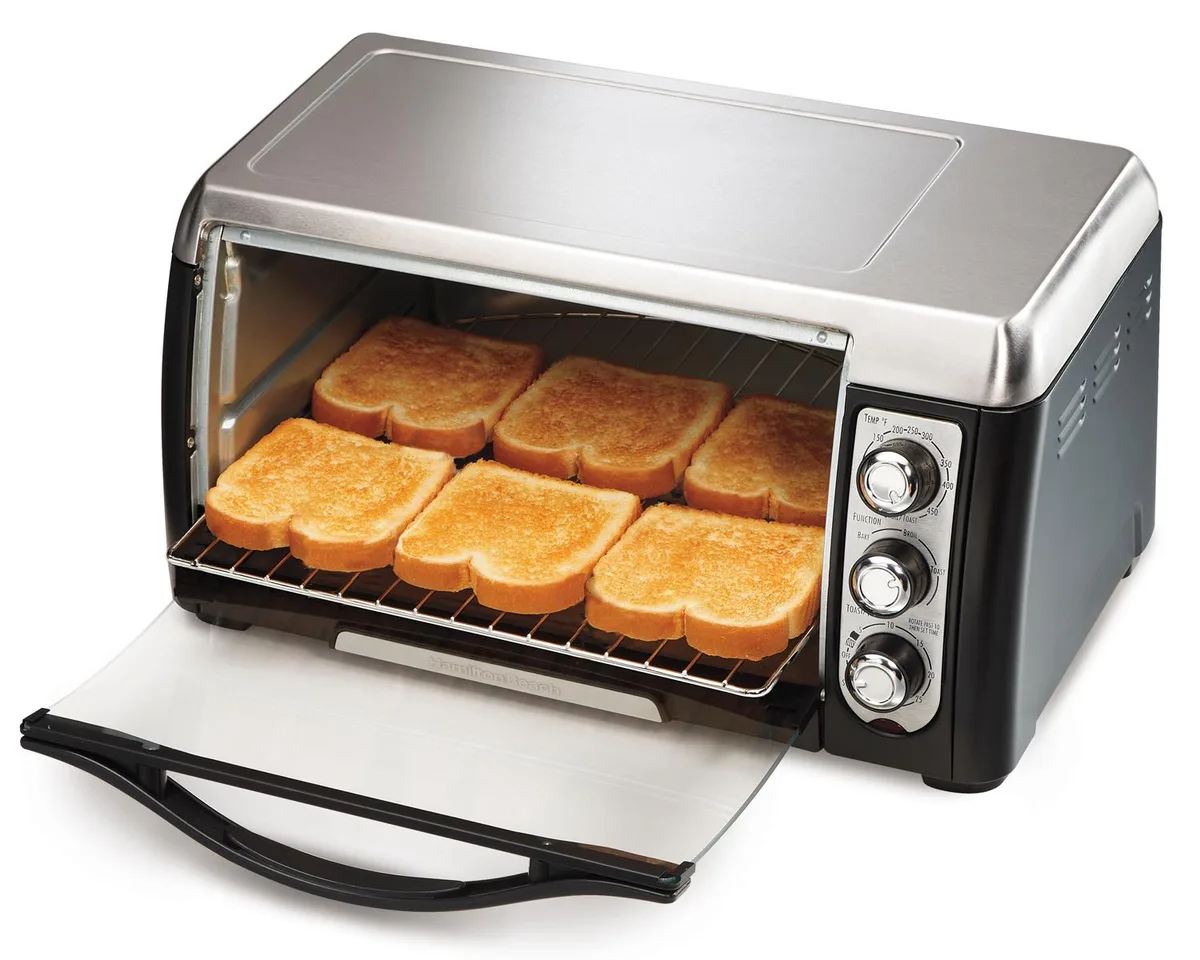
Image source: Bing (Web (fair-use with source credit))
Getting that perfect slice of toast from your toaster oven can sometimes feel like a culinary lottery. You know it's capable of so much more than just slightly warmed bread, but hitting that ideal golden brown and crisp texture isn't always straightforward. Many of us have faced the frustration of burnt edges or a sad, pale center.
Fortunately, mastering how to toast bread in a toaster oven is achievable with a little know-how and attention to a few key details. For instance, manufacturer specifications often detail rack positions and browning dial ranges, typically offering settings from 1 (lightest) to 5 or 6 (darkest), which are crucial for dialing in your toast.
Quick Answer
To toast bread in a toaster oven, place slices on the middle rack and set your browning dial. Watch closely. Aim for the middle setting initially.
Adjust time and heat for desired crispness. Clean the crumb tray regularly.
Why Visuals Are Key for Toaster Oven Toast
When you're toasting bread in a toaster oven, your eyes are your most important tool. Unlike a standard pop-up toaster with a simple timer, a toaster oven offers more variables, and that's where knowing what to look for visually becomes essential. Understanding these visual cues helps you avoid burnt edges and achieve consistent results, regardless of the bread type.
Rack Position Matters
The position of your bread inside the toaster oven dramatically affects how it toasts. Each rack position offers a different level of heat exposure from the top and bottom heating elements. Generally, the middle rack is the sweet spot for even toasting, providing balanced heat.
Placing bread too close to the top elements risks burning the top before the bottom is done, while the bottom rack might cook unevenly or too quickly.
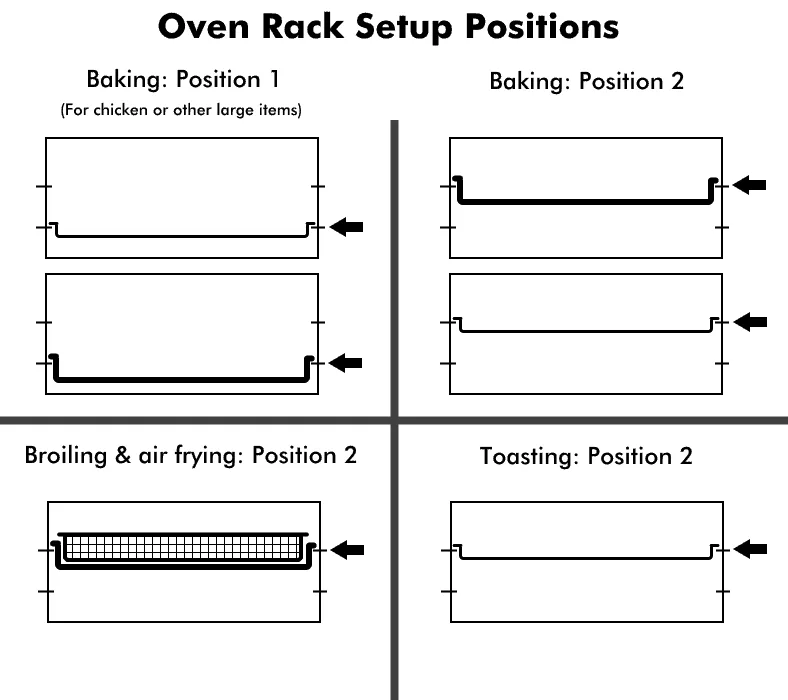
Image source: Bing (Web (fair-use with source credit))
Recognizing Browning Stages
Toast doesn't go from pale to burnt in an instant; it moves through a spectrum of brown. Learning to identify these stages is critical for stopping the process at your preferred level of doneness. Our research indicates that most users aim for a light golden brown to a medium brown, usually achieved within 2 to 5 minutes, depending on the toaster oven's power and the bread's thickness.
- Pale Yellow: Just warmed, no browning.
- Light Gold: The beginning of browning, slightly crisp.
- Golden Brown: The most common desired color, nicely toasted and crisp.
- Dark Brown: Deeper flavor, more pronounced crispness, nearing burnt.
- Black: Burnt.
Identifying Different Bread Behaviors
Not all bread toasts the same. Sourdough, for example, might toast faster than a dense whole wheat loaf due to its different moisture content and crumb structure. Thin slices will toast quicker than thick-cut artisan bread.
Even the type of flour and the presence of toppings like seeds or grains can influence how quickly and evenly your bread toasts.
Your Step-by-Step Toaster Oven Toasting Process
Getting that perfect slice is all about following a simple, visual process. It’s less about a strict timer and more about observation. This method works for most standard slices of bread, aiming for that ideal balance of crisp exterior and warm interior.
Picking Your Bread
Start with bread that's suitable for toasting. Slightly stale bread often toasts better than very fresh, soft bread because it has less moisture. However, very hard or dry bread can become overly brittle.
Standard sandwich bread, sourdough, challah, or even thicker artisan loaves all work well. Just be mindful of slice thickness, as it's a key factor in toasting time.
Setting Up Your Toaster Oven
- Cleanliness Check: Ensure your toaster oven's crumb tray is clean. Burnt crumbs can smoke and impart an unpleasant flavor. A clean appliance means cleaner toast.
- Rack Placement: Position the oven rack in the middle slot. This offers the most consistent heat distribution from both the top and bottom heating elements. If your oven has specific toast settings, consult your manufacturer's manual for the recommended rack placement.
- Browning Setting: Select your desired browning level. Most toaster ovens have a dial that ranges from light to dark. For a first attempt, start with a medium setting, usually around a "3" or "4" on a scale of 1-6. You can always toast it a little longer if needed.
The Actual Toasting

Image source: Web (Bing) / imdb.com (Web image (fair-use with source credit))
- Insert Bread: Place your bread slices directly on the middle rack. Don't overcrowd the oven; give each slice some space for even airflow and heat exposure.
- Set the Timer (if applicable): If your toaster oven has a dedicated timer, set it for a starting point, perhaps 2-3 minutes for standard white bread on a medium setting. If it only has a "toast" setting with no specific timer, you'll rely on visual cues and the browning dial.
- Watch Carefully: This is the most crucial step. Toaster ovens can toast quickly, especially as they approach the 2026 model year with improved heating technology. Keep an eye on the bread from the moment you turn the oven on. You're looking for the first signs of color change.
Knowing When It's Done
Your toast is ready when it reaches your preferred shade of golden brown and the edges start to look crisp. If you're unsure, you can carefully pull the rack out slightly (using oven mitts!) to get a better look. For thicker slices or if you prefer a crunchier toast, you might need to extend the toasting time by 30 seconds to a minute.
Always err on the side of under-toasting; you can always put it back in for a little longer, but you can't un-burn it.
Common Toasting Mistakes (And How to Fix Them)
Even with the best intentions, it's easy to make a few common blunders when toasting bread in a toaster oven. These usually stem from not paying close enough attention or misunderstanding how the appliance heats. Thankfully, most of these are easily corrected.
The Burned Bottom, Pale Top Problem
This often happens when the bread is too close to the bottom heating element, or if the top element is significantly more powerful than the bottom.
- The Fix: Ensure you're using the middle rack. If the problem persists, try lowering the rack slightly, but be cautious not to get too close to the bottom element. Some ovens allow you to control top and bottom elements independently; if yours does, reduce the bottom element's intensity if possible.
Over-Crisping Your Slice
You wanted toast, but you got charcoal. This is a classic case of toasting for too long or at too high a heat.
- The Fix: Turn down the browning dial. For your next batch, start with a lower setting (e.g., "2" or "3" instead of "5") and keep a closer eye on it. It’s better to gradually increase the toasting time in 30-second increments than to burn a whole batch.
Uneven Toasting Blues
One side is perfect, the other is practically raw. This can be due to uneven heating in your toaster oven or the bread not being placed correctly.
- The Fix: Try flipping the bread halfway through the toasting process. Also, ensure the bread slices aren't touching each other, as this can block heat from circulating. Regularly cleaning your toaster oven, including the heating elements (when cool and unplugged), can also help maintain even heating performance. Our research indicates that regular upkeep, akin to how one might maintain a wooden cutting board, significantly impacts appliance performance.
Beyond Basic Bread: Other Toaster Oven Toasting Wins
Your toaster oven isn't just for plain white bread. It's a versatile little appliance that can handle a variety of breakfast staples and snacks with ease. Mastering these can save you time and heat up your kitchen less than a full-sized oven.
Bagels and English Muffins
These are prime candidates for toaster oven success. Because they are often thicker and have nooks and crannies, a toaster oven can ensure they are heated through and toasted evenly on both sides.
- How-To: Slice them in half, of course. Place them cut-side up on the middle rack. Start with a medium-high browning setting. Keep an eye on them, as the denser dough can take a minute or two longer than regular bread. You're aiming for a golden crisp on the cut surfaces and a slightly softened exterior.
Frozen Pastries and Waffles
Don't shy away from frozen items! Toaster ovens are excellent for re-crisping frozen waffles, toaster pastries, or even small pastries you've bought from the bakery.
- How-To: For frozen waffles or pastries, generally use a medium browning setting. Place them directly on the middle rack. The key here is even heat to thaw and crisp without burning the edges. For items like croissants that can burn easily, you might opt for a slightly lower setting and watch them very closely. If you're reheating day-old croissants, a brief stint in the toaster oven can bring them back to life.
Toaster Oven Toasting vs. The Standard Toaster
When you're craving toast, you might wonder if your toaster oven is truly better than a trusty old pop-up toaster. While both do the job, they offer different experiences and results. Understanding these differences helps you pick the right tool for your toast-making needs.
- Standard Pop-Up Toaster:
- Pros: Fast, simple, consistent for standard bread slices, takes up less counter space.
- Cons: Limited to bread slices (and sometimes thin bagels), browning can be less even, difficult to control for thicker items.
- Toaster Oven:
- Pros: More versatile (toast, bake, broil), handles thicker items like bagels and pastries well, generally offers more even browning with rack positioning, can toast multiple slices at once.
- Cons: Slower to preheat (if necessary), takes up more counter space, can be overkill for just one slice of toast.
For a quick slice of plain white bread, a standard toaster is often more efficient. However, if you frequently toast bagels, thicker bread, or frozen items, or if you desire more control over the crispness and evenness, the toaster oven is the superior choice. It's also a great option if your pop-up toaster has given up the ghost; you can still get your toast fix while you look for a replacement.
Expert Tips for Next-Level Toast
Want to elevate your toast game beyond basic golden brown? A few pro tips can make a noticeable difference in texture, flavor, and overall toast satisfaction. These aren't complicated tricks, just small adjustments that seasoned users swear by.
Cleaning for Better Performance
It might sound basic, but a clean toaster oven performs better. Crumbs and grease build-up can lead to uneven heating, smoke, and off-flavors.
- Regular Crumb Tray Duty: Empty the crumb tray after every few uses, or immediately if you notice burnt bits. This prevents smoke and potential fire hazards.
- Wipe Down Elements (When Cool!): Once the oven is completely cool, you can gently wipe down the heating elements with a damp cloth to remove any splatters. This ensures they heat efficiently. For a deeper clean, consider consulting your manufacturer's guide on how to safely access and clean the elements. Proper appliance upkeep is similar to how one might maintain a wooden cutting board to bring it back to prime condition.
Experimenting with Settings
Don't be afraid to play with your toaster oven's settings. What works for one type of bread might not work for another, and different ovens have different power levels.
- Dial It In: If your toast is consistently too light, increase the browning setting by one level. If it's too dark, decrease it. Make small adjustments and watch closely.
- Mid-Toasting Flip: For maximum evenness, especially with artisanal or very thick bread, try flipping the slices halfway through the toasting cycle. This ensures both sides get consistent heat exposure.
- Preheating? While not always necessary for basic toast, if your recipe calls for it or you're toasting something like a thick bagel where you want it heated through and crisp, a brief 1-2 minute preheat on the toast setting can help.
Frequently Asked Questions About Toaster Oven Toasting
Why is my toast burning on the edges but still soft in the middle?
This usually means the heat is too intense or too close to the heating elements. Ensure you're using the middle rack, and if the problem persists, try a lower browning setting or slightly pulling the rack out to increase distance from the elements.
Can I toast more than two slices at once in a toaster oven?
Yes, most toaster ovens can accommodate 4-6 slices, depending on their size and the bread's dimensions. Just make sure not to overcrowd the rack; leave a little space between slices for even heat circulation.
How long does it typically take to toast bread in a toaster oven?
Toasting time varies greatly, but for standard bread slices on a medium setting, expect anywhere from 2 to 5 minutes. Thicker breads, bagels, or frozen items will take longer. Always watch your toast rather than relying solely on a timer.
Should I use the "toast" setting or a specific temperature on my toaster oven?
If your toaster oven has a dedicated "toast" setting, use that, as it's calibrated for toasting. If it only has temperature and time controls, aim for a medium heat (around 350°F or 175°C) and use visual cues to determine doneness.
How do I get my toast extra crispy?
For extra crispiness, you can slightly increase the toasting time or browning setting. Some experts suggest using a slightly lower temperature for a longer duration to dry out the bread more thoroughly before crisping. Flipping the toast halfway through can also help ensure both sides achieve a uniform crisp.