How to Knead Dough With a Stand Mixer
Baking your own bread or pizza dough from scratch can feel like magic, but getting that perfect texture often comes down to one crucial step: kneading. If you've ever wrestled with sticky dough or ended up with a dense, heavy loaf, you know the struggle. Thankfully, learning how to knead dough with a stand mixer takes the guesswork out and makes the process efficient, even for beginners.
Our research indicates that most modern stand mixers, especially those with a robust motor wattage of 300 watts or more, are well-equipped to handle various dough consistencies, from soft brioche to firm sourdough. Mastering this technique means consistently delicious results. Let's dive into what you need to know.
Quick Answer
To knead dough with a stand mixer, attach the dough hook and mix on low to medium speed. Watch the dough carefully; it should start to pull away from the sides of the bowl and form a smooth, elastic ball. This typically takes 5-10 minutes, depending on your mixer and recipe.
Why Visuals Matter for Kneading Dough in Your Stand Mixer
When you're trying to get dough just right, there's a lot you can't measure with numbers alone. Kneading in a stand mixer is a prime example. While you can follow recipe timings, the real success often hinges on what the dough looks like and how it behaves.
This is where visual cues become your best friend.
You're not just looking for a certain amount of time to pass; you're looking for the dough to transform. It starts as a shaggy, wet mess and should eventually become smooth, elastic, and less sticky. Understanding these visual stages is key to knowing when your dough has developed enough gluten, which is the protein network that gives bread its structure and chew.
Getting Your Stand Mixer Ready for Dough
Before you even think about flour and yeast, let's make sure your stand mixer is prepped and ready to go. It’s a simple setup, but getting these basics right makes the whole kneading process smoother.
Choosing the Right Dough Hook
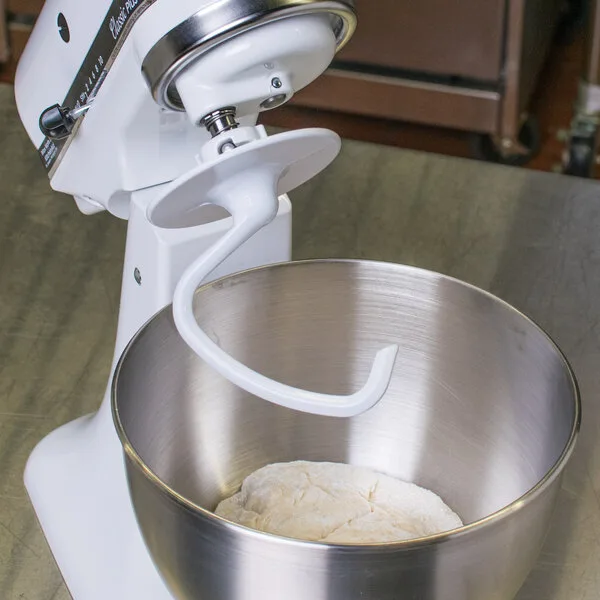
Your stand mixer likely came with a few different attachments. For kneading dough, you'll always want to use the dough hook. This C-shaped or spiral-shaped tool is specifically designed to work through thicker doughs, stretching and folding them to develop gluten.
Using a whisk or flat beater for dough will just make a mess and won't do the job.
Attaching the Dough Hook and Bowl
First things first, make sure your stand mixer is unplugged for safety. Then, lock the mixer head in the upright position if it tilts back, or ensure the base is stable for bowl-lift models.
Place the mixing bowl onto the stand mixer base, aligning it with the mounting points. Twist it until it clicks securely into place. Next, insert the dough hook into the attachment hub, it should slide in easily.
Secure it according to your mixer’s design, often with a small screw or clip.
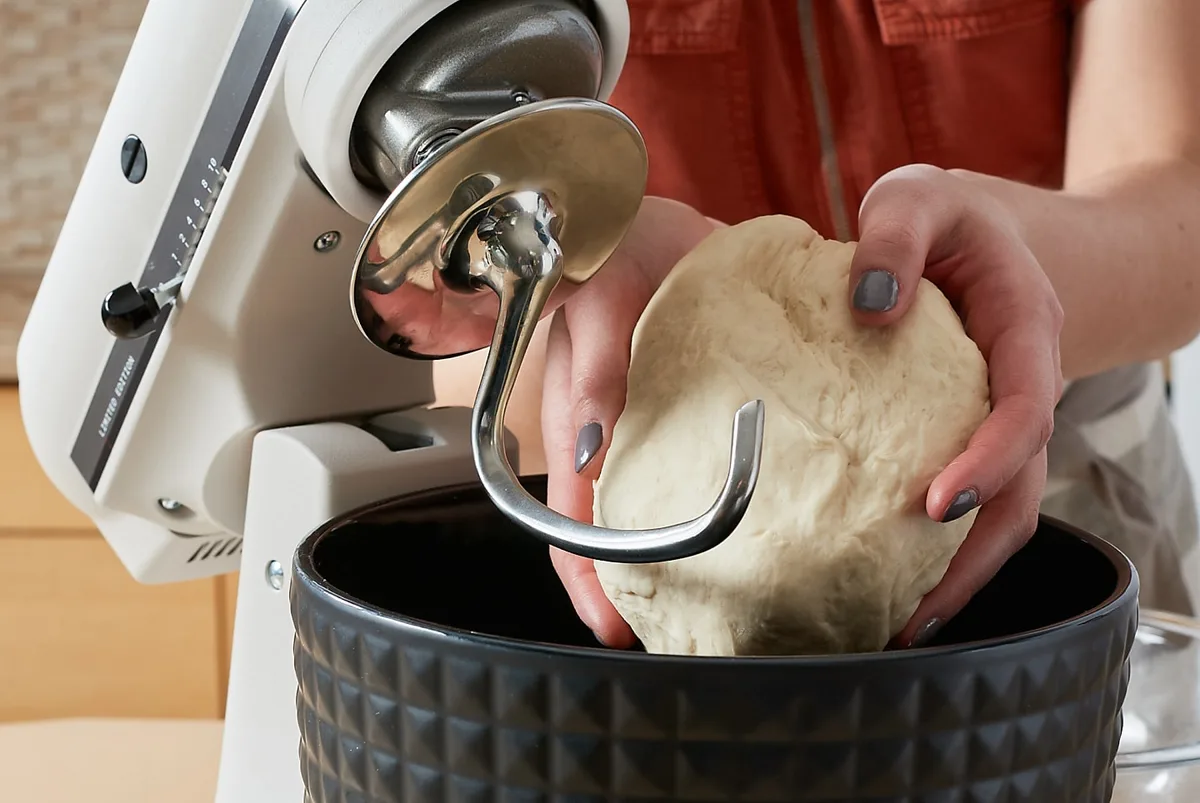
Once everything is attached and the bowl is secure, you can plug your mixer back in. Lower the mixer head (if applicable) so the dough hook is positioned inside the bowl, ready to go.
The Step-by-Step Process: Kneading Dough with Your Stand Mixer
Now for the main event: getting that dough properly kneaded. This is where your stand mixer really shines, doing the heavy lifting for you.
Adding Ingredients and Starting Low
With your bowl and dough hook in place, it’s time to add your ingredients. Most recipes call for adding liquids first, followed by dry ingredients like flour and yeast. Don't dump all the flour in at once; it’s often better to add about two-thirds to start.
Turn your stand mixer on to its lowest speed setting. This helps to gently combine the ingredients without splashing flour everywhere. Let it mix for about 30 seconds to a minute until a shaggy dough begins to form.
If it looks too dry and crumbly, add a tablespoon of water at a time. If it looks too wet and soupy, add flour a tablespoon at a time.
Monitoring Dough and Adjusting Speed
Once the initial shaggy dough forms, gradually increase the speed to medium-low, typically speed 2 or 3 on most models. This is where the real kneading begins. The dough hook will start to pull the dough away from the sides of the bowl, folding it over itself.
You’ll want to watch this closely for the next 5-10 minutes. The dough should start to gather around the dough hook and move from a sticky, rough mass into a smoother, more cohesive ball. If the dough starts to climb up the side of the hook excessively or seems to be struggling the mixer, you might need to adjust the speed slightly.
Some recipes call for a final minute or two on a slightly higher speed, but always refer to your specific recipe.
Recognizing Perfectly Kneaded Dough (The Visual Cues)
This is where the visual aspect is crucial. A properly kneaded dough will:
- Pull away from the sides of the bowl: It won't constantly stick or smear along the bowl’s surface.
- Be smooth and elastic: It should look and feel stretchy, not rough or lumpy.
- Not be overly sticky: It will still be slightly tacky, but you shouldn't have large amounts of dough stuck to your fingers when you briefly touch it.
- Form a ball around the dough hook: It will spin with the hook, creating a consistent mass.
If your dough looks like it’s just being pushed around the bowl, or it’s still a sticky mess after 7-8 minutes, it might need a bit more kneading or a slight adjustment in flour/liquid.
The Windowpane Test: Your Gluten Checkpoint
The ultimate test for properly developed gluten is the windowpane test. This is a quick and easy way to confirm your dough is ready.
Lightly flour your hands. Take a small piece of dough (about the size of a golf ball) and gently stretch it outwards with your fingertips. If you can stretch it thin enough so that light can pass through it without the dough tearing, your gluten is well-developed.
It should look like a translucent, thin window.

If the dough tears easily before you can see through it, it needs more kneading. Put it back in the mixer and knead for another 2-3 minutes, then test again. This test ensures your bread will have a good rise and a nice, airy crumb.
Common Mistakes and How to Avoid Them
Even with a stand mixer, it's easy to run into a few common snags. Being aware of these can save your bake from disaster.
Dough Too Sticky or Shaggy?
If your dough remains too sticky and shaggy after 5-7 minutes of mixing on medium speed, it likely needs more flour or slightly longer kneading. Aggregated user feedback suggests that humidity can play a big role here; on humid days, you might need an extra tablespoon or two of flour. Add flour very gradually, about a teaspoon at a time, while the mixer is running on low.
Too much flour too quickly can make the dough tough.
Dough Too Tough or Rubbery?
On the flip side, if your dough feels very stiff, overly chewy, or rubbery, you might have over-kneaded it or added too much flour. This can happen if you let the mixer run for too long or if your initial ingredient measurements were off. Unfortunately, over-kneaded dough can’t usually be fixed, but it serves as a lesson for next time.
Always aim for that elastic, smooth feel without resistance.
Overheating Your Mixer
Stand mixers, especially those with less powerful motors, can overheat if you try to knead very stiff dough for extended periods. If you notice a burning smell or the mixer feels unusually hot, stop immediately and let it cool down for 15-20 minutes before continuing. Most manufacturers specify maximum dough weights or continuous run times to prevent motor damage.
For instance, some models might recommend not exceeding 8-10 minutes of continuous kneading for dense bread doughs. Always check your mixer's manual for specific guidelines to protect its lifespan.
Stand Mixer Kneading vs. Hand-Kneading: What's the Difference?
The biggest difference between kneading dough by hand and using a stand mixer is the effort and time involved. Hand-kneading can be a fantastic workout and a very mindful process, but it requires considerable physical effort, especially for larger batches or stiffer doughs. You have to push, fold, and stretch the dough repeatedly for 10-15 minutes to achieve proper gluten development.
A stand mixer, on the other hand, automates this process. It handles the stretching and folding mechanically, freeing up your hands and saving you from the physical strain. This makes it ideal for those with strength limitations or for anyone who bakes frequently and wants to speed up the process.
While the end goal, developing gluten, is the same, the stand mixer offers a more convenient and consistent way to get there, especially as of 2026.
Who Will Love Kneading Dough with a Stand Mixer?
If you're someone who bakes bread, pizza dough, or other yeasted goods regularly, a stand mixer can be a game-changer. It's particularly great for beginners who might find hand-kneading intimidating or physically challenging. People who often bake large batches of dough will also appreciate the time and energy savings.
Home bakers looking for consistent results without the physical demand will find a stand mixer invaluable. It’s also a lifesaver if you have wrist or shoulder issues that make prolonged hand-kneading difficult. For those who love making multiple loaves or large pizzas, the ability to mix and knead dough efficiently is a huge benefit.
It truly makes complex recipes more accessible.
Expert Tips for Flawless Dough Every Time
Beyond the basic steps, a few insider tips can elevate your stand mixer kneading game from good to great. These are the little things that experienced bakers swear by to ensure consistent, delicious results every single time.
Understanding Your Dough's Consistency
Pay close attention to how the dough behaves in the bowl. It should move from a sticky, shapeless mass to a smooth, elastic ball that cleanly detaches from the sides. If it’s still clinging stubbornly or looks too dry, make minor adjustments.
Aggregate reviews suggest adding water a teaspoon at a time for too-dry dough, and a tablespoon of flour for too-wet dough. Always add slowly while the mixer is on low speed.
Don't Fear the Windowpane Test
The windowpane test is your best friend for verifying gluten development. It's a simple visual confirmation that your dough is ready for its rise. Gently stretch a small piece of dough until it's thin and translucent.
If it tears easily, it needs more kneading. For instance, a well-developed dough should be able to stretch thin enough to read text through it.
Clean Your Mixer Bowl Regularly
During the kneading process, some dough will inevitably stick to the sides of the bowl. Periodically, pause your mixer and use a rubber spatula to scrape down the sides. This ensures all the dough is incorporated into the kneading action, leading to a more uniform texture throughout your final product.
This simple action prevents dry patches from forming and helps the dough develop evenly.
Know Your Mixer's Limits
Stand mixers vary in power and capacity. A lighter-duty model might struggle with very stiff doughs or large batches. Overloading your mixer can lead to overheating, which can damage the motor.
Always consult your stand mixer's manual for its maximum dough capacity and recommended operating times. For example, a 300-watt motor might handle 1-1.5 pounds of flour, whereas a 500-watt unit could manage 2-3 pounds.
Experiment with Speed Settings
While recipes often suggest specific speeds, don't be afraid to adjust them slightly based on how your dough is responding. If the dough seems to be struggling or the mixer motor sounds strained, reduce the speed. If it’s not gathering well, a slight increase might be necessary.
The goal is a consistent, elastic ball that spins cleanly around the dough hook.