How to Replace a Treadmill Belt
If you’ve ever searched how to replace a treadmill belt because your machine slips, thumps, or drifts left with every stride, you already know the problem. The fix is doable at home, but it is also a job where what you see matters as much as what you turn.
Manufacturer specifications indicate most walking belts last between 800 and 1,200 miles, or roughly three to five years of regular use. By the time it needs replacing, the deck, rollers, and tension bolts all play a part. That’s why a visual, step-by-step approach works better than a generic parts list.
Let’s walk through it.
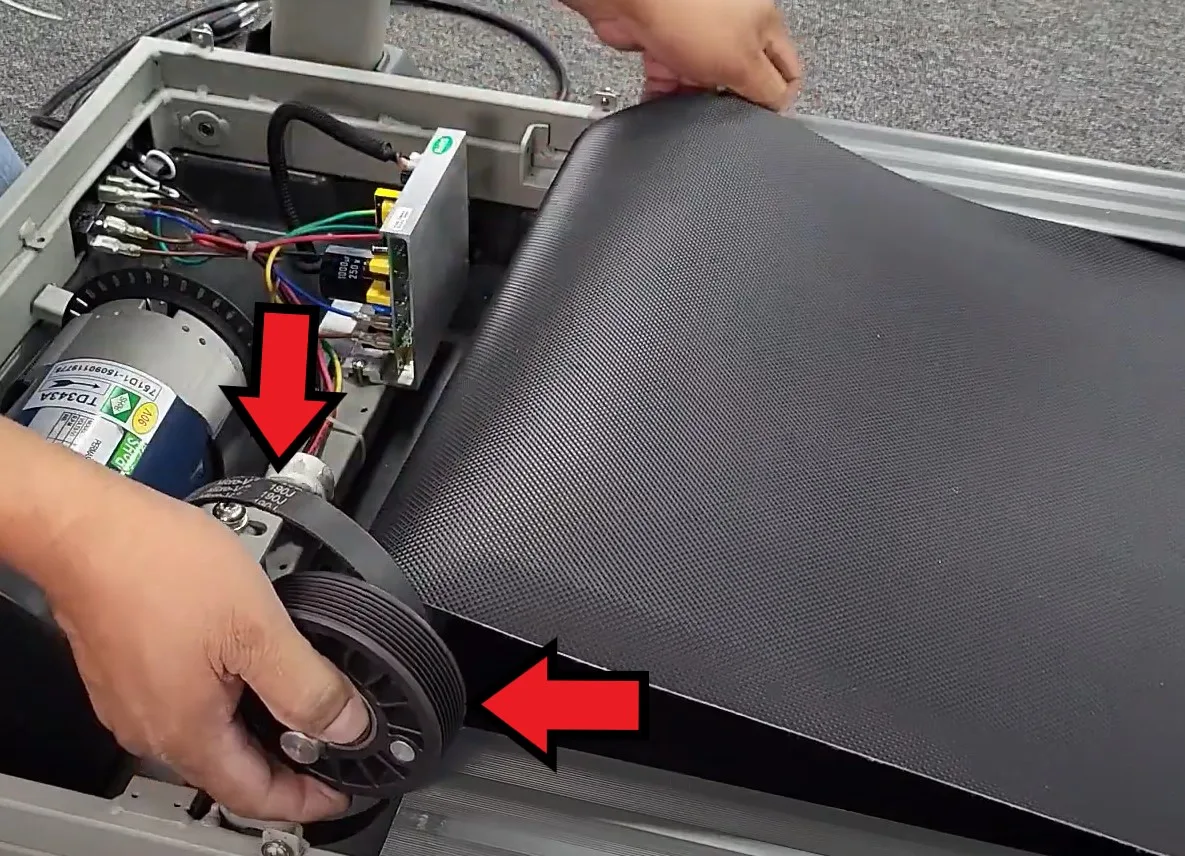
Image source: Bing (Web (fair-use with source credit))
Why Seeing the Job Matters Before You Start
Every treadmill model looks a little different under the hood. The same instruction that works on one machine can confuse you on another. That’s why you need to look at the actual hardware, not just follow a written sequence.
Your treadmill walking belt sits on a deck, loops around a front roller and a rear roller, and gets tension from bolts at the back. In our research, most first-time replacements go wrong because people misread which end is which. A photo or diagram clears that up instantly.
So before you touch any tool, take a picture of the current setup. Notice how the belt wraps around the rollers and which side the seam faces. If you’ve ever dealt with a squeaky elliptical, you know sound and motion often lead you back to a worn part.
Same principle here, but visual cues do the heavy lifting.
Visual ID: Know Your Belt, Deck, and Rollers Before You Touch Anything
What should you look for?
Start with the size label. Many belts have the length and width printed on the underside, so roll the belt forward to read it. If it’s faded, measure the old belt while it’s off.
Common home sizes are 20 by 60 inches, but yours can vary.
Directional arrows and seam
The underside of most replacement belts has arrows. Those arrows must point in the running direction. The belt seam also matters.
On most machines, the seam should face the rear so it rides over the rear roller cleanly.
Rollers and tension bolts
The rear roller is adjustable. Look for two tension bolts, one on each side of the frame, near the back. The front roller is motorized and usually behind a cover.
The motor pulley drives it.
A quick visual check of all these parts before you start saves you from installing the belt backward. Here’s a snapshot:
| Part | What to look for |
|---|---|
| Belt arrows | Point toward the front of the treadmill |
| Belt seam | Centered, not twisted |
| Rear roller bolts | One per side, even at same depth |
| Front roller | Clean, no worn grooves |
| Deck surface | Smooth, no gouges or splinters |
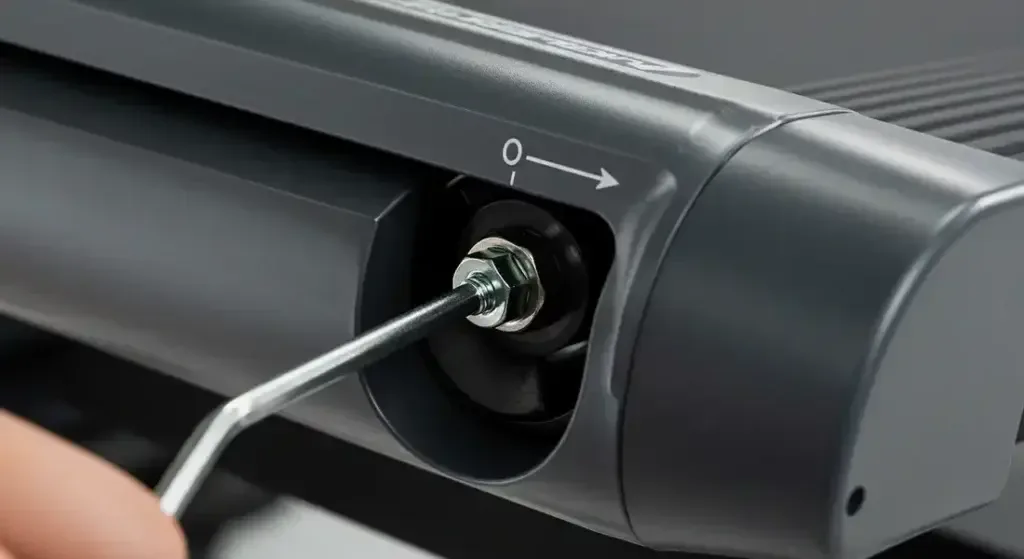
Image source: Bing (Web (fair-use with source credit))
Step-by-Step: Replacing the Belt with Visual Cues at Every Step
Step 1: Unplug and remove the motor cover
Unplug the treadmill first. Then remove the motor cover with a screwdriver. Keep the screws in a small bowl.
Step 2: Loosen the rear roller bolts
Use an Allen wrench or socket to turn both tension bolts about a half turn. Loosen evenly. You want the rear roller to slide forward, which slackens the belt.
Step 3: Mark the old belt direction
Before you slide it off, use tape or a marker on the top of the belt near the front. That gives you a reference for the new one.
Step 4: Slide the old belt off
Pull the belt toward you. Work it off the front roller, then the rear roller. Notice how it sits on the deck.
Step 5: Clean and inspect the deck
Wipe the deck and rollers with a dry cloth. Check for rough spots on the deck. A damaged deck can ruin a new belt quickly.
Step 6: Install the new belt
Lay the belt over the deck. Match the directional arrows to your tape mark. Slip it over the front roller first, then the rear roller.
Step 7: Tension and hand-spin
Pull the belt tight and tighten the rear bolts a half turn each. Spin the belt by hand. Watch to make sure it tracks near the center.
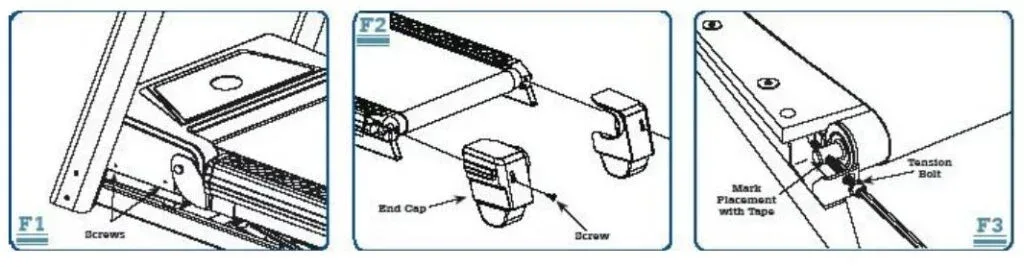
Image source: Bing (Web (fair-use with source credit))
Visual Mistakes That Wreck a New Belt (and How to Spot Them)
The most common failures are all visual once you know what to look for. We’ve seen all four in aggregate reviews.
- Installing the belt backward. The arrows face the rear. The belt runs, but it pulls against the seam and wears unevenly. Check the arrows before you spin the belt.
- Over-tightening. If the belt is so stiff you can’t lift the middle an inch or two, it’s too tight. It will strain the motor and drag on the deck.
- Twisted seam. A seam that isn’t flat means the belt is folded somewhere along the roller. Look at both sides to confirm it’s parallel.
- Wrong tracking read. If the belt drifts right, most people tighten the right side. That’s backward. Loosen the right side or tighten the left. Watch the belt motion to confirm.
The fix for all of these is simple: slow down, look at the belt from the rear, and adjust in quarter turns. Then let the belt run at low speed for a minute before stepping on.
Sizing, Cost, and Time: What to Expect
How do you size a replacement belt?
Measure the length and width of the old belt flat on the floor. Also check the thickness. As of 2026, most home treadmills use a 1.6mm to 2.5mm belt.
Thicker isn’t always better if your rollers are narrow.
What does it cost?
| Item | Typical price |
|---|---|
| Replacement walking belt | $50 to $150 |
| Aftermarket vs. OEM | Aftermarket about 30% cheaper |
| Professional installation | $100 to $250 plus parts |
| DIY time | 1 to 3 hours |
OEM vs. aftermarket
An original equipment manufacturer belt matches your frame precisely. Aftermarket belts can work fine, but you need to verify width, length, and seam direction against your old belt. That’s a visual check, not a guess.
If a part is off by even a half inch, the belt will rub the frame or slip off the rollers.
Is a full replacement worth it?
Compare this to a new treadmill, which usually costs far more. If the deck and rollers are in decent shape, a new belt is the smarter move. Routine upkeep on other home cardio gear follows the same logic.
After the Install: Tracking, Tension, and Long-Term Maintenance
The real test starts when you plug it back in. Run the belt at low speed, around 1 to 2 mph. Watch how it tracks across the deck.
Your eyes are the best alignment tool you have.
If the belt drifts left, tighten the left rear roller bolt a quarter turn. If it drifts right, do the same on the right side. Wait 30 seconds after each tweak for the belt to settle.
Small turns work best, just like when fine-tuning other cardio machines.
New belts stretch during the first few runs. Recheck tension after your first hour of use. Lift the belt at the center.
It should rise about 2 to 3 inches without much force. Less than that means it's too tight. More than that means it's too loose.
Lubrication matters too. Many modern belts are self-lubricating. Older machines need silicone spray on the deck.
A dry belt creates friction that heats the deck and strains the motor. That friction also shows up as odd noises, so it helps to know common reasons for squeaking in your home gym.
A solid maintenance rhythm keeps things simple. Wipe under the belt monthly. Check tension every couple of months.
Inspect the deck for shiny spots, which signal friction. The same logic applies to regular care on other cardio equipment, so you can use a similar checklist across your machines. If you're balancing multiple machines, knowing how cardio options compare can help you prioritize which ones need attention first.
Safety guidelines from the Consumer Product Safety Commission stress unplugging equipment before any service. That includes belt adjustments. A quick pull of the plug beats a fast-moving roller, hands down.
Frequently Asked Questions
Can I replace just the belt and not the deck?
Yes, if the deck is smooth and free of deep grooves. Run your hand across it to feel for rough patches. A damaged deck wears out a new belt quickly, so replace the deck if you feel any splinters or gouges.
How tight should the treadmill belt be?
The belt should lift about 2 to 3 inches in the middle. If it's tighter, you strain the motor and rollers. If it's looser, you'll feel slipping underfoot.
Check this after every 50 to 100 miles of running.
Why does my new belt still slip or drift?
Uneven tension is the usual culprit. Loosen both rear bolts, then retighten them evenly. A drift to one side usually means that side is tighter.
Adjust in quarter turns and test again at low speed.
How often should a treadmill belt be replaced?
Most manufacturers recommend every 800 to 1,200 miles. That's roughly three to five years for a typical home user. Heavy daily use shortens that window, so inspect the belt visually twice a year.
How do I know which replacement belt fits my model?
Read the size label on the underside of the old belt. If it's worn away, measure length and width after removing it. Compare those numbers to the manufacturer's spec sheet.
A variance of even a half inch can cause rubbing or slipping.