How to Improve Ice Maker Performance
Image source: Bing (Web (fair-use with source credit))
Why Your Ice Maker Isn't Performing Its Best (And What to Do)
That moment when you realize your ice maker is sputtering, slow, or just not making ice at all can be frustrating, especially when you need it most. If you've ever poured a drink only to find a nearly empty ice bin, you're probably wondering how to improve ice maker performance so you can get back to perfectly chilled beverages. It's often a fixable issue that doesn't require a service call.
Our research shows that many ice production problems stem from common maintenance oversights or simple mechanical hiccups. For instance, most home ice makers operate efficiently when water pressure is between 20 and 60 PSI (pounds per square inch), a crucial spec often overlooked. We'll walk you through the most common culprits and straightforward solutions.
Quick Answer
To improve ice maker performance, first check for obvious blockages in the water line or ice bin. Ensure the unit is level and has adequate airflow around its condenser. Regularly clean and descale the ice maker, and replace the water filter as recommended by the manufacturer.
If problems persist, inspect specific components like the water inlet valve and sensor arm.
Common Ice Maker Problems & What They Mean
Ice makers are generally reliable, but like any appliance, they can develop issues. Understanding what a particular problem signifies is the first step toward fixing it. Many common complaints point to straightforward causes that you can address yourself.
Here's a look at the most frequent ice maker woes and their likely explanations:
- Slow Ice Production: This can signal a few things. The most common are low water pressure, a dirty water filter, or insufficient airflow to the condenser, which is part of the cooling system. If the ambient room temperature is too high, it can also slow down freezing.
- No Ice Production: If you hear the unit running but no ice is forming, it could be a faulty water inlet valve not letting water in, a frozen water line, a malfunctioning thermostat or sensor, or even a tripped circuit breaker if it's a complete power failure.
- Small or Irregularly Shaped Ice: This often relates to the amount of water making its way to the ice mold. It could be low water pressure, a partially clogged water filter, or mineral buildup on the mold plate where ice forms. The ice maker might also be cycling too quickly, not allowing enough time for full formation.
- Ice Melting in the Bin: This is usually a sign that the ice maker's cooling system isn't working effectively. The condenser fan might be blocked, dirty, or broken, preventing heat from escaping. Alternatively, the compressor could be failing.
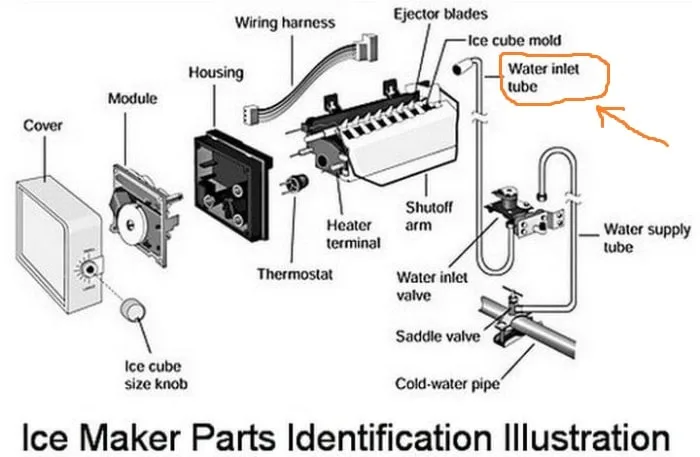
Image source: Bing (Web (fair-use with source credit))
- Leaking Water: A leak can come from several places. The water supply line connection might be loose, the drain line could be clogged, or there might be a crack in a component of the water system. For under-counter models, check the drain pump if equipped.
- Strange Smells or Tastes: This almost always points to a need for cleaning. Stagnant water, mold, or mineral deposits can affect the ice's purity. A dirty water filter can also contribute to off-flavors.
Quick Fixes: Simple Steps for Better Ice Production
Before diving into complex troubleshooting, several quick checks can often restore your ice maker's performance. These are the go-to solutions for many common issues and require minimal effort. They’re the first things any homeowner or restaurant manager should try.
- Check the Water Supply: Ensure the water shut-off valve connected to your ice maker is fully open. Many units have a lever or knob; make sure it's in the "on" position. If you have a refrigerator with a built-in ice maker, verify the corresponding water line is properly connected and the valve is open.
- Inspect the Ice Bin and Auger: Remove the ice bin. Look for any jammed ice cubes that might be blocking the mechanism. If your ice maker has an auger (a screw-like part that moves ice), make sure it's clear of obstructions. Gently break apart any large chunks of ice.
- Level the Unit: Most ice makers need to be perfectly level to function correctly. If the unit is tilted, water may not distribute evenly in the mold, or sensors might not register properly. Use a spirit level to check and adjust the appliance's feet as needed.
- Ensure Proper Airflow: Ice makers, especially those with external condensers (like under-counter units), need good ventilation. Check that nothing is blocking the vents or grilles, typically found on the front, side, or back. Allow at least 2-3 inches of clearance around these areas.
- Reset the Unit: Sometimes, a simple power cycle can resolve temporary glitches. Turn off the ice maker, unplug it from the power source, and wait for 5-10 minutes. Then, plug it back in and turn it on. This can clear minor electronic faults.
Deeper Dive: Troubleshooting Water Supply & Filtration Issues
If the quick fixes don't bring your ice maker back up to speed, it's time to look more closely at the water entering the appliance. Problems with water supply or filtration are among the most common reasons for reduced ice production and poor ice quality. This is where we often find the root cause.
Is the Water Line Frozen?
A frozen water line is a common culprit, especially in colder climates or if the line runs near an unheated space.
- How to Check: Visually inspect the water line leading to the ice maker. If you see ice, you'll need to thaw it.
- How to Thaw:
- Turn off the ice maker and shut off the water supply valve.
- Gently warm the affected area of the line with a hairdryer on a low setting. Avoid using open flames or extremely high heat, which can damage the plastic line.
- Once thawed, turn the water supply back on and restart the ice maker.
Water Pressure Matters
Manufacturer specifications often indicate a required water pressure range for optimal ice maker operation.
- Ideal Range: Typically, 20-60 PSI is recommended.
- How to Test: You can purchase a simple water pressure gauge that screws onto an outdoor hose spigot. Turn off the main water supply to the house, open a nearby faucet, then attach the gauge to the spigot and slowly turn the water back on. Record the reading.
- What to Do: If the pressure is too low, you might need to contact a plumber to investigate potential issues with your home's main water line or pressure regulator. If it's too high, a pressure reducing valve may be necessary.
The Critical Role of the Water Filter
A clogged or expired water filter significantly impedes water flow and can affect ice taste.
- When to Replace: Most manufacturers recommend replacing the filter every 6 months, or sooner if your water is particularly hard or you notice a drop in production or taste issues.
- Signs It Needs Replacing:
- Slow water flow when dispensing water from a refrigerator's water dispenser.
- Cloudy or off-tasting ice.
- Reduced ice production.
- Replacement Process: Filters are usually located inside the ice maker compartment or refrigerator. Consult your appliance manual for the exact location and specific instructions. It's typically a twist-and-lock or push-and-release mechanism. After replacement, flush the system by dispensing water for a few minutes.
Cleaning & Maintenance: Your Ice Maker's Best Friend
Regular cleaning and maintenance are not just about appearance; they're crucial for keeping your ice maker running efficiently and producing clean, safe ice. Mineral buildup (scale) and general grime can clog parts and affect performance. Making this a routine task will save you headaches down the line.
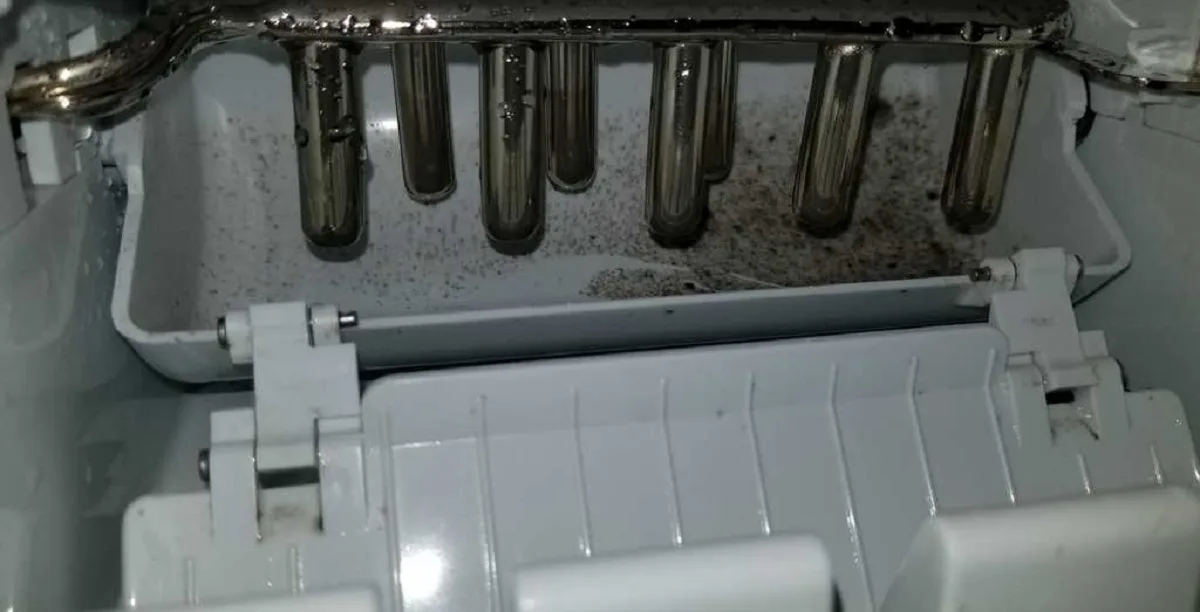
Image source: Bing (Web (fair-use with source credit))
How Often Should You Clean?
- Internal Cleaning: Most experts recommend a thorough internal cleaning every 6 months. If you have hard water or notice taste issues more frequently, clean it every 3-4 months.
- External Cleaning: Wipe down the exterior weekly or as needed to keep it looking good and to prevent dust and debris from entering vents.
Steps for a Thorough Internal Clean:
- Empty and Power Down: Remove all ice from the bin. Unplug the unit or turn off the circuit breaker. For units with water lines, shut off the water supply valve.
- Prepare Cleaning Solution: Mix a solution of 1 tablespoon of white vinegar or a commercial ice maker cleaner with 1 gallon of water. For heavily scaled units, you might need a stronger solution or a descaling product specifically designed for ice makers.
- Clean Internally: Pour the cleaning solution into the water reservoir or ice maker mold. Let it circulate through a cycle or two if your unit allows. If not, use a soft cloth or sponge dipped in the solution to wipe down the interior surfaces, including the mold plate, ice bin, and any visible water lines.
- Rinse Thoroughly: After cleaning, empty any remaining solution. Rinse the interior multiple times with clean water to remove all traces of the cleaning agent. Run at least two full cycles of ice production using only fresh water and discard the ice from these cycles to ensure no cleaning residue remains.
- Clean the Exterior and Air Vents: Use a damp cloth and mild detergent for the exterior. Use a vacuum cleaner with a brush attachment or a soft brush to clear dust from condenser coils and air vents. Proper airflow is vital for the cooling system.
Descaling for Hard Water Areas
If you have hard water, mineral deposits (scale) can build up quickly, much like in a coffee maker or kettle.
- Signs of Scale: White, chalky residue on components, especially the mold plate.
- Solution: Use a descaling solution specifically made for ice makers. Follow the product instructions carefully. These solutions are often more effective than vinegar for tough mineral buildup.
When to Call a Pro: Recognizing Serious Problems
While many ice maker issues are DIY-friendly, some problems indicate a more significant mechanical failure that requires professional attention. Ignoring these can lead to more extensive damage or costly repairs. It's wise to know when to hand over the reins.
Here are signs that it's time to contact a qualified appliance repair technician:
- Persistent Leaks: If you've checked all visible connections and the water line is intact, but the unit continues to leak, there might be a crack in an internal component, a faulty pump, or a seal failure that needs expert diagnosis.
- Loud or Unusual Noises: Grinding, squealing, or excessively loud banging sounds are not normal. These often point to issues with the motor, compressor, or fan bearings, which can be complex to repair.
- Ice Maker Runs Constantly: If the unit appears to be running non-stop, never shutting off the freezing cycle, it could indicate a problem with the thermostat, a sensor, or the compressor failing to cycle properly. This can lead to over-freezing and potential damage.
- No Cooling at All: If you can hear the motor running but feel no cold air, and ice production has completely stopped with no other obvious cause (like a tripped breaker), the compressor or refrigerant system might be at fault. These are high-pressure systems requiring specialized tools and knowledge.
- Electrical Issues: Any signs of sparking, burning smells from the unit, or repeated tripping of the circuit breaker warrant immediate professional inspection for electrical safety reasons.
Remember, using your appliance manual is always the first step. It often details specific troubleshooting steps for your model and may guide you on when service is recommended. You can also often find model-specific diagnostic information on the manufacturer's support website.
Is It the Ice Maker or Something Else? Ruling Out External Factors
Sometimes, the problem you're experiencing might not be with the ice maker itself, but with external factors that influence its operation. Before assuming the appliance is broken, it's good practice to rule out these outside influences. This saves you time and potential repair costs.
Water Supply Line Issues
The most common external factor is the water supply.
- Valve Not Open: As mentioned, ensure the shut-off valve is fully open.
- Kinks or Clogs: Check the entire length of the flexible water line connecting your home's plumbing to the ice maker. Any kinks or sharp bends can restrict water flow. If the line is old, it might be clogged internally with sediment.
- House Water Pressure: We discussed this in the water supply section, but it's worth repeating: insufficient water pressure from your home's main line is a frequent cause of slow production or small cubes.
Ambient Temperature and Humidity
Ice makers, especially those in refrigerators, are designed to work within specific environmental conditions.
- High Room Temperature: If the ice maker is in a poorly ventilated area, a hot garage, or during a heatwave, the ambient temperature can rise significantly. This makes it harder for the cooling system to freeze water efficiently, slowing production. Ensure good airflow around the unit.
- High Humidity: While less common as a direct cause of performance issues, extreme humidity can sometimes contribute to frost buildup or affect the efficiency of certain cooling components over time.
Electrical Supply Problems
An intermittent or insufficient electrical supply can cause odd behavior.
- Dedicated Circuit: Many larger ice makers require a dedicated electrical circuit. If it's on a circuit with other high-draw appliances, it might not receive consistent power, leading to performance dips.
- Loose Connections: Ensure the ice maker's power cord is securely plugged in. Check the wall outlet for any signs of damage or loose connections.
By systematically checking these external factors, you can often pinpoint the reason for diminished ice maker performance without needing to call for service. It’s a crucial step in the troubleshooting process.