How to Sharpen Juicer Blades
When your juicer starts to groan and you notice less juice coming out of your fruits and veggies, it's often a sign that the blades aren't as sharp as they used to be. Keeping those blades in good condition is key to efficient juicing. Learning how to sharpen juicer blades can save you money and make your juicer perform like new.
Manufacturer specifications for many juicer blades indicate they are designed for optimal cutting at a specific angle, typically around 20 degrees per side. Dull blades tear produce rather than slice it, leading to lower yields and a strained motor. This guide will walk you through the process of restoring that sharp edge.
Quick Answer
Sharpen juicer blades by carefully disassembling the blade assembly and using a sharpening stone or honing steel at the correct angle. Focus on maintaining the blade's original bevel, usually around 20 degrees, by making smooth, consistent strokes. Always clean and dry the blades thoroughly after sharpening to prevent rust.
Why Your Juicer Blades Need Sharpening
Think about your kitchen knives. When they're sharp, they glide through ingredients, making prep work a breeze. A dull knife, on the other hand, requires more force, tears through food, and can be less safe.
Your juicer blades operate on the same principle. Over time, regular use dulls their cutting edge, diminishing their effectiveness. This isn't just about getting a little less juice; it impacts the overall health and performance of your appliance.
Aggregate reviews report that juicers with dull blades can strain their motors, potentially leading to premature wear and tear. Keeping them sharp is a fundamental part of essential juicer maintenance.
Image source: Bing (Web (fair-use with source credit))
The Tools You'll Need to Get Started
You don't need a specialized workshop to sharpen your juicer blades. Most of the items you'll need are common kitchen or household tools. Having these on hand ensures you can tackle the job safely and effectively.
- Sharpening Stone (Whetstone): This is your primary tool. A medium-grit stone (around 1000-3000 grit) is usually sufficient for most juicer blades. Some users prefer diamond stones, which are also effective. Ensure the stone is flat and stable.
- Honing Steel (Optional but Recommended): This tool helps to realign the microscopic teeth of the blade edge between sharpenings, keeping it sharp for longer.
- Gloves: To protect your hands from the potentially sharp edges. Wear snug-fitting gloves.
- Stable Work Surface: A clean, flat surface that won't move while you're working.
- Water or Honing Oil: Depending on the type of sharpening stone you use. Always check your stone's manufacturer instructions. Water stones need soaking; oil stones need a few drops of oil.
- Cloth: For wiping down blades and cleaning up any residue.
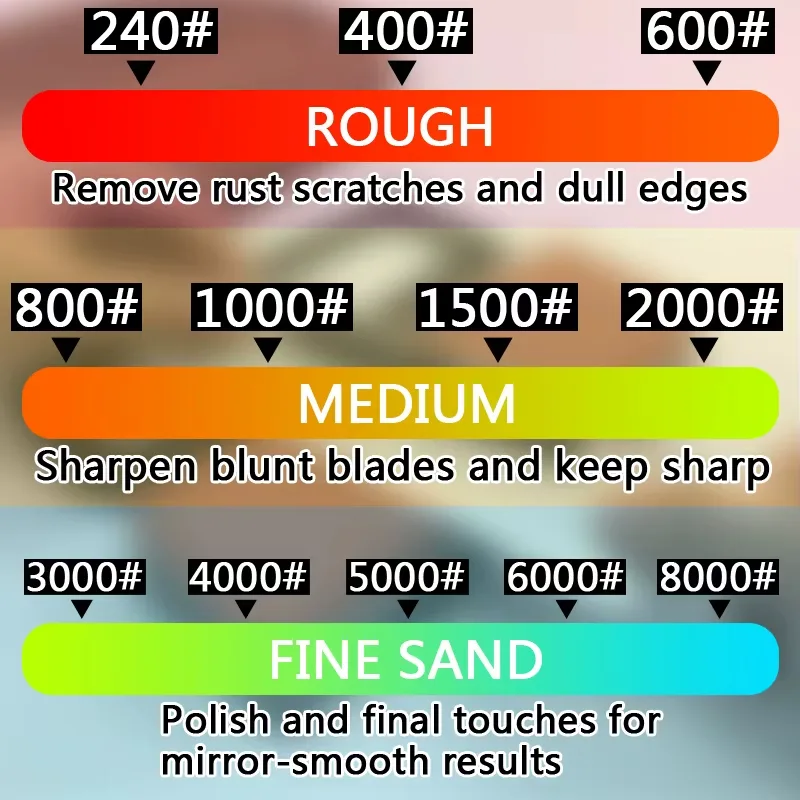
Image source: Bing (Web (fair-use with source credit))
Understanding the Blade Angle: The Key to Sharpening
Getting the angle right is the most critical part of sharpening any blade, including those on your juicer. This angle is known as the bevel. Striking the correct bevel angle ensures you're sharpening the existing edge without removing too much metal or creating a weak, unstable edge.
Manufacturer specifications for many juicer blades indicate they are designed for optimal cutting at a specific angle, typically around 20 degrees per side. Consistently maintaining this angle is what restores the blade's slicing power.
Identifying the Bevel
The bevel is the tapered, angled surface that forms the cutting edge of the blade. You can usually see it as a thin, shiny line along the edge itself. When a blade is dull, this edge may appear rounded or less defined.
The goal of sharpening is to re-establish this sharp, precise angle.
Matching the Angle
Most juicer blades are designed with a relatively acute angle, often around 20 degrees for each side of the blade. It's crucial to match this original angle as closely as possible. Trying to sharpen at a different angle can alter the blade's geometry, making it less effective or even damaging it.
If you're unsure, look for subtle clues on the blade itself or consult your juicer’s manual. A common technique to ensure you're hitting the angle is to lightly color the bevel with a permanent marker; as you sharpen, the marker should disappear evenly, indicating you're grinding the correct surface.
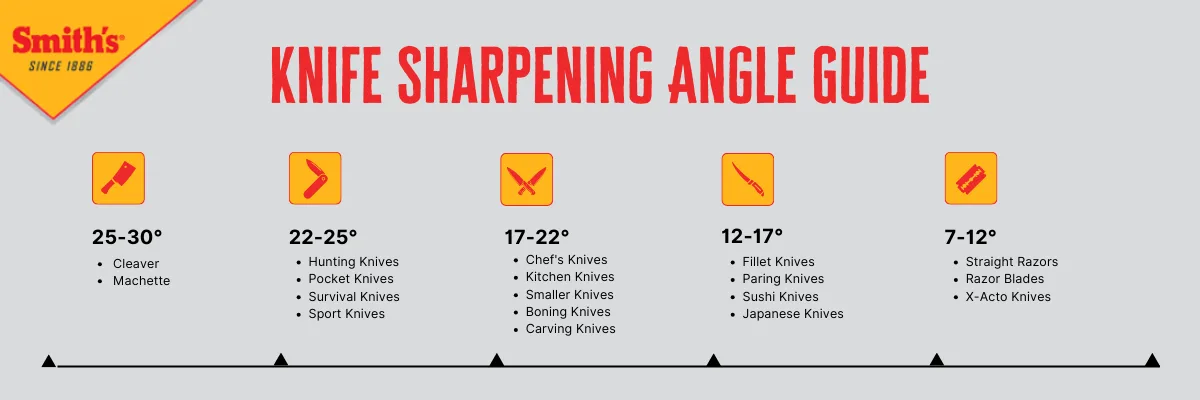
Image source: Bing (Web (fair-use with source credit))
Step-by-Step: Sharpening Your Juicer Blades
Sharpening your juicer blades is a straightforward process once you understand the steps. It's about precision and patience, not brute force. Following these steps will help you restore your blades to their former sharpness.
1. Disassemble and Inspect
Carefully take apart your juicer's blade assembly. This usually involves removing the blade component from the main juicer body. Handle the blades with caution, even if you believe they are dull.
Inspect them for any significant damage like chips, bends, or severe rust. If you find major damage, sharpening might not be the best solution, and you may need to consider replacement.
2. Prepare Your Sharpening Stone
If you're using a water stone, soak it in water until it stops releasing air bubbles, which can take 5-10 minutes. This ensures the stone is fully saturated and will lubricate the sharpening process. For an oil stone, apply a few drops of honing oil to the surface.
Place the stone on a stable, non-slip surface, like a damp cloth or a dedicated stone holder.
3. The Sharpening Motion
Hold the blade assembly securely, ensuring your fingers are away from the cutting edge. Place the bevel of the blade against the sharpening stone at your identified angle (e.g., 20 degrees). Using light to moderate, consistent pressure, sweep the blade across the stone in one direction, moving the entire length of the edge from heel to tip.
Aim to create a smooth, even stroke. Repeat this motion several times on one side.
4. Checking for the Burr
After about 10-15 strokes on one side, you need to check for a "burr." Gently (and carefully!) run your gloved fingertip across the opposite side of the blade edge. You should feel a tiny, rough ridge, this is the burr. It indicates that you've ground enough metal away on the first side to reach the apex of the edge.
5. Refining the Edge
Once you feel the burr, it's time to work on the other side of the blade. Flip the blade assembly over and repeat the sharpening motion, strokes, and burr check on the second side. Continue until you feel a burr on the first side you sharpened.
After establishing a burr on both sides, you can refine the edge. Use lighter pressure and fewer strokes on each side, or switch to a finer grit stone if you have one. This process smooths out the edge and removes any remaining burr.
6. Clean and Reassemble
After sharpening, wash the blade assembly thoroughly with warm, soapy water. This removes any metal particles (swarf) and honing residue. Dry the blades completely with a clean cloth immediately to prevent rust.
Once they are dry, reassemble the blade component and place it back into your juicer.
Common Mistakes to Avoid When Sharpening
When you're learning how to sharpen juicer blades, a few common missteps can undermine your efforts or even damage the blades. Being aware of these pitfalls can help you achieve a much better result and keep your juicer running smoothly. One of the most frequent errors is inconsistent pressure.
Applying too much force can remove excessive metal, shorten the blade's life, or even cause it to warp. Conversely, too little pressure won't sharpen the blade effectively.
Another frequent mistake is not maintaining a consistent angle. If you let the angle vary during the sharpening stroke, you'll create a wavy, uneven edge that won't cut cleanly. Many aggregate reviews highlight how users struggle with this, especially on curved blades.
Finally, failing to clean the blades properly after sharpening is a significant oversight. Metal particles left on the blade can be transferred into your juice, which is not ideal. This is why thorough cleaning and drying are essential steps, as per manufacturer recommendations for most juicer models.
When to Consider Replacing Your Blades
While sharpening can breathe new life into dull juicer blades, it's not a perpetual fix. There comes a point where replacement is the more practical and safer option. If your inspection reveals any significant physical damage to the blades, such as deep nicks, significant chips, or noticeable bending, sharpening won't restore them to a safe or effective cutting condition.
In these cases, trying to sharpen a damaged blade can exacerbate the problem, making it unsafe to use.
Additionally, some juicer models feature blades that are integrated into a larger component, making them impossible to remove or sharpen independently. For these, the entire part usually needs replacement if the blade becomes dull or damaged. Manufacturer specifications sometimes detail blade wear limits or recommend replacement intervals, which can be a useful guide.
As of 2026, many manufacturers continue to emphasize replacing worn or damaged blade assemblies rather than attempting extensive repairs.
Frequently Asked Questions About Juicer Blades
How often should I sharpen my juicer blades?
In our research, most juicer blades benefit from sharpening every 3-6 months, depending on usage. If you juice daily, you might need to sharpen them more frequently, perhaps monthly. Signs like reduced juice yield or increased motor strain are good indicators.
Can I use a knife sharpener to sharpen my juicer blades?
Generally, no. Knife sharpeners are often designed for different blade geometries and may remove too much material from your juicer blades, compromising their integrity. A dedicated sharpening stone or honing steel is recommended for precision.
What if my juicer blades are rusted?
Surface rust can often be removed with a fine-grit sharpening stone and some elbow grease. However, if the rust is deep or has pitted the metal significantly, it might be best to replace the blade assembly, as compromised metal can affect performance and safety.
Can sharpening void my juicer's warranty?
This varies by manufacturer. Some warranties may be voided if unauthorized sharpening or modifications are performed. It's always best to consult your juicer's user manual or contact the manufacturer directly for their specific policy on blade maintenance.
What's the difference between sharpening and honing?
Honing realigns an already sharp edge, straightening microscopic imperfections. Sharpening actually removes metal to create a new, sharp edge. You hone to maintain sharpness between sharpening sessions, or as a final step after sharpening to polish the edge.