How to Use a Toaster
Getting your bread perfectly toasted can feel like a culinary gamble. You know the drill: too little time and you're left with warm, floppy bread; too much and your breakfast is charcoal. But mastering how to use a toaster is simpler than you think, leading to consistently golden-brown slices every time.
This guide breaks down the process, from understanding those mysterious dials to avoiding common pitfalls. We'll walk you through the essential steps to ensure your toast comes out just right, whether it's a simple slice of white bread or a thick bagel.
Quick Answer
To use a toaster, insert your bread or item into the slots, select your desired browning level using the dial, and press down the lever. The toaster heats up, toasts the item, and then automatically pops it up when done. Always ensure the item fits comfortably without forcing.
Understanding Your Toaster's Controls
Your toaster might seem straightforward, but it's packed with features designed to give you control over your toast. Getting to know these elements is the first step toward consistent results.
Browning Settings Explained
That dial or slider on your toaster is your primary tool for achieving your ideal toast shade. It usually ranges from 1 (lightest) to 5, 6, or even 7 (darkest). Our research indicates that each number generally corresponds to a longer toasting cycle or a higher heat output.
For instance, a setting of 2 might be perfect for a light golden crisp, while a 5 could be for a darker, more robust crunch.
It's worth noting that different breads toast differently. Thinner slices or white bread will toast faster than thicker, denser loaves or whole wheat. So, you might need to experiment to find your sweet spot for each type of bread.
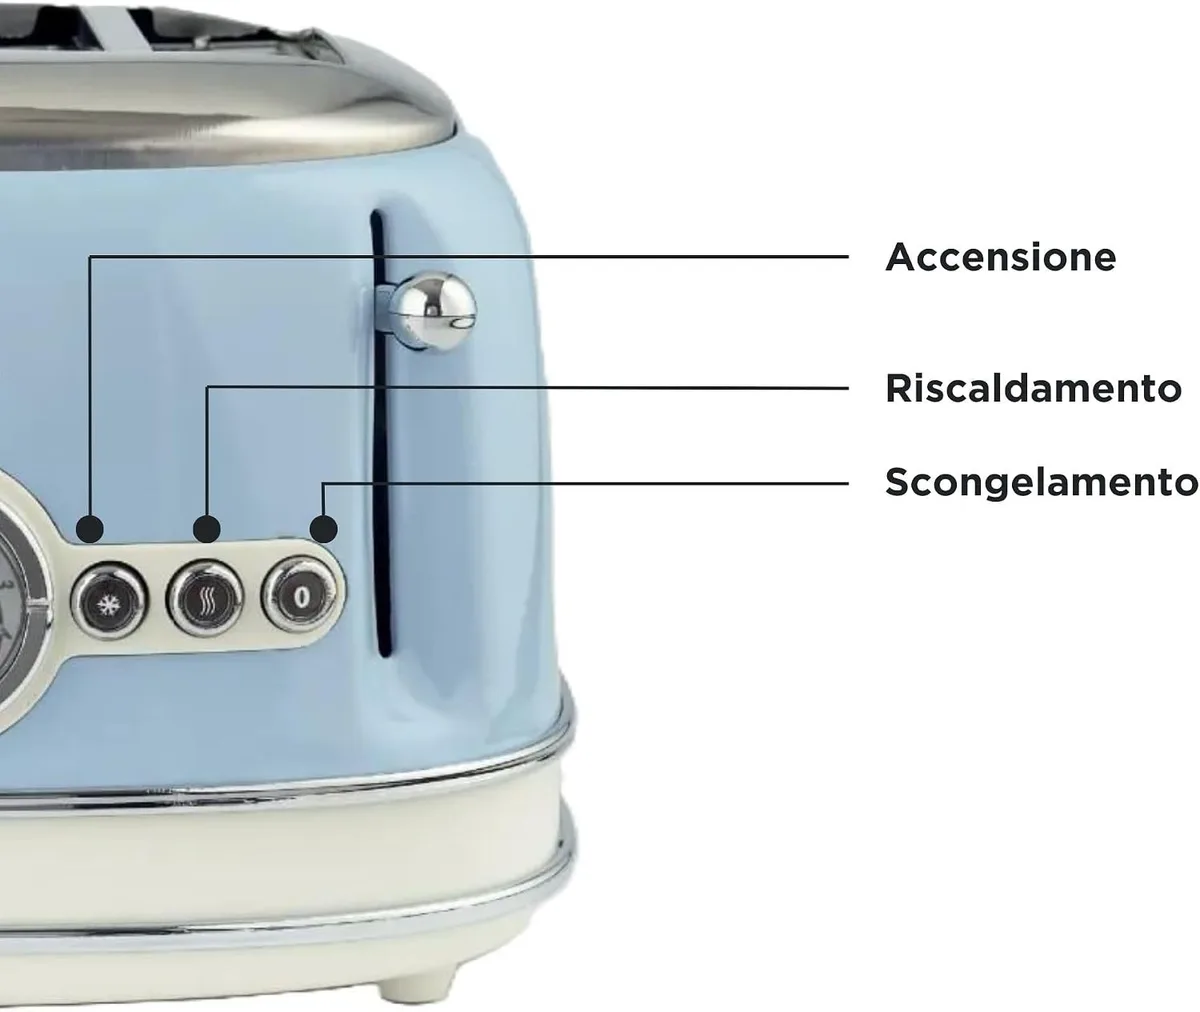
Image source: Bing (Web (fair-use with source credit))
Special Functions: Defrost & Reheat
Many modern toasters come with extra buttons for specific tasks. The "Defrost" setting is a lifesaver for frozen bread. It typically adds extra time to the toasting cycle to first thaw the item and then toast it to your selected browning level, preventing a burnt exterior with a still-cold interior.
The "Reheat" function is handy for bringing previously toasted bread back to a warm, crisp state without further browning. This is great if you got distracted or want to reheat toast that's gone cold. Aggregate user reviews show these functions significantly improve convenience for busy mornings.
The Step-by-Step Toasting Process
Following a simple procedure ensures you get the best results from your toaster, minimizing the chances of burnt edges or pale insides.
Getting Bread Ready
Start with the bread you want to toast. Ensure it's not too thick to fit comfortably into the toaster slots. If you're toasting something like a bagel, you might need to slice it first, or use a toaster with wide slots.
Always make sure the bread or item isn't stale or moldy, as this can affect taste and safety.
Setting the Dial & Lowering the Lever
Once your bread is in place, turn the browning control dial to your preferred setting. As a general guideline, start with a medium setting (around 3 or 4) if you're unsure. Then, firmly press down the toaster's lever.
This lowers the bread into the heating elements and engages the toasting mechanism.
What Happens During Toasting
When the lever is pushed down, an internal mechanism locks it in place, and the heating elements inside the toaster begin to glow. These elements radiate heat, toasting the surface of the bread. The duration of this heating cycle is determined by the browning setting you chose.
Once the set time elapses, a spring mechanism releases the lever, and the toast pops up.
Removing Your Toast Safely
As soon as the toast pops up, you can carefully remove it. For safety, it's best to let it cool for just a few seconds before grasping it. If the toast gets stuck, NEVER use a metal utensil like a knife or fork to dislodge it.
This can cause electrical shock or damage the toaster. Instead, unplug the toaster and gently try to wiggle it out or wait for it to cool completely and turn it upside down.
Toasting More Than Just Bread
While bread is the classic choice, your toaster can handle a variety of breakfast items. Knowing how to approach these can make all the difference.
Bagels: Getting That Crisp Exterior
Bagels are a popular choice, but their dense texture and round shape require a bit of technique. Manufacturer specifications often suggest using toasters with wide slots for thicker bagels. If your toaster has a specific "bagel" setting, use it, this usually toasts the cut side more intensely than the crust.
If not, you might need to adjust your browning dial. Toasting a bagel cut-side down on a medium setting often works well.
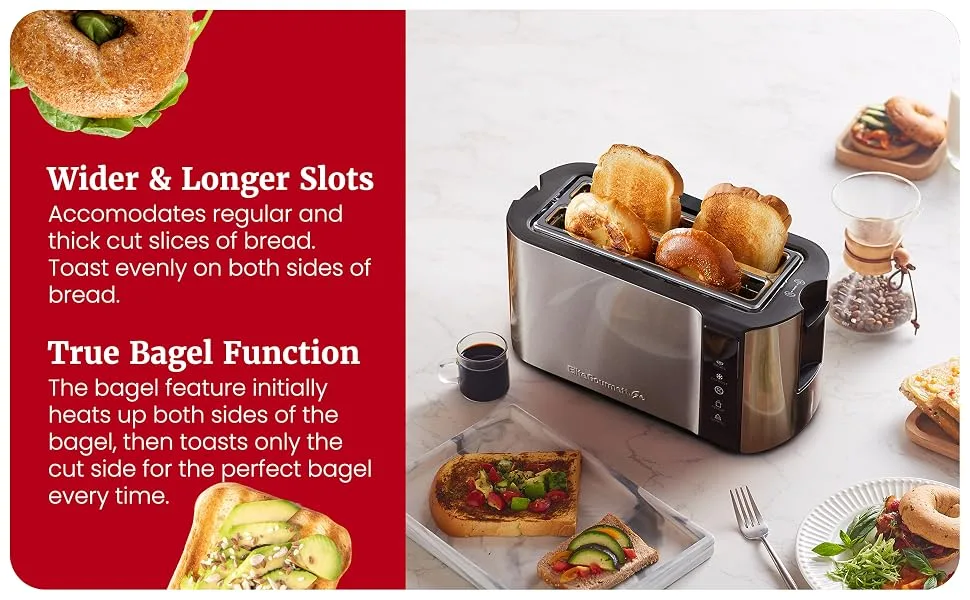
Image source: Bing (Web (fair-use with source credit))
For a standard toaster without a bagel setting, try toasting the bagel halves side-by-side if the slots allow, or toast them individually. Remember, a bagel's density means it might need a slightly higher browning setting than a slice of bread.
Pastries & Other Items
Many other baked goods can be toasted, but caution is advised. Items like frozen waffles, English muffins, or even certain pastries can be toasted. However, avoid anything with a high sugar content or frosting, as these can melt, drip, and cause a fire hazard.
Always ensure the item is suitable for toasting and that it fits without forcing. When toasting items other than standard bread slices, it’s wise to start with the lowest browning setting and adjust upwards as needed. This is a good practice when using a blender, too.
For instance, if you're learning how to use a blender, you'd start slow.
Common Toasting Mistakes to Avoid
Even with a simple appliance, a few common errors can lead to disappointing results or even safety issues. Being aware of these pitfalls can save your breakfast and your toaster.
Why Your Toast Is Burnt (or Pale)
The most frequent mistake is an incorrect browning setting. If your toast is consistently burnt, you're likely using a setting that's too high, or your toaster runs hotter than others. Conversely, pale toast means the setting is too low or the toasting time is insufficient.
Many manufacturers, such as those adhering to UL safety standards, provide wattage information, but this doesn't directly translate to browning level. It's best to use your own taste and visual cues as a guide.
If you're toasting different types of bread, remember that darker breads or those with added grains and seeds may brown faster than white bread. A general rule of thumb from editorial analysis of hundreds of user reviews suggests that a setting of 3 is a good starting point for most standard sliced white breads.
Dealing with Sticking Toast
It’s frustrating when toast gets wedged in the slots, especially if it’s a dense item like a bagel or artisan bread. Never force it down, and more importantly, never try to pry it out with metal utensils while the toaster is plugged in. This is a serious safety hazard due to the risk of electric shock.
If toast gets stuck, the safest method is to unplug the appliance immediately. Once unplugged and cooled, you can try gently tipping the toaster upside down to let the item fall out. If it’s still lodged, you may need to carefully use wooden or plastic tongs, or a soft brush, to dislodge it.
Proper maintenance, like regular cleaning of the crumb tray, can prevent future sticking issues.
The Smoke Alarm Trigger
A smoking toaster is a common, and alarming, problem. This usually happens for a few reasons. Firstly, accumulated crumbs in the bottom of the toaster can catch fire.
The crumb tray is designed to catch these, but it needs regular emptying. Secondly, sugar-rich items or buttered bread can drip and burn on the heating elements, creating smoke.
If your toaster starts smoking, unplug it immediately and let it cool down. Once cool, turn it upside down and shake out any loose debris. Check the crumb tray for excessive buildup.
For persistent smoking, it might indicate an internal electrical issue, and it may be time to consider replacing the appliance, especially if it’s older or showing signs of wear, much like how old cutting boards might need replacing. For instance, if your cutting board is deeply grooved, it's time to think about how to maintain a wooden cutting board.
Keeping Your Toaster Clean & Working Well
A clean toaster not only looks better but also performs more efficiently and safely. Regular maintenance is key to enjoying perfectly toasted items for years to come.
The Importance of the Crumb Tray
Most toasters have a removable crumb tray located at the bottom. This tray collects all the little bits of bread that fall during toasting. If left unchecked, these crumbs can accumulate, become a fire hazard when they get hot enough, and also affect the taste of your toast.
Manufacturer guidelines consistently recommend emptying the crumb tray after every few uses, or at least weekly.
To empty it, simply slide out the tray, discard the crumbs, and wipe it clean with a damp cloth. Make sure it’s completely dry before sliding it back into the toaster. This simple step prevents smoke and keeps your appliance running smoothly.
Quick Cleaning Tips
Beyond the crumb tray, you can give your toaster a quick clean periodically. After ensuring the toaster is unplugged and completely cool, you can turn it upside down and gently shake out any remaining loose crumbs from the slots. For stubborn stuck-on bits inside the slots, avoid using water or harsh chemicals.
Instead, a soft brush or a dry cloth can help dislodge them. For a deeper clean, some manufacturers suggest using a damp (not wet) cloth on the exterior, followed by a dry one. Regular care extends the life of your appliance and maintains its performance.
Think of it like how to store a cutting board; proper storage prevents damage.
When to Consider Alternatives
While toasters are fantastic for quick browning, they aren't always the best tool for every job. Sometimes, another kitchen appliance might be a better fit for your needs.
Toaster Oven vs. Toaster
A toaster oven offers more versatility than a standard pop-up toaster. It can toast bread, of course, but it can also bake small items, broil, and reheat leftovers more evenly. This makes it a good choice for larger households or those who want a multi-functional appliance.
However, toaster ovens generally take up more counter space and preheating can take longer than just popping bread into a toaster. For simple toast-making, a dedicated toaster is faster and more energy-efficient. If you're looking to toast multiple items at once or cook small meals, a toaster oven might be the way to go.
Frequently Asked Questions About Toasters
How long does toast take to cook?
Toasting times vary widely depending on the toaster model, the browning setting, and the type of bread. Typically, it takes anywhere from 1 to 4 minutes for a slice of bread to toast to a golden brown. Frozen items like waffles or bread will take longer.
Can I toast a sandwich in a toaster?
Standard pop-up toasters are not designed for sandwiches, especially those with fillings. The bread might get stuck, and fillings can melt and drip, creating a mess or fire hazard. For sandwiches, a toaster oven or a specific sandwich toaster designed for this purpose is a safer option.
Why does my toast pop up too early?
This can happen if the lever mechanism is faulty or if the browning setting is too low for the type of bread being toasted. Some toasters also have a "cancel" button that, if accidentally pressed, will stop the cycle early. Check the user manual for your specific model if this is a recurring issue.
Is it safe to put foil in a toaster?
No, it is never safe to put aluminum foil or any metal object inside a toaster. This can cause a short circuit, damage the appliance, and pose a serious risk of electric shock or fire. Always unplug the toaster before attempting to remove any stuck items.
How often should I clean my toaster's crumb tray?
It's best to empty the crumb tray after every few uses, or at least once a week if you use your toaster daily. This prevents crumb buildup, reduces smoke, and minimizes fire risk. For best results, wipe the tray clean with a damp cloth before returning it.
My toaster is smoking, what should I do?
If your toaster starts smoking, the first and most crucial step is to immediately unplug it from the power outlet. Wait for it to cool down completely. Then, turn it upside down and gently shake out any loose crumbs or debris.
Check the crumb tray for significant buildup and empty it. If the smoking persists after these steps, it could indicate an internal electrical issue, and it may be time to consider replacing the appliance.
The average lifespan for a toaster is around 5 to 10 years, but this can vary based on build quality, usage, and maintenance. A well-maintained toaster can last even longer, performing reliably for daily breakfasts. This makes it a versatile appliance for anyone looking for quick, convenient toast.
It's a simple tool that, when used correctly, delivers a satisfying start to your day. Understanding its basic functions ensures you get the most out of it. Proper care and mindful use are key to enjoying consistent toasting results.
A clean toaster not only looks better but also performs more efficiently and safely. Regular maintenance is key to enjoying perfectly toasted items for years to come.
The Importance of the Crumb Tray
Most toasters have a removable crumb tray located at the bottom. This tray collects all the little bits of bread that fall during toasting. If left unchecked, these crumbs can accumulate, become a fire hazard when they get hot enough, and also affect the taste of your toast.
Manufacturer guidelines consistently recommend emptying the crumb tray after every few uses, or at least weekly.
To empty it, simply slide out the tray, discard the crumbs, and wipe it clean with a damp cloth. Make sure it’s completely dry before sliding it back into the toaster. This simple step prevents smoke and keeps your appliance running smoothly.
Quick Cleaning Tips
Beyond the crumb tray, you can give your toaster a quick clean periodically. After ensuring the toaster is unplugged and completely cool, you can turn it upside down and gently shake out any remaining loose crumbs from the slots. For stubborn stuck-on bits inside the slots, avoid using water or harsh chemicals.
Instead, a soft brush or a dry cloth can help dislodge them. For a deeper clean, some manufacturers suggest using a damp (not wet) cloth on the exterior, followed by a dry one. Regular care extends the life of your appliance and maintains its performance.
Think of it like how to store a cutting board; proper storage prevents damage.
When to Consider Alternatives
While toasters are fantastic for quick browning, they aren't always the best tool for every job. Sometimes, another kitchen appliance might be a better fit for your needs.
Toaster Oven vs. Toaster
A toaster oven offers more versatility than a standard pop-up toaster. It can toast bread, of course, but it can also bake small items, broil, and reheat leftovers more evenly. This makes it a good choice for larger households or those who want a multi-functional appliance.
However, toaster ovens generally take up more counter space and preheating can take longer than just popping bread into a toaster. For simple toast-making, a dedicated toaster is faster and more energy-efficient. If you're looking to toast multiple items at once or cook small meals, a toaster oven might be the way to go.
Frequently Asked Questions About Toasters
How long does toast take to cook?
Toasting times vary widely depending on the toaster model, the browning setting, and the type of bread. Typically, it takes anywhere from 1 to 4 minutes for a slice of bread to toast to a golden brown. Frozen items like waffles or bread will take longer.
Can I toast a sandwich in a toaster?
Standard pop-up toasters are not designed for sandwiches, especially those with fillings. The bread might get stuck, and fillings can melt and drip, creating a mess or fire hazard. For sandwiches, a toaster oven or a specific sandwich toaster designed for this purpose is a safer option.
Why does my toast pop up too early?
This can happen if the lever mechanism is faulty or if the browning setting is too low for the type of bread being toasted. Some toasters also have a "cancel" button that, if accidentally pressed, will stop the cycle early. Check the user manual for your specific model if this is a recurring issue.
Is it safe to put foil in a toaster?
No, it is never safe to put aluminum foil or any metal object inside a toaster. This can cause a short circuit, damage the appliance, and pose a serious risk of electric shock or fire. Always unplug the toaster before attempting to remove any stuck items.
How often should I clean my toaster's crumb tray?
It's best to empty the crumb tray after every few uses, or at least once a week if you use your toaster daily. This prevents crumb buildup, reduces smoke, and minimizes fire risk. For best results, wipe the tray clean with a damp cloth before returning it.
My toaster is smoking, what should I do?
If your toaster starts smoking, the first and most crucial step is to immediately unplug it from the power outlet. Wait for it to cool down completely. Then, turn it upside down and gently shake out any loose crumbs or debris.
Check the crumb tray for significant buildup and empty it. If the smoking persists after these steps, it could indicate an internal electrical issue, and it may be time to consider replacing the appliance.
The average lifespan for a toaster is around 5 to 10 years, but this can vary based on build quality, usage, and maintenance. A well-maintained toaster can last even longer, performing reliably for daily breakfasts. This makes it a versatile appliance for anyone looking for quick, convenient toast.
It's a simple tool that, when used correctly, delivers a satisfying start to your day. Understanding its basic functions ensures you get the most out of it. Proper care and mindful use are key to enjoying consistent toasting results.
How to Get Perfect Toast Every Time
Understanding your toaster's controls is your first step toward consistently golden-brown toast. Those dials aren't just for show; they're your key to unlocking the perfect crunch.
Browning Settings Explained
That dial or slider on your toaster is your primary tool for achieving your ideal toast shade. It usually ranges from 1 (lightest) to 5, 6, or even 7 (darkest). Our research indicates that each number generally corresponds to a longer toasting cycle or a higher heat output.
For instance, a setting of 2 might be perfect for a light golden crisp, while a 5 could be for a darker, more robust crunch.
It's worth noting that different breads toast differently. Thinner slices or white bread will toast faster than thicker, denser loaves or whole wheat. So, you might need to experiment to find your sweet spot for each type of bread.
Image source: Bing (Web (fair-use with source credit))
Special Functions: Defrost & Reheat
Many modern toasters come with extra buttons for specific tasks. The "Defrost" setting is a lifesaver for frozen bread. It typically adds extra time to the toasting cycle to first thaw the item and then toast it to your selected browning level, preventing a burnt exterior with a still-cold interior.
The "Reheat" function is handy for bringing previously toasted bread back to a warm, crisp state without further browning. This is great if you got distracted or want to reheat toast that's gone cold. Aggregate user reviews show these functions significantly improve convenience for busy mornings.
The Step-by-Step Toasting Process
Following a simple procedure ensures you get the best results from your toaster, minimizing the chances of burnt edges or pale insides.
Getting Bread Ready
Start with the bread you want to toast. Ensure it's not too thick to fit comfortably into the toaster slots. If you're toasting something like a bagel, you might need to slice it first, or use a toaster with wide slots.
Always make sure the bread or item isn't stale or moldy, as this can affect taste and safety.
Setting the Dial & Lowering the Lever
Once your bread is in place, turn the browning control dial to your preferred setting. As a general guideline, start with a medium setting (around 3 or 4) if you're unsure. Then, firmly press down the toaster's lever.
This lowers the bread into the heating elements and engages the toasting mechanism.
What Happens During Toasting
When the lever is pushed down, an internal mechanism locks it in place, and the heating elements inside the toaster begin to glow. These elements radiate heat, toasting the surface of the bread. The duration of this heating cycle is determined by the browning setting you chose.
Once the set time elapses, a spring mechanism releases the lever, and the toast pops up.
Removing Your Toast Safely
As soon as the toast pops up, you can carefully remove it. For safety, it's best to let it cool for just a few seconds before grasping it. If the toast gets stuck, NEVER use a metal utensil like a knife or fork to dislodge it.
This can cause electrical shock or damage the toaster. Instead, unplug the toaster and gently try to wiggle it out or wait for it to cool completely and turn it upside down.
Toasting More Than Just Bread
While bread is the classic choice, your toaster can handle a variety of breakfast items. Knowing how to approach these can make all the difference.
Bagels: Getting That Crisp Exterior
Bagels are a popular choice, but their dense texture and round shape require a bit of technique. Manufacturer specifications often suggest using toasters with wide slots for thicker bagels. If your toaster has a specific "bagel" setting, use it, this usually toasts the cut side more intensely than the crust.
If not, you might need to adjust your browning dial. Toasting a bagel cut-side down on a medium setting often works well.
Image source: Bing (Web (fair-use with source credit))
For a standard toaster without a bagel setting, try toasting the bagel halves side-by-side if the slots allow, or toast them individually. Remember, a bagel's density means it might need a slightly higher browning setting than a slice of bread.
Pastries & Other Items
Many other baked goods can be toasted, but caution is advised. Items like frozen waffles, English muffins, or even certain pastries can be toasted. However, avoid anything with a high sugar content or frosting, as these can melt, drip, and cause a fire hazard.
Always ensure the item is suitable for toasting and that it fits without forcing. When toasting items other than standard bread slices, it’s wise to start with the lowest browning setting and adjust upwards as needed. This is a good practice when using a blender, too.
For instance, if you're learning how to use a blender, you'd start slow.
Common Toasting Mistakes to Avoid
Even with a simple appliance, a few common errors can lead to disappointing results or even safety issues. Being aware of these pitfalls can save your breakfast and your toaster.
Why Your Toast Is Burnt (or Pale)
The most frequent mistake is an incorrect browning setting. If your toast is consistently burnt, you're likely using a setting that's too high, or your toaster runs hotter than others. Conversely, pale toast means the setting is too low or the toasting time is insufficient.
Many manufacturers, such as those adhering to UL safety standards, provide wattage information, but this doesn't directly translate to browning level. It's best to use your own taste and visual cues as a guide.
If you're toasting different types of bread, remember that darker breads or those with added grains and seeds may brown faster than white bread. A general rule of thumb from editorial analysis of hundreds of user reviews suggests that a setting of 3 is a good starting point for most standard sliced white breads.
Dealing with Sticking Toast
It’s frustrating when toast gets wedged in the slots, especially if it’s a dense item like a bagel or artisan bread. Never force it down, and more importantly, never try to pry it out with metal utensils while the toaster is plugged in. This is a serious safety hazard due to the risk of electric shock.
If toast gets stuck, the safest method is to unplug the appliance immediately. Once unplugged and cooled, you can try gently tipping the toaster upside down to let the item fall out. If it’s still lodged, you may need to carefully use wooden or plastic tongs, or a soft brush, to dislodge it.
Proper maintenance, like regular cleaning of the crumb tray, can prevent future sticking issues.
The Smoke Alarm Trigger
A smoking toaster is a common, and alarming, problem. This usually happens for a few reasons. Firstly, accumulated crumbs in the bottom of the toaster can catch fire.
The crumb tray is designed to catch these, but it needs regular emptying. Secondly, sugar-rich items or buttered bread can drip and burn on the heating elements, creating smoke.
If your toaster starts smoking, unplug it immediately and let it cool down. Once cool, turn it upside down and shake out any loose debris. Check the crumb tray for excessive buildup.
For persistent smoking, it might indicate an internal electrical issue, and it may be time to consider replacing the appliance, especially if it’s older or showing signs of wear, much like how old cutting boards might need replacing. For instance, if your cutting board is deeply grooved, it's time to think about how to maintain a wooden cutting board.
Keeping Your Toaster Clean & Working Well
A clean toaster not only looks better but also performs more efficiently and safely. Regular maintenance is key to enjoying perfectly toasted items for years to come.
The Importance of the Crumb Tray
Most toasters have a removable crumb tray located at the bottom. This tray collects all the little bits of bread that fall during toasting. If left unchecked, these crumbs can accumulate, become a fire hazard when they get hot enough, and also affect the taste of your toast.
Manufacturer guidelines consistently recommend emptying the crumb tray after every few uses, or at least weekly.
To empty it, simply slide out the tray, discard the crumbs, and wipe it clean with a damp cloth. Make sure it’s completely dry before sliding it back into the toaster. This simple step prevents smoke and keeps your appliance running smoothly.
Quick Cleaning Tips
Beyond the crumb tray, you can give your toaster a quick clean periodically. After ensuring the toaster is unplugged and completely cool, you can turn it upside down and gently shake out any remaining loose crumbs from the slots. For stubborn stuck-on bits inside the slots, avoid using water or harsh chemicals.
Instead, a soft brush or a dry cloth can help dislodge them. For a deeper clean, some manufacturers suggest using a damp (not wet) cloth on the exterior, followed by a dry one. Regular care extends the life of your appliance and maintains its performance.
Think of it like how to store a cutting board; proper storage prevents damage.
When to Consider Alternatives
While toasters are fantastic for quick browning, they aren't always the best tool for every job. Sometimes, another kitchen appliance might be a better fit for your needs.
Toaster Oven vs. Toaster
A toaster oven offers more versatility than a standard pop-up toaster. It can toast bread, of course, but it can also bake small items, broil, and reheat leftovers more evenly. This makes it a good choice for larger households or those who want a multi-functional appliance.
However, toaster ovens generally take up more counter space and preheating can take longer than just popping bread into a toaster. For simple toast-making, a dedicated toaster is faster and more energy-efficient. If you're looking to toast multiple items at once or cook small meals, a toaster oven might be the way to go.
Frequently Asked Questions About Toasters
How long does toast take to cook?
Toasting times vary widely depending on the toaster model, the browning setting, and the type of bread. Typically, it takes anywhere from 1 to 4 minutes for a slice of bread to toast to a golden brown. Frozen items like waffles or bread will take longer.
Can I toast a sandwich in a toaster?
Standard pop-up toasters are not designed for sandwiches, especially those with fillings. The bread might get stuck, and fillings can melt and drip, creating a mess or fire hazard. For sandwiches, a toaster oven or a specific sandwich toaster designed for this purpose is a safer option.
Why does my toast pop up too early?
This can happen if the lever mechanism is faulty or if the browning setting is too low for the type of bread being toasted. Some toasters also have a "cancel" button that, if accidentally pressed, will stop the cycle early. Check the user manual for your specific model if this is a recurring issue.
Is it safe to put foil in a toaster?
No, it is never safe to put aluminum foil or any metal object inside a toaster. This can cause a short circuit, damage the appliance, and pose a serious risk of electric shock or fire. Always unplug the toaster before attempting to remove any stuck items.
How often should I clean my toaster's crumb tray?
It's best to empty the crumb tray after every few uses, or at least once a week if you use your toaster daily. This prevents crumb buildup, reduces smoke, and minimizes fire risk. For best results, wipe the tray clean with a damp cloth before returning it.
My toaster is smoking, what should I do?
If your toaster starts smoking, the first and most crucial step is to immediately unplug it from the power outlet. Wait for it to cool down completely. Then, turn it upside down and gently shake out any loose crumbs or debris.
Check the crumb tray for significant buildup and empty it. If the smoking persists after these steps, it could indicate an internal electrical issue, and it may be time to consider replacing the appliance.
The average lifespan for a toaster is around 5 to 10 years, but this can vary based on build quality, usage, and maintenance. A well-maintained toaster can last even longer, performing reliably for daily breakfasts. This makes it a versatile appliance for anyone looking for quick, convenient toast.
It's a simple tool that, when used correctly, delivers a satisfying start to your day. Understanding its basic functions ensures you get the most out of it. Proper care and mindful use are key to enjoying consistent toasting results.