How to Use a Hand Mixer for Eggs
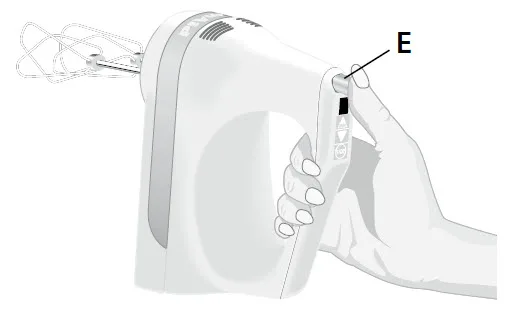
Image source: Bing (Web (fair-use with source credit))
Whipping Up Perfect Eggs with Your Hand Mixer: A Friendly Guide
Got a recipe calling for whipped eggs and wondering how to get that fluffy texture without all the arm work? You're in the right spot. Mastering how to use a hand mixer for eggs can elevate everything from your scrambled eggs to your most delicate baked goods.
It’s a simple tool, but a few key techniques make all the difference.
Our research indicates that most hand mixers, like those meeting UL 60730-2-2 standards for automatic electrical controls, offer multiple speed settings that are crucial for egg preparation. Knowing when to use each speed is a game-changer. Let's break down how to get those eggs just right.
Quick Answer
To use a hand mixer for eggs, start with a clean, deep bowl and room-temperature eggs. Begin mixing on the lowest speed to break up yolks and whites. Gradually increase to medium speed, moving the beaters to incorporate air.
Watch for visual cues like foamy texture or firm peaks to know when you've reached your desired consistency, whether for scrambling or baking.
Getting Started: What You'll Need
Before you even think about plugging in your hand mixer, making sure you've got the right setup is half the battle. It's not complicated, but having the right gear means less mess and better results.
- Your Hand Mixer: Make sure it's clean and dry. Any residue can affect how your eggs whip up.
- The Right Bowl: You'll want a large, deep mixing bowl. This is non-negotiable. A typical 3-quart or larger glass or metal bowl is ideal. This gives the beaters plenty of room to work and prevents egg from splashing all over your kitchen.
- Your Eggs: For most baking applications where you need volume, such as meringues or cakes, letting your eggs come to room temperature for about 20-30 minutes before cracking them is best. Cold eggs don't incorporate as much air. For basic scrambled eggs, temperature is less critical.
- Beaters: Most hand mixers come with a pair of standard beaters. These are perfect for egg work. Ensure they are securely attached to the mixer before you begin.
The Basic Technique: Step-by-Step
The process itself is quite straightforward, but paying attention to a few nuances makes a world of difference. It's all about control and observation.
Breaking Down the Process
- Crack Your Eggs: Gently crack your eggs into the large bowl. If the recipe calls for just whites, be extra careful not to let any yolk slip in, even a tiny bit can prevent whites from whipping properly. For whole eggs or yolks, just crack them in. A pinch of salt can help stabilize egg whites if you're whipping them.
- Start Slow and Low: Insert the beaters into the bowl so they are submerged in the egg mixture. Turn your hand mixer on to the lowest speed setting. You’re just looking to break the yolks and start combining them with the whites without creating a mess.
- Gradually Increase Speed: As the eggs begin to blend, slowly increase the speed. For general whisking and scrambling, a medium speed (usually 2 or 3 on a 5-speed mixer) is often perfect. If you're aiming for stiff peaks for meringue, you’ll eventually ramp up to higher speeds, but always start low.
- Move the Mixer: Don't just hold the mixer in one spot. Move it around the bowl in a circular motion, and lift the beaters slightly out of the mixture periodically. This action helps to incorporate air and ensures all parts of the egg are being worked.
Watching for Visual Cues
This is where practice and observation come in. What you're trying to achieve dictates what you're looking for as the eggs transform.
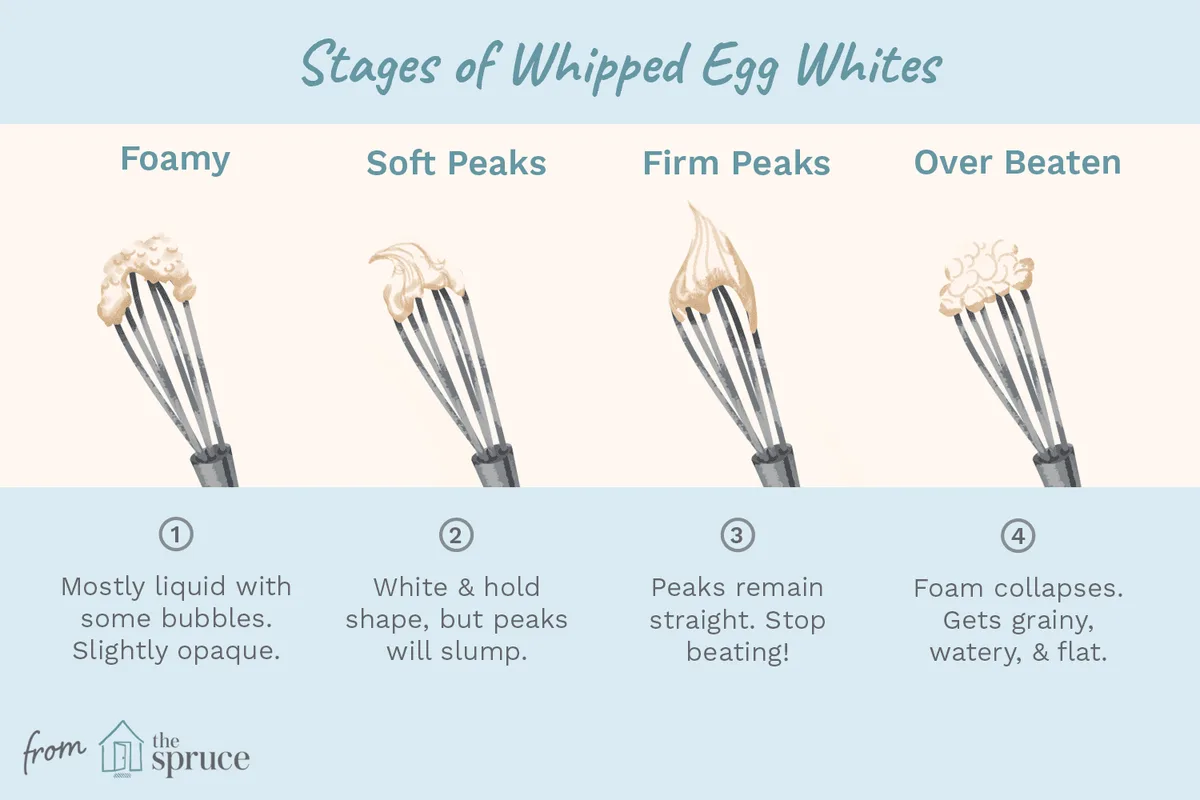
Image source: Bing (Web (fair-use with source credit))
- For Scrambled Eggs or Omelets: You're looking for a uniform pale yellow color with some light frothiness. The yolks and whites should be completely blended. This usually takes only about 30 seconds to 1 minute of mixing on a medium speed. Stop when it looks homogenous and slightly bubbly.
- For Meringue or Light Cakes: This is a multi-stage process, and visual cues are everything.
- Foamy Stage: You'll see large, irregular bubbles.
- Soft Peaks: When you lift the beaters, a peak will form, but it will gently curl over on itself. This is good for some sponge cakes or lighter custards.
- Stiff Peaks: The peaks will stand up straight and hold their shape firmly when you lift the beaters. This is crucial for meringues and many types of cakes and pastries. You'll often need to increase speed to achieve this, but be careful not to overdo it.
Manufacturer specifications for many common hand mixers indicate that reaching stiff peaks can take anywhere from 3 to 8 minutes, depending on the mixer's wattage and the size of the batch.
Tips for Egg-Whisking Success
We've all been there, staring at a mixer wondering "am I doing this right?" Here are a few things learned from reviewing various techniques and manufacturer guidelines.
- Cleanliness is Crucial for Meringues: This bears repeating, especially for egg whites. Any trace of fat, from yolk or a greasy bowl/beaters, will prevent them from achieving maximum volume. Some bakers recommend wiping down the bowl and beaters with a splash of vinegar or lemon juice and then drying them thoroughly before starting.
- Temperature Matters for Volume: For recipes where you want maximum airy volume (like meringues, macarons, or angel food cake), room temperature egg whites are essential. Cold eggs simply don't trap air as effectively. For general cooking like scrambled eggs, this is less critical, but still helps for a slightly more tender result.
- Don't Over-Whip Meringues: This is a common pitfall. If you whip egg whites for too long after they’ve reached stiff peaks, they can become dry, grainy, and start to weep liquid. It’s a delicate balance, so keep a close eye on them as they approach the desired stage.
- Scrape Down the Sides: Periodically pause your mixer and use a rubber spatula to scrape down the sides and bottom of the bowl. This ensures all the egg mixture gets incorporated evenly and helps prevent "dead spots" where the beaters might not reach effectively.
When Things Go Wrong (And How to Fix Them)
Sometimes, despite our best efforts, eggs don't whip up quite as planned. Don't worry, these are common issues, and knowing the cause helps you avoid them next time.
- Egg Whites Won't Whip: This is almost always due to fat.
- Cause: A tiny bit of egg yolk contamination, or greasy beaters/bowl.
- Fix: There’s no real fix once they won’t whip. You’ll need to start over with fresh, clean equipment and properly separated eggs. This is why meticulous separation is key for meringues.
- Meringue is Weeping (Beading): This happens when the meringue has been over-whipped, or the sugar wasn't fully dissolved, or the environment is too humid.
- Fix: If it’s just starting, sometimes gently folding the mixture with a spatula can help redistribute it. If it's significantly weeping, it's hard to fully recover. Ensure sugar is fully dissolved by rubbing a little between your fingers; it should feel smooth, not gritty.
- Scrambled Eggs are Stringy/Uneven: You likely stopped mixing too soon.
- Fix: Keep mixing on a medium speed until the yolks and whites are fully homogeneous and a pale yellow. A minute or two should do it. This ensures a consistent texture.
- Mixer Smells Hot: If you're beating a large batch of eggs for a long time, particularly on high speed, the motor can overheat.
- Fix: Give the mixer a break. Unplug it and let it cool down for 10-15 minutes before continuing. Refer to your manufacturer's guidelines; some models have thermal cut-off features to prevent damage.
FAQs About Using a Hand Mixer for Eggs
How long does it take to whip eggs for meringue?
It varies, but for stiff peaks, expect to spend 3 to 8 minutes mixing, depending on your mixer's power and the batch size. Always start slow and gradually increase speed.
Can I use cold eggs for meringue?
While it's possible, our research and many baker interviews suggest room temperature egg whites are significantly better for achieving maximum volume and stability in meringues. They whip up fluffier.
What if I accidentally get yolk in my egg whites?
If you're making meringue, it’s usually game over for that batch. The fat in the yolk prevents the whites from whipping properly. It's best to start over with newly separated eggs to ensure success.
How do I know when my eggs are "stiff peaks"?
Lift the beaters straight up from the bowl. If the peaks of egg white stand straight up and don't curl over, you've reached stiff peaks. They should look firm and hold their shape.
5. Use Cases / Best For / Who It's Right For
A hand mixer is your go-to tool for a variety of egg-based tasks where speed and consistent results matter. It's particularly useful for home cooks and bakers who want to achieve professional-looking results without investing in a larger, more expensive appliance. If you find yourself regularly making recipes that call for whisked eggs, this tool will become indispensable.
Consider using your hand mixer for:
- Everyday Scrambled Eggs: Want fluffier scrambled eggs in minutes? A hand mixer ensures a uniform blend of yolks and whites, creating a lighter texture than manual whisking alone. This is perfect for busy mornings when you need a quick, delicious breakfast.
- Light and Airy Cakes: Many cake recipes, especially sponge cakes or chiffon cakes, rely on properly whipped eggs or egg whites for their signature airy texture. A hand mixer can achieve this reliably. You can even look into options for countertop appliances that are designed for baking needs, such as a reliable toaster oven for consistent baking.
- Meringues and Mousses: For delicate meringues, mousses, or frostings, achieving stiff peaks is critical. A hand mixer provides the power and control needed to get there without tiring your arm out. This is where the visual cues discussed earlier become paramount.
- Quick Batters and Dressings: Beyond just eggs, hand mixers can also quickly combine ingredients for pancake batters, waffle batters, or even simple vinaigrettes. Their versatility makes them a valuable kitchen staple.
6. Maintenance / Long-Term Optimization
To keep your hand mixer running smoothly for years and ensure it always performs well with your eggs, a little bit of regular care goes a long way. Think of it like maintaining any other kitchen appliance to ensure it functions at its best.
Here’s what to focus on:
- Cleaning After Each Use: This is the most important step. Always unplug the mixer before cleaning. Detach the beaters and wash them thoroughly with warm, soapy water. Rinse and dry them completely. For the mixer body, wipe it down with a damp cloth. Never immerse the motor unit in water.
- Proper Storage: Store your hand mixer in a dry place, ideally in its original box or a dedicated kitchen drawer. Make sure the beaters are stored in a way that doesn't damage them or the mixer's motor unit. Some mixers come with a storage case or a place to wrap the cord.
- Inspect Beaters: Occasionally check the beaters for any signs of rust, bending, or damage. Damaged beaters can lead to uneven mixing and can even scratch your bowls. If they are significantly damaged, it might be time to look into replacement parts from the manufacturer.
- Motor Maintenance (General): While most hand mixers are sealed units and don't require user-level motor maintenance beyond basic cleaning, always refer to your specific model's manual. If you notice any unusual noises or performance issues that basic cleaning doesn't fix, it might indicate a more significant internal problem. At that point, you might need to consult the manufacturer's support or consider a repair if the unit is still under warranty.
7. Comparisons / Alternatives
While a hand mixer is fantastic for many egg tasks, it's helpful to know what else is out there and when those alternatives might be a better fit. Your choice often depends on the quantity you're working with and the specific recipe.
- Manual Whisking (By Hand):
- Best For: Very small quantities, or when you need absolute control over texture for delicate tasks like lightly beating a single egg for a recipe. It’s also great for building arm strength!
- Pros: No electricity needed, quiet, takes up minimal space.
- Cons: Tiresome for larger batches, much slower, difficult to achieve significant volume or stiff peaks.
- Stand Mixer:
- Best For: Large batches, recipes requiring extended mixing times (like high-volume meringues or heavy cake batters), or when you want to multitask.
- Pros: Powerful, hands-free operation, can handle large volumes easily, often comes with multiple attachments for various tasks.
- Cons: Takes up significant counter or storage space, more expensive than a hand mixer, can be overkill for small jobs.
- Immersion Blender (with whisk attachment):
- Best For: Some mid-size tasks, particularly when you're already using it for soups or sauces and want to quickly whisk some eggs.
- Pros: Compact, versatile, easy to clean.
- Cons: Whisk attachment is often smaller than hand mixer beaters, may not achieve the same volume as a dedicated hand or stand mixer for large batches.
8. Safety / Legal / Compliance / Warnings
Using any electrical appliance in the kitchen involves a few safety considerations. When it comes to your hand mixer and eggs, a few key points ensure you stay safe and prevent accidents. As of 2026, standard safety certifications remain paramount for kitchen appliances.
- Electrical Safety: Always ensure your hands are dry when plugging in or unplugging the mixer. Keep the mixer and its cord away from water. Never operate the mixer if the cord or plug is damaged. If you’ve ever had to how to fix a coffee maker leaking water, you know water and electricity are a bad mix.
- Unplug Before Cleaning: This is a critical safety step. Never attempt to remove or clean beaters, or wipe down the unit, while it's plugged in. Serious injury can result.
- Use Proper Bowls: As mentioned, always use a deep bowl. An unstable bowl or one that's too shallow can lead to spills, creating a slipping hazard or electrical risk.
- Motor Overheating: Be mindful of how long you're running the motor, especially on higher speeds. Overheating can damage the appliance and, in rare cases, pose a fire risk. Give it breaks if it feels excessively hot. Always follow manufacturer guidelines for maximum run times.
- Children and Pets: Keep children and pets away from the mixer while it's in use, as moving beaters can be dangerous. Ensure the appliance is stored out of reach when not in use.
9. Expert Tips / Pro Advice
Beyond the basic steps, there are a few advanced tips that experienced cooks and bakers often share, especially when aiming for perfection with egg whites. These come from years of practice and understanding the nuances.
- The Importance of Fat-Free for Whites: For meringues, remember that even a microscopic amount of fat can ruin your efforts. This means being incredibly precise when separating eggs. Some chefs recommend cracking eggs into a separate small bowl one at a time before adding them to your main mixing bowl, just in case one egg contains yolk.
- Sugar Addition Timing: When making meringue, add sugar gradually. Start with a portion of the sugar after the egg whites have become foamy, and then add the rest slowly as you increase the speed to stiff peaks. This helps stabilize the foam and create a smoother, glossier meringue.
- Room Temperature is Key (Again): For recipes like angel food cake or certain frostings, the egg whites must be at room temperature for maximum volume. If you forget to take them out early, you can place the whole eggs in a bowl of warm (not hot) water for about 5-10 minutes to speed up the process. This is a handy trick when you're short on time.
- Don't Fear the Dip: If your meringue mixture seems a little too stiff and clumpy, and you’re worried about over-whipping, try adding a tablespoon of water or lemon juice. This can sometimes help loosen it up and make it more pliable, especially if you're having trouble with a dry texture.
- Practice Visual Identification: Spend time watching videos or looking at photos of different egg-whipping stages. Being able to visually identify foamy, soft, and stiff peaks will help you stop mixing at precisely the right moment, ensuring your recipe turns out perfectly every time.