How To Use A Coolant Tester: Easy Step-By-Step Guide
A coolant tester helps you check antifreeze strength, freeze protection, and engine cooling health fast.
If you have ever wondered whether your coolant is still doing its job, a coolant tester gives you a clear answer in minutes. I have used one many times on daily drivers, older work trucks, and stubborn project cars, and the process is simple once you know what each reading means. This guide will walk you through how to use a coolant tester the right way, what the results tell you, and the small mistakes that can save you from big repair bills.
What a coolant tester does
A coolant tester measures the condition of your engine coolant, usually by checking its freeze point or the concentration of antifreeze in the mix. That matters because coolant is not just colored liquid in the radiator. It protects the engine from freezing, overheating, corrosion, and scale buildup.
Most testers are made for one of two jobs:
- Checking freeze protection in the coolant
- Checking coolant concentration in the system
Some testers are simple hydrometers or floating-ball tools. Others are refractometers, which many technicians prefer because they give more precise readings. In my experience, the type of tester matters less than using it correctly and reading it in the right conditions.

Types of coolant testers
Before you learn how to use a coolant tester, it helps to know what kind you have. Different tools work in slightly different ways, but the goal is the same: see if the coolant still protects the engine.
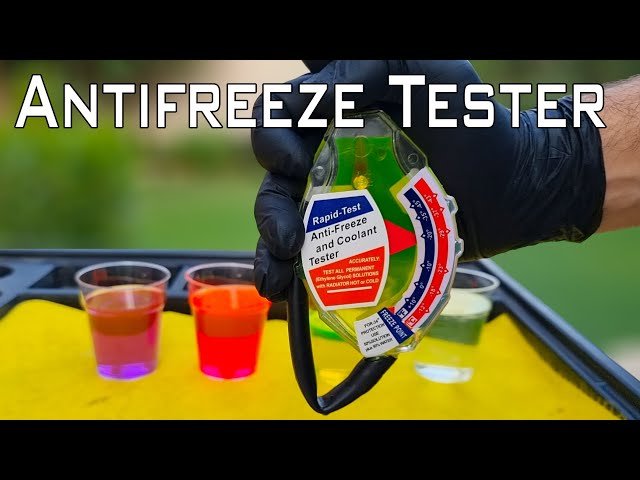
Floating-ball coolant tester
This is one of the most common tools. It uses a chamber with floating balls that rise or sink based on coolant strength. The more balls that float, the better the freeze protection.
This style is cheap, easy to use, and fine for quick checks. The downside is that it can be less accurate if the coolant is dirty or the tool has air bubbles inside it.
Refractometer coolant tester
A refractometer uses light to measure the coolant’s concentration. You place a drop or two on the lens, close the cover, and look through the eyepiece. The reading usually gives a freeze point or glycol percentage.
I like this type best for accuracy. If you work on cars often, it is one of those tools that pays for itself by preventing guesswork.
Strip-style tester
Test strips are another option. You dip the strip in coolant and compare the color change with the chart on the package. These can also test pH or corrosion protection in some cases.
They are handy for quick checks, but they are not always as precise as a refractometer. Still, they are useful if you want a simple, low-cost check.

When to use a coolant tester
You do not need to test coolant every week, but you should not wait until the engine overheats either. A coolant tester is useful any time you want to confirm that the cooling system is still in good shape.
Good times to test coolant include:
- Before winter, to check freeze protection
- Before summer road trips, to make sure the system can handle heat
- After adding coolant, to confirm the mix is correct
– When buying a used car, to see if maintenance was skipped - After a repair, such as a radiator, water pump, or hose replacement
- If the coolant looks rusty, dirty, or weak
A small check now can prevent a very expensive problem later. I have seen people skip this step and end up with cracked radiators or overheating on the first cold snap.
How to use a coolant tester step by step
Using a coolant tester is not hard, but the details matter. The biggest rule is to work safely and never rush a hot engine.
1. Let the engine cool down
Never open a hot radiator cap unless the manufacturer says it is safe and the engine has cooled. Pressurized coolant can spray out and cause serious burns.
Wait until the engine is cool to the touch. If you are unsure, give it extra time. This is one of those moments where patience is worth more than speed.
2. Find the right place to sample coolant
You can usually test coolant from the radiator, overflow reservoir, or coolant expansion tank, depending on the vehicle design. The goal is to get a sample that reflects the actual system condition.
If the coolant in the reservoir looks very different from the radiator, the reservoir may not give the best reading. In that case, check the service manual or use the radiator fill point if it is safe and accessible.
3. Check the coolant condition first
Before testing, look at the coolant. Healthy coolant is usually clean and has a consistent color, though the exact color depends on the formula used by the manufacturer.
Watch for these warning signs:
- Rust or brown sludge
- Oil floating on top
- Thick debris
- Milky or muddy color
- Strong burnt smell
If the coolant looks contaminated, a tester can still give you a reading, but the result may not tell the full story. Dirty coolant often means the system needs more than a simple top-off.
4. Use the tester correctly
The steps depend on the tool type.
For a floating-ball tester:
- Squeeze the bulb to remove air from the chamber
- Place the intake tube into the coolant
- Release the bulb slowly to draw in coolant
- Hold the tool level
- Read the number of floating balls shown in the chamber
For a refractometer:
- Open the daylight cover
- Put a few drops of coolant on the prism
- Close the cover so the sample spreads evenly
- Look through the eyepiece toward a light source
- Read the freeze protection scale or glycol scale
For test strips:
- Dip the strip in the coolant for the time listed on the package
- Remove it and wait for the reaction time
- Match the color to the chart
I learned long ago that “close enough” does not work well here. Even a few trapped air bubbles or an uneven sample can throw off the result.
5. Read the result against the temperature chart
The important part is not just whether the coolant is “good” or “bad.” It is how much freeze protection it actually provides.
Most coolant testers show either:
- A freeze point, such as minus 34°F
- A glycol percentage, such as 50/50 mix
A proper 50/50 mix often protects many vehicles down to around minus 34°F, though exact protection depends on the coolant formula. Always compare your reading to the chart that comes with the tester.
6. Clean the tester after use
Rinse the tool with clean water and let it dry. Coolant residue can damage the tool, and leftover contamination can affect the next reading.
This part is easy to skip, but I would not. A clean tester lasts longer and gives more reliable results. That is especially true for refractometers and test strips.

How to understand the reading
Once you know how to use a coolant tester, the reading becomes the real story. The number tells you whether the coolant mix is strong enough for the climate and the vehicle’s needs.
Here is a simple way to think about it:
- Good freeze protection means the coolant mixture is strong enough for the temperature where you drive
- Weak freeze protection means the coolant may need to be adjusted
- No protection or very weak protection means the system is at risk in cold weather
If the reading is too weak, the system may need coolant added or the mix corrected. If it is too strong, the cooling system may not transfer heat as well as it should. That is why balance matters.
What the results mean for your engine
A coolant tester is useful because it helps you make a smart decision, not just collect a number. The reading can point you toward a simple top-off or a bigger cooling system issue.
If the coolant tests fine
If the coolant is within range and looks clean, you are probably in good shape. Keep following the maintenance schedule and check it again before extreme weather.
If the coolant is weak
Weak coolant often means the mixture has too much water or has lost strength over time. You may need to add the correct premixed coolant or drain and refill the system if it is badly off.
If the coolant looks contaminated
Dirty coolant can signal rust, gasket failure, neglected maintenance, or mixing incompatible coolant types. In that case, testing is only part of the diagnosis.
If the coolant is too diluted
This is common after topping off with plain water. Water helps in emergencies, but too much of it reduces freeze protection and corrosion resistance.
If the coolant is too concentrated
Too much antifreeze is not better. Excess concentration can reduce heat transfer and hurt cooling performance.
In short, the goal is the right balance, not maximum strength.
Common mistakes to avoid
I have seen plenty of good tools give bad answers because of simple user mistakes. The good news is that most of them are easy to avoid.
- Testing a hot system can be dangerous and inaccurate
- Reading a dirty sample can hide the real condition
- Forgetting to remove air bubbles can skew the result
- Mixing incompatible coolant types can create sludge
- Trusting the tester alone without checking coolant color and condition
- Using a damaged or uncalibrated refractometer
One mistake I made early on was taking a sample right after a long drive. The coolant was hot, foamy, and not ideal for testing. The result looked fine, but after the system cooled, the reading changed. Since then, I always let the engine settle first.
How often you should test coolant
For most drivers, testing coolant a few times a year is enough. A good rhythm is:
- Before winter
- Before long summer trips
- After cooling system repairs
- Whenever the coolant looks off
If you drive an older vehicle, tow heavy loads, or live in a harsh climate, test more often. Engines under stress are less forgiving when coolant strength drops.
Extra checks that pair well with a coolant tester
A coolant tester gives one part of the picture, but the whole cooling system matters. If you want a better sense of engine health, pair the test with a few quick checks.
- Check coolant level in the reservoir
- Look for leaks around hoses, clamps, and the radiator
- Inspect the radiator cap for cracks or weak seals
- Watch for temperature gauge swings while driving
- Check for heater performance inside the cabin
A healthy coolant reading with a leaking hose is like a strong umbrella with a hole in the middle. The test is important, but it is not the only clue.
Best practices for accurate readings
If you want your results to be reliable, keep these habits in mind:
- Use the tester at room temperature when possible
- Take a fresh sample from the system
- Follow the tool’s instructions exactly
- Compare the reading to the manufacturer’s chart
- Store the tester clean and dry
- Replace worn or damaged tools
Accuracy is a mix of good tool choice and good habit. That is especially true if you work on multiple vehicles with different coolant types.
Frequently Asked Questions
How do you use a coolant tester on a car?
Let the engine cool, draw a sample of coolant, and use the tester according to the tool type. Then compare the reading to the temperature or concentration chart to see if the mix is strong enough.
Can I test coolant in the overflow tank?
Yes, but the overflow tank may not always reflect the exact condition inside the radiator. If the tank and radiator are not well mixed, the reading may be less reliable.
What is a good coolant reading?
A good reading depends on your climate and the coolant type, but many vehicles use a 50/50 mix for strong freeze protection. Check the chart that comes with your tester for the exact target.
Is a refractometer better than a floating-ball tester?
A refractometer is usually more accurate and easier to trust for fine readings. A floating-ball tester is still useful for quick checks and basic maintenance.
What if the coolant looks dirty but the tester says it is fine?
That can happen, and it is why testing should not be the only step. Dirty coolant may still show acceptable freeze protection while the system has corrosion, sludge, or contamination issues.
Conclusion
Knowing how to use a coolant tester gives you a simple way to protect your engine from freezing, overheating, and costly damage. Once you understand the tool, the process becomes fast, practical, and easy to repeat before each season or road trip.
The big takeaway is this: do not just guess about coolant health. Test it, read it correctly, and pay attention to what the sample looks like as well. If you want to keep your cooling system reliable, start checking your coolant today and make it part of your regular maintenance routine.