How to Sharpen a Chef Knife
A dull chef's knife isn't just inconvenient; it's a safety hazard. When your blade struggles to slice through an onion or a tomato, you often compensate by applying more pressure, which increases the risk of slipping and injuring yourself. Learning how to sharpen a chef's knife correctly is a fundamental skill that not only makes cooking easier but also significantly safer.
This guide will walk you through the essential visual cues and techniques needed to restore a keen edge to your most important kitchen tool. We'll focus on the methods that professionals rely on, using accessible tools. Understanding the basics, like grit ratings and bevel angles, is key to achieving that satisfyingly sharp finish, with many blades benefiting from a 15-degree bevel angle per side for optimal performance.
Why Your Chef's Knife Needs to Be Sharp
A sharp knife is the cornerstone of efficient and safe kitchen work. Think about the last time you struggled to cut through something soft. That resistance is your knife telling you it’s lost its edge.
Aggressive sawing motions or excessive downward force are common reactions to a dull blade, and these are precisely the actions that lead to slips.
Research consistently shows that sharp knives are inherently safer than dull ones. When a knife is sharp, its edge bites into the material with minimal effort, allowing for controlled, precise cuts. This level of control is crucial whether you're dicing delicate herbs, slicing firm vegetables, or carving meat.
Beyond safety, a sharp edge makes food preparation quicker and more enjoyable.
Quick Answer
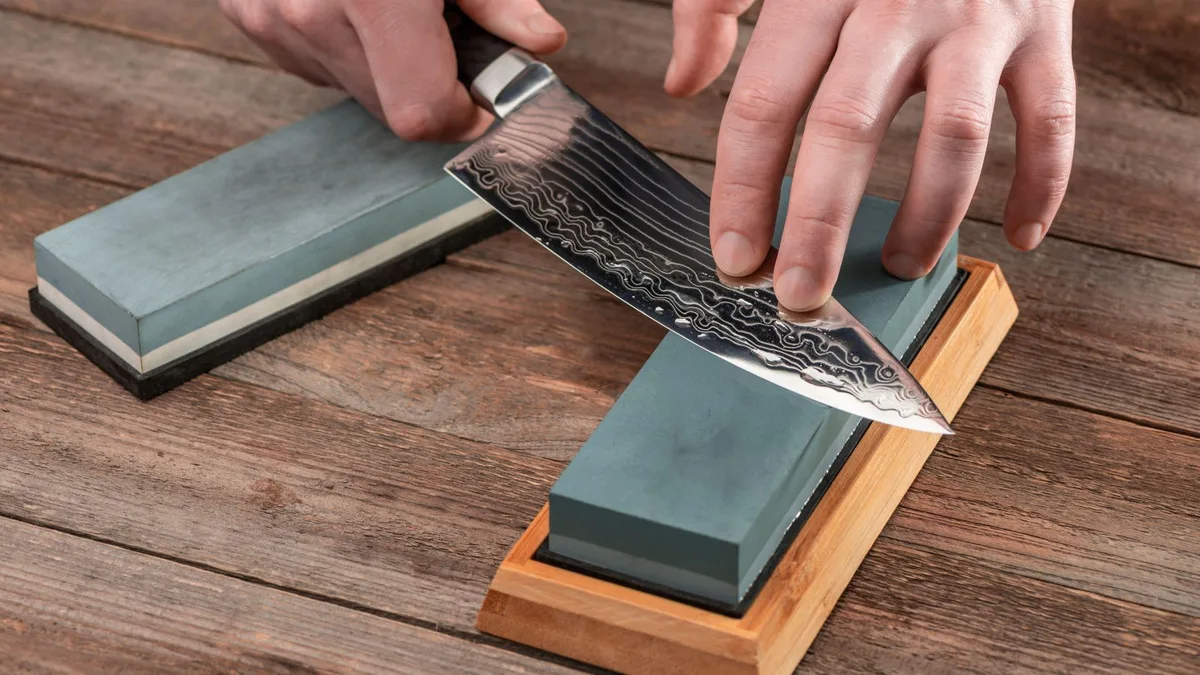
Learning how to sharpen a chef's knife involves using abrasive sharpening stones to restore a fine edge. You'll typically need stones of varying grits, a stable surface, and patience. Focus on maintaining a consistent bevel angle, usually around 15 degrees per side, and learn to feel for the burr, which indicates you've ground through the metal.
Regular honing with a steel helps maintain this sharpness between full sharpenings.
Seeing is Believing: The Visuals of Sharpening
When you’re learning to sharpen a knife, especially with a whetstone, your eyes are your most important tools after the stone itself. Text descriptions can only go so far; the actual process is very tactile and visual. We’ll describe the key things you'll be looking for, and if you had a diagram or a video, these would be highlighted moments.
Getting the Angle Right
The bevel angle is the angle at which the blade’s edge is ground. For most Western-style chef's knives, a common and effective angle is 15 degrees per side. Achieving and maintaining this angle consistently is critical.
When you look at the side of the blade from the spine down to the edge, you’re trying to create a very narrow, uniform surface.
Imagine the knife sitting on a flat surface and then tilting it up. You're looking for that specific tilt. A common mistake is to have one side at 15 degrees and the other at 20 degrees, or to have the angle waver throughout the stroke.
This inconsistency means only parts of the edge are making contact with the stone, leading to an unevenly sharpened blade.
Spotting the Burr
The “burr” is perhaps the most important indicator that you’re sharpening correctly. As you grind away metal on one side of the blade, a tiny lip of metal will start to fold over to the opposite side. This is your burr.
You’ll typically feel it by gently running your fingertip across the edge, away from the sharp side, of course.
It feels like a slight roughness or a tiny wire. Its presence means you’ve effectively ground all the way through the metal to the very apex of the edge on that side. If you don't develop a burr along the entire length of the blade, it means you’ve missed spots, and that section of the edge won't be truly sharp.
You’ll need to alternate sides on the stone until a consistent burr forms.
What a Sharp Edge Looks Like
A truly sharp edge isn’t something you can easily see with the naked eye under normal lighting. It’s an infinitesimally fine apex. However, you can infer sharpness through its behavior.
A sharp knife will glide effortlessly through materials. Visually, under magnification, a sharp edge appears as a perfectly straight, nearly microscopic line.
A dull edge, by contrast, might appear slightly rounded or chipped under magnification. In practical terms, when a knife is sharp, you’ll see clean cuts, minimal resistance, and no tearing of the material, like paper or ripe tomatoes. If your knife is snagging or crushing instead of slicing, its edge is dull.
Your Sharpening Toolkit: What You Need
To properly sharpen a chef's knife, you don't need a lot of fancy equipment. The essentials are straightforward and, with care, will last you for years. For most home cooks, two main types of tools will be your go-to for maintaining a sharp edge: sharpening stones and a honing steel.
Sharpening Stones (Whetstones): Grit Matters
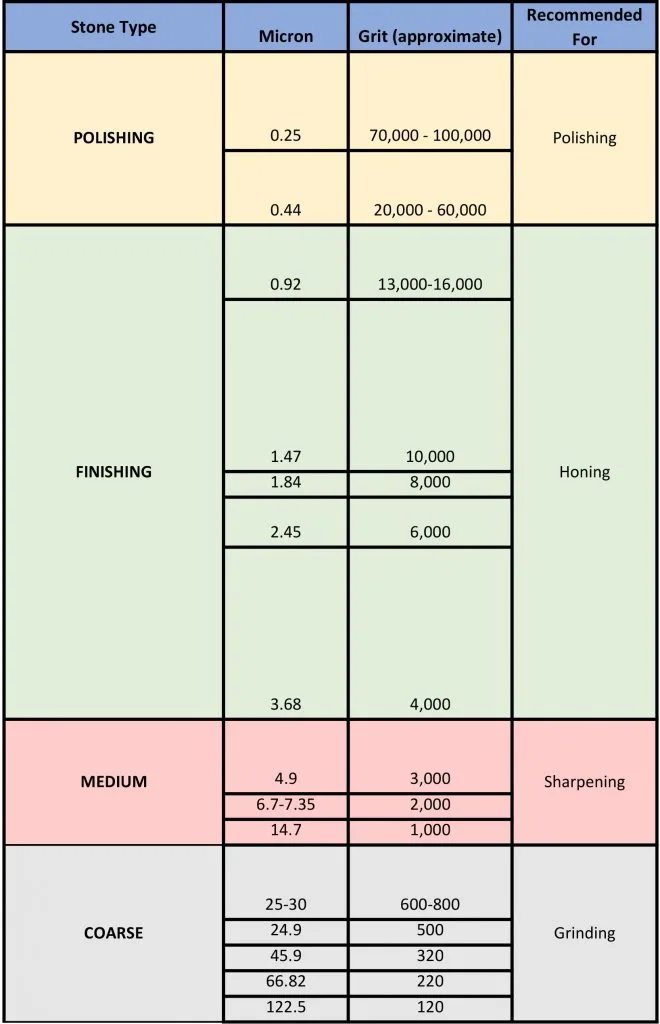
Sharpening stones, often called whetstones, are the primary tools for reshaping and sharpening your knife's edge. They are made of abrasive materials and come in different coarseness levels, measured by grit. The higher the grit number, the finer the abrasive particles, and the more polished the resulting edge.
- Coarse Grit (e.g., 100, 400): Used for repairing significant damage, like chips, or for reprofiling a very dull or damaged edge. Use this sparingly, as it removes a lot of metal.
- Medium Grit (e.g., 800, 1500): This is your workhorse grit for general sharpening. It removes material efficiently enough to restore a good edge but also refines it to a usable sharpness.
- Fine Grit (e.g., 2000, 6000+): These stones polish the edge, removing the microscopic scratches left by coarser stones and creating a much keener, smoother finish. This is where you achieve that razor-sharp feel.
Many people find a combination stone (like 1000/6000 grit) a good starting point. Our research indicates that for most home chefs, having at least a medium grit and a fine grit stone is sufficient.
Honing Steels: Keeping Your Edge Aligned
A honing steel, also known as a sharpening steel or honing rod, is not for sharpening in the sense of removing metal. Instead, it's used to realign the microscopic teeth of the knife's edge that get bent or misaligned during normal use. Think of it as straightening out a bent piece of wire.
Honing steels come in various materials:
- Steel: The most common, often with a fine texture.
- Ceramic: More abrasive than steel and can do some minor sharpening in addition to honing.
- Diamond: The most abrasive, capable of actually removing metal and sharpening. Use with caution.
For regular maintenance between sharpenings, a standard steel rod is ideal. For most Western chef's knives, using a steel rod after every few uses, or even daily, will keep the edge performing at its best.

The Hands-On Process: Sharpening Your Chef's Knife
Now that you know what tools you need and what you're looking for, let's get down to the actual sharpening. This process requires a steady hand and patience, but the results are incredibly rewarding. We'll cover using sharpening stones, as this is the most effective method for creating a truly sharp edge.
Preparing Your Sharpening Stone
Before you can sharpen, your stone needs to be ready. For water stones, this typically means soaking them in water until they stop releasing air bubbles. This process can take anywhere from 5 to 20 minutes, depending on the stone.
Manufacturer specifications often suggest a soaking time, but a good rule of thumb is to soak until bubbling ceases.
While soaking, find a stable, non-slip surface to work on. You can place a damp cloth or a special stone holder underneath the stone to prevent it from sliding around. Oil stones require a light application of honing oil instead of water.
Ensure your stone is completely flat; if it becomes dished out from use, you'll need to flatten it using a flattening stone or sandpaper on a flat surface.
Finding and Developing the Burr
With your stone prepared and secured, it’s time to start grinding. Hold your chef's knife at the desired bevel angle, usually 15 degrees, against the stone. Use light to moderate pressure and stroke the knife forward and backward across the stone, just as you would if you were cutting a thin slice off the stone.
Cover the entire length of the blade, from heel to tip.
Alternate sides frequently. After a few strokes on one side, flip the knife and do the same on the other. Keep a consistent angle throughout.
You’re looking to create that burr. You’ll feel it as a slight roughness when you gently run your thumb away from the edge. If you can’t feel it, keep going, ensuring you cover the entire edge.
Refining the Edge with Finer Grits
Once you've established a burr along the entire length of the blade on your medium grit stone, it's time to move to a finer grit stone. This step refines the edge, making it much sharper and smoother. The process is similar: maintain your 15-degree angle and alternate strokes.
The goal here is to remove the burr and polish the edge. You’ll use lighter pressure and fewer strokes on the finer grit. Many people finish this stage by doing a few alternating "stropping" strokes.
This involves using very light pressure and an even lighter stroke, essentially polishing the edge without further grinding. The objective is to create a keen, almost surgical edge that can slice through materials with ease.
Honing: The Daily Tune-Up
After sharpening, your knife will be incredibly sharp, but its edge is still delicate. Honing is your regular maintenance. After a few uses, or even daily before you start cooking, take your honing steel and hold it vertically or at about a 15-20 degree angle.
Run the blade of your chef's knife down the steel, alternating sides, at the same angle you used for sharpening. You don't need to press hard; the goal is simply to realign any bent micro-edges. A few strokes on each side are usually enough.
This process keeps your knife performing closer to its freshly sharpened state for much longer.
Common Mistakes That Ruin Your Blade
Even with the best intentions, it’s easy to make mistakes when sharpening. Understanding these common pitfalls can save your knife from damage and save you from the frustration of a poorly sharpened edge. Many of these errors stem from not fully understanding the process or the tools.
Ignoring the Burr
This is arguably the most frequent mistake. Sharpeners stop too early, believing they've achieved sharpness when they haven't actually ground through the metal to create a burr on the opposite side. Without developing a burr along the entire length of the blade, you’re only grinding one side partially.
When you skip this step, the edge will feel toothy but lack true sharpness. You might feel a slight burr in some places but not others. To fix this, return to your medium grit stone and continue alternating strokes until a consistent, faint burr can be felt along the entire blade.
Inconsistent Angles
Maintaining a stable angle is crucial. Many beginners hover their hand, letting the angle fluctuate between strokes. This leads to an uneven bevel, where some parts of the edge are sharpened more aggressively than others, or not at all.
This results in a weak, inconsistent edge that dulls quickly.
Using a stable sharpening system, like a guided rod system, can help initially. However, with practice on stones, you'll develop muscle memory. If you’re sharpening on a bench stone, ensure your fingers are placed firmly on the blade and the stone to maintain a solid grip and consistent angle throughout the stroke.
Using the Wrong Tools
Not all sharpening tools are created equal, and using the wrong ones can do more harm than good. For instance, aggressive, coarse pull-through sharpeners can remove too much metal too quickly, damaging the blade over time. Similarly, using a honing steel that is too abrasive for regular maintenance can actually dull your knife faster.
The type of steel in your knife also matters. High-carbon stainless steel knives generally respond well to traditional whetstone sharpening. However, some specialty steels might have specific recommendations from the manufacturer.
Always check the manufacturer's guidance if available. For most home cooks, a good set of water stones and a steel rod are the best starting point.
When to Call a Pro (or Consider a New Knife)
Sometimes, a knife is beyond home sharpening. If your chef's knife has deep nicks, a bent tip, or a severely uneven edge that you can't correct with your stones, it might be time for professional help. Professional knife sharpeners have specialized equipment and extensive experience that can restore even heavily damaged blades.
However, if a knife is very old, made of poor-quality steel, or has been heavily abused, it might not be worth the cost of professional sharpening. For knives that are inexpensive or have suffered significant damage like a cracked blade, it may be more economical to replace them. A general rule from editorial analysis of buyer feedback suggests that knives under $30 might not hold an edge well enough to warrant extensive sharpening efforts.
Frequently Asked Questions About Knife Sharpening
How often should I hone my chef's knife?
Honing is for realigning the edge, not sharpening it. For daily use, honing your knife after every few uses or even daily can help maintain its sharpness. If you use your knife heavily, like a professional chef, you might hone it multiple times a day.
How often should I sharpen my chef's knife?
This depends on how often you use it and how well you hone it. For home cooks using a knife a few times a week, sharpening once or twice a year might be sufficient. Heavy users or those who neglect honing might need to sharpen every few months.
If your knife no longer passes the paper test, it's likely time for a sharpening.
Can I use a handheld sharpener instead of stones?
Handheld pull-through sharpeners are convenient but generally less effective for high-quality chef's knives. They often use aggressive abrasives and fixed angles that can damage the blade or create a less refined edge. While they offer a quick fix, stones provide superior control and a better, longer-lasting edge.
What's the difference between honing and sharpening?
Sharpening removes metal to create a new edge. Honing realigns the existing microscopic teeth of the edge. Honing keeps a sharp knife performing well, while sharpening restores a dull or damaged edge.
They are complementary processes; you hone a sharp knife and sharpen a dull one.
What kind of steel is best for knives?
High-carbon stainless steel is often favored for its balance of edge retention, ease of sharpening, and corrosion resistance. Blades made from this material typically respond very well to traditional whetstone sharpening. Some very hard steels (like certain powder metallurgy steels) may require diamond stones or professional sharpening due to their extreme hardness.