How to Sharpen Kitchen Knife
You know that frustrating feeling when your knife just won't cut through that tomato cleanly, or you have to saw through a piece of meat? It’s a common kitchen woe, but learning how to sharpen kitchen knives yourself can make all the difference. A truly sharp knife isn't just more efficient; it's significantly safer because it requires less force, reducing the chance of slips.
The sharpness of a blade is primarily determined by its edge angle, which can degrade over time with use. For most Western-style kitchen knives, an edge angle between 15 and 20 degrees per side is standard. Fortunately, with the right tools and a little practice, you can restore that factory-sharp edge and enjoy effortless slicing again.
Quick Answer
To sharpen a kitchen knife, you'll need a sharpening stone (whetstone) or a honing steel and to maintain a consistent angle, typically 15-20 degrees. Start with a coarser grit stone to reshape the edge, then move to finer grits to refine it, finishing by removing the burr. Regular honing keeps the edge aligned between sharpenings.
Why Pictures Matter: The Visuals of a Sharp Edge
When we talk about sharpening knives, especially freehand on a whetstone, the exact angle and the subtle feedback you get are absolutely critical. It's not something you can easily grasp from words alone. Think about it: demonstrating the precise tilt of the blade against the stone, showing how to create a consistent bevel, or illustrating how to detect that tiny, sharp curl of metal known as a burr, these are all visual cues.
Our research indicates that learners often struggle with the abstract nature of written instructions for sharpening. What does "maintain a consistent angle" actually look like when you're holding a slippery knife? It looks like holding the spine of the knife just high enough off the stone to create that specific angle, which is much easier to see in a diagram or a short video clip.
We'll focus on describing these visual checkpoints throughout this guide.

Image source: Web (Bing) / hanoiexploretravel.com (Web image (fair-use with source credit))
Getting Started: What You Need to Sharpen
Before you can turn a dull blade into a precision instrument, you need the right gear. The goal is to reshape the metal at the very edge of the knife, creating a fine point that can slice through materials easily. This requires tools that can abrade the steel effectively without damaging the rest of the blade.
The most common and effective tools involve abrasive materials. You'll typically need something to remove metal (sharpening) and something to realign the microscopic teeth of the edge (honing). The choice of tool often comes down to personal preference, budget, and the type of knife you're working with.
Choosing Your Sharpening Tool: Whetstones vs. Steels vs. Electric
When it comes to keeping your knives sharp, you've got a few main routes you can go. Each has its own pros and cons, and what works best often depends on what kind of knives you have and how much time you want to invest.
- Whetstones (Sharpening Stones): These are the traditionalists' choice. They're flat blocks made of abrasive material, like aluminum oxide, silicon carbide, or diamond, bonded together. You usually use them with water or oil as a lubricant. Whetstones offer the most control and can achieve the sharpest edges, but they have a steeper learning curve. They come in various grits, from coarse for repairing chips to ultra-fine for polishing.
- Honing Steels (Sharpening Rods): Contrary to their name, most honing steels don't actually remove much metal; they primarily hone the edge. This means they realign the microscopic teeth on the blade that get bent out of shape during use. A quick pass on a honing steel can make a knife feel sharp again between full sharpenings. They are often made of steel, ceramic, or diamond-coated materials.
- Electric Knife Sharpeners: These are the most convenient option for many home cooks. You simply run the knife through designated slots, and motorized abrasive wheels do the work. They're fast and easy to use, requiring minimal skill. However, they offer less control than whetstones, can remove more metal than necessary if used improperly, and may not be suitable for all knife types or high-end blades.
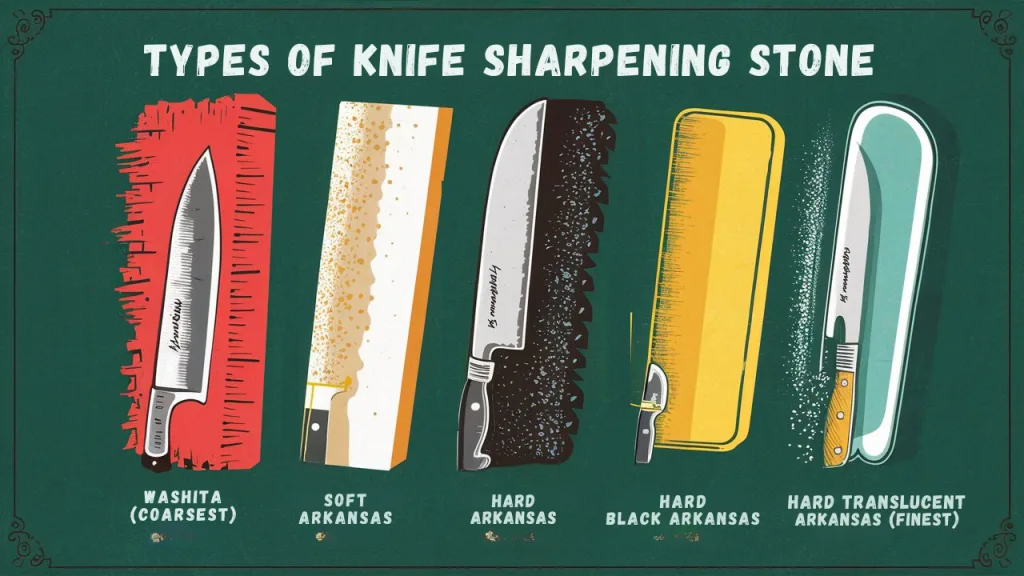
Image source: Bing (Web (fair-use with source credit))
For most home cooks looking for a balance of effectiveness and ease of use, a combination of a good whetstone set and a honing steel is often recommended. Professional chefs frequently rely on whetstones for their precision.
The Sharpening Process: Step-by-Step Visual Guide
The core of sharpening a knife involves consistently moving the blade's edge against an abrasive surface at a specific angle. This process reshapes the metal, creating a new, sharp apex. We'll break down the key stages, focusing on what you should be seeing and feeling.
Finding and Holding the Right Angle
This is arguably the most crucial part of sharpening. For most Western-style kitchen knives, aiming for an angle between 15 and 20 degrees per side is ideal. This provides a good balance of sharpness and durability.
Too shallow an angle can lead to a fragile edge that chips easily, while too steep an angle results in a duller knife that requires more force to cut.
So, how do you find that 15-20 degree angle? It’s helpful to visualize. Imagine your knife standing upright on its edge.
Now, tilt it over until the spine is about a quarter to half an inch off the surface. That's roughly the angle you're looking for. Some sharpening systems come with guides to help you maintain this angle.
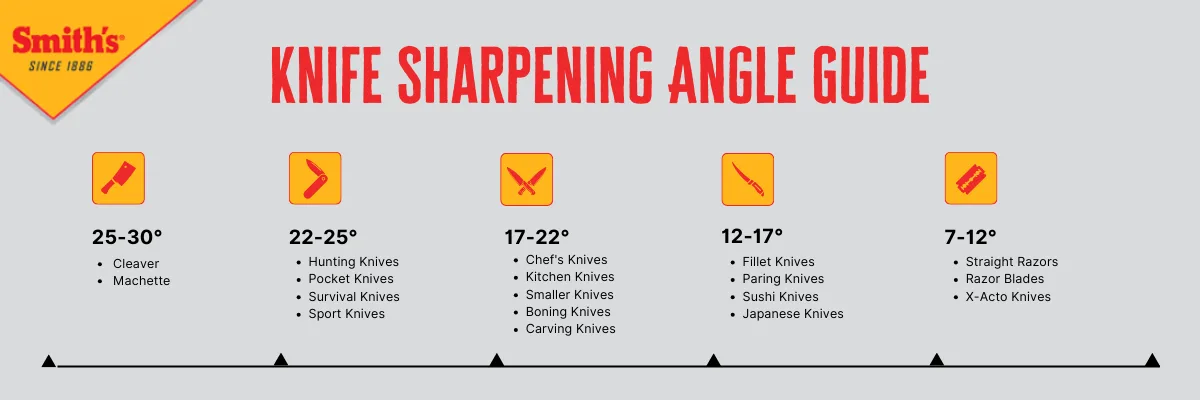
Image source: Bing (Web (fair-use with source credit))
When sharpening freehand on a whetstone, try to keep the entire length of the blade in contact with the stone at that consistent angle. Don't just rock the knife; try to keep the bevel angle steady throughout the stroke.
Mastering the Strokes: From Coarse to Fine
You'll typically start with a coarser grit sharpening stone to remove damaged metal and reshape the edge. This is where you'll do most of the material removal. Apply moderate, consistent pressure as you draw the knife across the stone, from heel to tip, maintaining your chosen angle.
Repeat this motion several times on one side of the blade.
After a few strokes, you'll want to switch to the other side of the knife and perform the same number of strokes, again maintaining that consistent angle. The goal here is to create a new edge, and you'll start to feel a slight resistance or a tiny curl of metal forming along the opposite edge, this is the burr.
Once you've worked on the coarse grit and developed a burr along the entire length of the blade, you move to a finer grit stone. This step refines the edge, making it smoother and sharper. The process is the same: a set number of strokes on one side, then an equal number on the other, always maintaining your angle.
You'll use lighter pressure on finer grits.
Finally, you might move to an even finer grit stone, sometimes called a polishing stone, for the ultimate sharpness. This step removes any remaining coarseness and makes the edge exceptionally keen. Again, light pressure is key here.
Checking for and Removing the Burr
As you sharpen, a tiny ridge of metal, called a burr, will form along the edge opposite the side you're sharpening. It's a sign that you've ground the metal all the way to the apex on that side. You can usually feel this burr by carefully running your fingertip away from the edge (never towards it!) along the length of the blade.
It will feel like a slight, rough catch.
The burr needs to be removed to create a clean, sharp edge. After you've sharpened both sides to your satisfaction, you'll alternate between very light strokes on each side of the blade, with even fewer passes than before. This gradually refines the edge and breaks off the burr.
You can also remove the burr by gently “stropping” the blade. This involves dragging the edge, spine-first, across a piece of leather (often a leather strop) or even cardboard. This gently polishes the very apex of the edge and removes any lingering burr.
Honing the Edge
Honing is different from sharpening. While sharpening removes metal to create a new edge, honing realigns the existing edge. Think of it like straightening out a bent-out-of-shape comb.
Microscopic teeth on your knife's edge can get bent over with use, making it feel dull. A honing steel (or rod) helps bend them back into alignment.
To hone, hold the steel vertically or at a slight angle and draw the knife down its length, maintaining the same sharpening angle (15-20 degrees). Alternate sides, performing a few strokes on each. This should be done regularly, perhaps before each use or after every few uses, to keep your knives performing at their best between full sharpening sessions.
A duller knife is a dangerous knife.
Common Sharpening Mistakes to Spot (and Avoid)
Even with the best intentions, it's easy to make a few common slip-ups when you're sharpening your kitchen knives. Being aware of these can save you frustration and prevent you from accidentally damaging your blades. Our research shows many users encounter similar issues, especially when first starting out.
Angle Blunders and Burr Burdens
One of the biggest mistakes is not maintaining a consistent sharpening angle. If your angle is constantly changing, you'll create a wavy, uneven edge that won't perform well and will dull faster. Remember that visual cue: aim for that 15-20 degree tilt.
Another common error is not properly removing the burr. If you finish sharpening but haven't managed to break off or remove that little curl of metal, your knife will feel surprisingly dull and might even snag on food. You'll often feel that burr as a rough catch when you run your finger away from the edge.
If it's still there after your final strokes, you need to do more alternating light passes or consider stropping.
Over-sharpening is also a concern, especially with electric sharpeners. These can remove a lot of metal quickly. Use them judiciously and follow the manufacturer's instructions precisely to avoid grinding away too much of your valuable blade.
Keeping Your Knives Sharp: Maintenance and Care
Once you've achieved that satisfyingly sharp edge, the key is to maintain it. This prevents your knives from becoming dull again too quickly and reduces the need for frequent, heavy sharpening sessions. Regular honing is your best friend here.
Performing a few strokes on a honing steel before or after each use helps realign the microscopic edge.
Think of honing as a tune-up for your blade. It’s quick and easy, and it makes a noticeable difference in how sharp the knife feels. Beyond honing, proper handling and storage are also crucial.
Avoid tossing your knives into a drawer with other utensils, where their edges can get nicked and bent. Instead, use a knife block, a magnetic strip, or blade guards.
Finally, remember to clean your knives by hand after each use, even if they're dishwasher safe. High heat and harsh detergents in a dishwasher can dull and even damage the blade. A quick wash with soap and water, followed by immediate drying, is all it takes to preserve that hard-won sharpness.
When to Call in the Pros (or Buy a New Knife)
While most kitchen knives can be brought back to life with a bit of effort, there are times when it's better to seek professional help or consider replacing the knife altogether. If your knife has significant chips or has been severely damaged, a DIY sharpening session might not be enough. Trying to fix deep nicks with a standard whetstone can take a very long time and requires advanced skill.
In such cases, a professional knife sharpener can use specialized equipment to restore even heavily damaged blades. For very inexpensive knives, however, the cost of professional sharpening might approach the cost of a new one. For high-end knives with sentimental value or exceptional performance, investing in professional sharpening is usually worthwhile.
Consider replacing a knife if the handle is damaged beyond repair, if the steel itself is poor quality and won't hold an edge, or if the knife is so inexpensive that it’s not worth the effort to sharpen. A quality knife is an investment, and knowing when to maintain versus replace is part of good kitchen practice. Our research indicates that blades made from high-carbon stainless steel typically offer the best balance of edge retention and ease of sharpening for home cooks.
Frequently Asked Questions About Knife Sharpening
How often should I hone my knife?
You should hone your knife regularly, ideally before or after each use, especially if you use your knives frequently. Honing realigns the edge without removing significant amounts of metal, helping to maintain sharpness between actual sharpening sessions.
How often should I sharpen my knife?
This depends heavily on usage and the quality of the knife. For a home cook, sharpening might be needed every few months. Professionals who use their knives daily might sharpen them weekly or even more often.
A good indicator is when your knife starts to feel noticeably duller or requires more force to cut through common ingredients.
What is a burr and why is it important?
A burr is a tiny ridge of metal that forms on the edge of the blade as you sharpen it. It's a sign that you've ground the metal all the way to the apex. It's crucial to remove this burr because it's weak and will fold over, making the knife feel dull and less precise.
Can I use just any sharpening stone?
Not necessarily. Stones come in different grits, which dictate their abrasive power. Coarse grits (around #100 to #400) are for repairing chips and reshaping badly damaged edges.
Medium grits (#600 to #1000) are for general sharpening. Fine and extra-fine grits (#3000 and up) are for refining and polishing the edge to razor sharpness. Most home users benefit from a medium grit stone, perhaps with a finer one for finishing.