How To Use A Bike Rack For Your Car: Easy Guide
Using a bike rack for your car is simple: mount it securely, load bikes evenly, and check safety before driving.
If you have ever stared at a new bike rack and wondered where to begin, you are not alone. I have set up more than a few racks over the years, and the same lesson always comes back: the job is easy when you follow the right order, but rushed when you skip the basics. This guide walks you through how to use a bike rack for your car with clear steps, practical tips, and real-world advice so you can transport your bikes with confidence.
What a bike rack does and why it matters
A bike rack is a vehicle accessory that carries bicycles outside your car instead of inside it. That frees up cargo space, keeps your seats clean, and makes it possible to travel with one bike or several.
The biggest benefit is convenience. Whether you are heading to a trail, a race, or a family ride, a bike rack lets you bring your bike without folding seats or removing wheels every time. It also helps protect the bike from the kind of cramped damage that can happen inside a trunk.
There are different rack styles, and each one has its own use case:
- Roof racks: Best for drivers who want the rear of the car clear and do not mind lifting bikes higher.
- Hitch racks: Great for heavier bikes and easy loading.
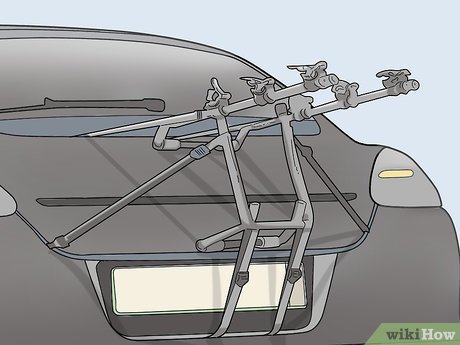
- Trunk racks: Often the most affordable, but they can be less stable and need careful strap placement.
- Spare tire racks: Designed for vehicles with rear-mounted spare tires.
In my experience, the best rack is the one that fits your vehicle, your bike, and your routine. A rack that looks simple but fits poorly can turn a short drive into a stressful one.

How to choose the right bike rack for your car
Before you learn how to use a bike rack for your car, you need to know whether the rack matches your vehicle. This matters more than most people think. A rack that works on one SUV may not fit a sedan or hatchback the same way.
Start with your car’s setup:
- Roof rails or crossbars may support a roof rack.
- A trailer hitch is needed for most hitch racks.
- A trunk or hatch can usually support a trunk rack, but only if the rack is made for your vehicle shape.
- A rear spare tire requires a spare tire bike rack built for that design.
Then think about your bikes:
- Heavy e-bikes often need a hitch rack with a higher weight rating.
- Carbon frames may need extra care to avoid clamp pressure.
- Kids’ bikes can be tricky because of smaller frames.
- Full suspension mountain bikes may need special adapter bars.
A good rule I have learned is this: buy for the bike you own today, but also think about the bike you may own next year. That simple habit can save a lot of money and frustration.
How to install a bike rack on your car
Installing a bike rack correctly is the most important step. If the rack is mounted badly, even the best straps or arms will not fix the problem.
1. Read the rack manual first
This sounds obvious, but it is where many mistakes start. Each rack has its own weight limits, attachment points, and setup rules.
Take a few minutes to check:
- Vehicle compatibility
- Weight capacity
- Required tools
- Strap or bolt placement
- Locking system instructions
2. Position the rack properly
Place the rack on the part of the car it was designed for. Roof racks should sit on the crossbars or rails. Hitch racks should slide into the hitch receiver and line up straight. Trunk racks should rest on the supported points listed by the manufacturer.
If the rack is crooked, stop and adjust it. A small tilt can create bounce and extra wear on the car and bikes.
3. Tighten all attachment points
Secure every strap, bolt, pin, or clamp until the rack feels solid. Do not over tighten to the point of damaging the car, but do not leave anything loose.
A loose rack is like a backpack with one weak strap. It may hold for a while, but it will not stay dependable once the road gets rough.
4. Check clearance around the car
Make sure the rack does not block:
- Brake lights
- License plates
- Trunk or hatch opening
- Rear cameras
- Antennas or spoilers
This is especially important with trunk racks and hitch racks. I have seen drivers mount a rack perfectly, only to find they cannot open the hatch without taking everything off again.
How to load bikes onto a bike rack
Once the rack is installed, loading the bikes the right way keeps them stable and safe. This is where balance matters most.
1. Place the heaviest bike first if needed
On hitch racks and some trunk racks, the heaviest bike should go on the most stable position. That helps reduce sway and keeps the rack balanced.
2. Separate the bikes so they do not touch
Handlebar scratches, pedal marks, and frame rub are common when bikes are too close together. Use wheel trays, frame holders, or protective pads if your rack includes them.
3. Secure the frame and wheels
Depending on the rack type, use:
- Frame clamps
- Wheel straps
- Arm holders
- Cradles
- Adapter bars for step-through or small frames
Do not assume one strap is enough. The bike should feel anchored at more than one point whenever possible.
4. Make sure pedals and handlebars are turned safely
If a pedal sticks out too far, it can hit another bike or the car itself. Turn the handlebars where needed so the bikes sit close without forcing contact.
I still remember the first time I loaded a bike too quickly and left a pedal half loose. It made a loud tap-tap sound every mile until I pulled over. That small mistake taught me to always do a final walkaround before driving.
How to use a bike rack for your car safely on the road
Knowing how to use a bike rack for your car does not end once the bikes are on the rack. Road safety is just as important as installation.
Before you drive, check these items:
- All straps and clamps are tight
- Bikes do not sway or bounce
- The rack itself is locked or pinned
- Reflectors and lights are visible if required
- Nothing hangs too low near the road
Drive more carefully than usual, especially at first. Take turns gently, brake gradually, and slow down on uneven roads. Bikes on a rack create extra wind resistance, so fast highway speeds can increase vibration and noise.
If you are driving a roof rack, remember that your car is taller now. Garages, drive-throughs, low tree branches, and parking structures can all become hazards. A lot of roof rack damage happens not while driving, but while someone forgets the extra height.
How to secure your bike rack against theft
A bike rack can be a target if it stays on your car often. The good news is that a few simple habits can lower the risk.
Use the security features your rack includes:
- Locking hitch pins
- Cable locks
- Locking frame arms
- Anti-theft bolts
If you are stopping for lunch or staying overnight, take extra steps:
- Lock each bike to the rack
- Park in well-lit areas
- Remove expensive accessories like lights and computers
- Keep the rack locked to the car when possible
No lock is perfect, but visible security usually discourages casual theft. In my experience, making the rack look harder to steal is often enough to send someone looking for an easier target.
Common mistakes to avoid when using a bike rack for your car
Most rack problems come from a few repeat mistakes. Knowing them ahead of time makes the whole process much easier.
Watch out for these:
- Exceeding the rack’s weight limit
- Using a rack that does not fit your car
- Leaving straps loose
- Blocking the license plate or taillights
- Letting bikes touch during transit
- Forgetting the car’s added height
- Driving too fast over bumps or potholes
One of the biggest mistakes I see is assuming “tight enough” means “safe enough.” A rack should feel firm before the trip, not after the first mile. If it moves in the driveway, it will move more on the road.
Maintenance tips for longer rack life
A bike rack lasts longer when you treat it like a tool, not a one-time purchase. Small care steps can prevent rust, cracking, and weak straps.
Do this regularly:
- Wipe off dirt and road salt
- Inspect straps for fraying
- Check bolts and pins for looseness
- Store the rack indoors when not in use
- Lubricate moving metal parts if the manual allows it
Also inspect your bikes after each trip. Check the frame, tires, and wheels for wear marks or pressure points. Catching small issues early can prevent expensive damage later.
When a bike rack may not be the best choice
A bike rack is useful, but it is not always the best option. Some vehicles and bike types call for another setup.
You may want to reconsider if:
- Your car cannot support the rack safely
- Your bikes are too heavy for the rack type
- You need frequent access to the trunk or hatch
- You often park in tight garages and low-clearance spaces
- You want the most aerodynamic option for long highway trips
Roof racks can create more drag. Trunk racks can limit access. Hitch racks can block rear sensors on some vehicles. The right choice depends on your daily use, not just the price tag.
Frequently Asked Questions of How to use a bike rack for your car
How do I know if a bike rack will fit my car?
Check your car’s features first, such as a hitch, roof rails, or trunk shape. Then match those features to the rack’s compatibility list and weight rating.
Can I use a bike rack on any car?
Not every rack works on every vehicle. Some cars are not suited for certain trunk racks or roof racks, so it is important to confirm fit before buying or installing.
Do I need to remove the front wheel of my bike?
Usually, no. Most bike racks hold the bike with both wheels attached, though some roof and fork-mount systems may require wheel removal.
Is it safe to drive long distances with bikes on a rack?
Yes, if the rack is properly installed and the bikes are secured. Check the rack at rest stops and avoid speeding over rough roads or taking sharp turns too fast.
How tight should the straps or clamps be?
They should be snug enough that the bike does not shift, but not so tight that they damage the frame or wheels. Follow the rack manual and recheck tension after the first few miles.
Can I leave the bike rack on my car all the time?
You can, but it is better to remove it when not in use if possible. Leaving it on too long can expose it to weather, reduce fuel efficiency, and raise theft risk.
Conclusion
Using a bike rack for your car is mostly about fit, balance, and routine. Once you know how to install it, load bikes safely, and check everything before driving, the process becomes simple and repeatable. The best results come from slowing down at the start so you can drive with peace of mind later.
If you are planning your next ride, take a few extra minutes to inspect your rack, confirm the fit, and secure your bikes the right way. That small effort can protect your gear, your car, and everyone on the road. Explore more guides, compare rack styles carefully, and leave a comment with your own tips if you have learned a trick that makes bike transport easier.