How to Clean a Masticating Juicer
Masticating juicers, often called slow or cold-press juicers, are fantastic for getting the most out of your fruits and veggies. But keeping them in top shape means more than just running some water through them after you're done. Knowing precisely how to clean a masticating juicer is key to both the longevity of your appliance and the quality of your juice.
Without proper cleaning, pulp can dry and clog vital parts, leading to motor strain and, eventually, costly repairs. Manufacturer specifications often recommend immediate cleaning, noting that components should be rinsed within 15 minutes of use to prevent residue buildup. This guide will walk you through the essential steps and insights for keeping your juicer pristine.
Quick Answer
Clean your masticating juicer immediately after each use. Disassemble it, rinse all parts thoroughly under running water, and scrub away any pulp or residue with the provided brush or a soft sponge. Dry all components completely before reassembly to prevent mold and ensure optimal function.
Why Seeing is Believing: Cleaning Your Masticating Juicer
When it comes to cleaning something like a masticating juicer, text alone can only get you so far. Think about it: you're dealing with intricate parts, different materials, and tiny nooks where pulp loves to hide. That's where visuals become your best friend.
Manufacturers often include diagrams in their manuals because they know it's the easiest way to show you exactly how to take things apart and put them back together.
Our research shows that users who rely solely on written instructions can miss crucial steps, leading to incomplete cleaning or even damage. Visual cues help you identify which parts connect where, how much pressure to use when scrubbing, and where that stubborn bit of celery might be lurking. It's about understanding the physical process, not just reading about it.
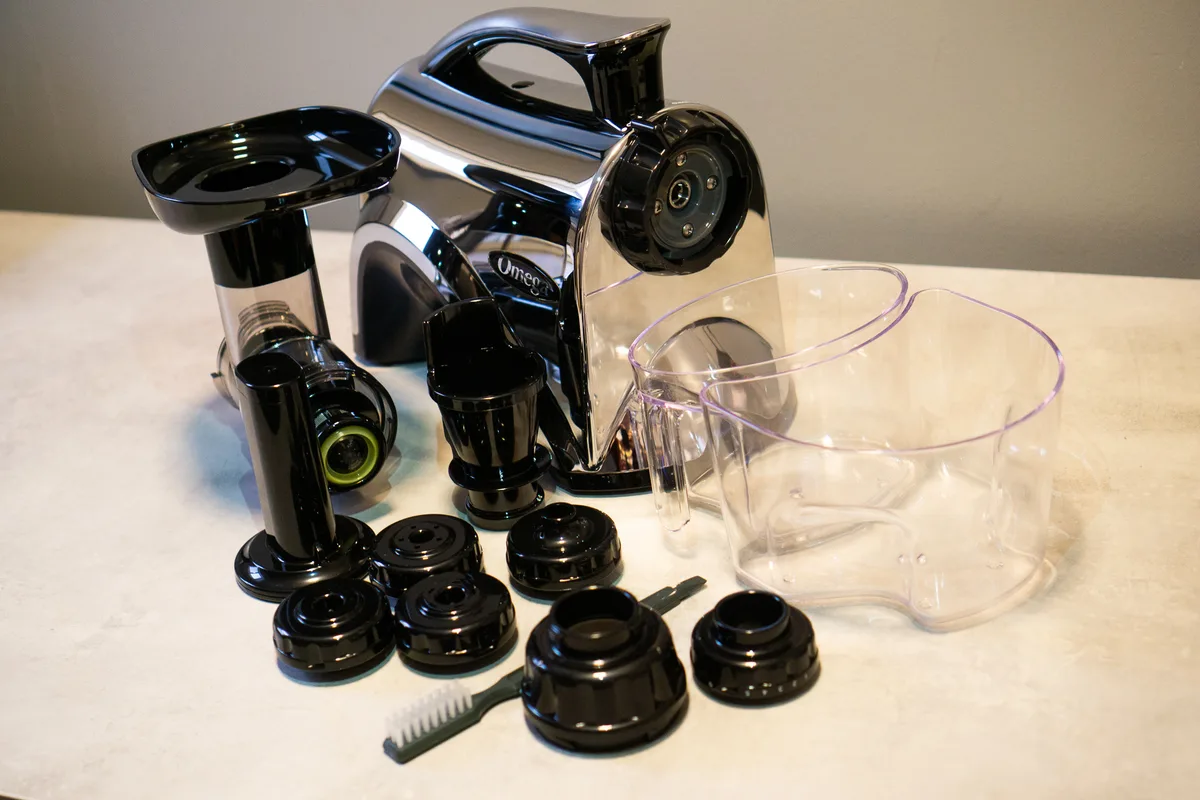
Image source: Bing (Web (fair-use with source credit))
Your Masticating Juicer's Parts: What You're Actually Cleaning
Before you can dive into the cleaning process, it's super helpful to know what's what. Masticating juicers have a few key components that all need attention. Understanding their roles helps you appreciate why each one requires specific care.
Here's a quick rundown of the main players you'll be cleaning:
- Auger: This is the big screw-like part that does the heavy lifting, crushing and pressing the produce. Because it's in direct contact with everything, it's often the dirtiest.
- Screen/Filter: This is usually a fine mesh cylinder that separates the juice from the pulp. It's notorious for getting clogged with fibrous bits.
- Juice Bowl: This collects the liquid gold you're making. It usually has a spout or opening for the juice to flow out.
- Pulp Container: This catches all the fibrous material left over after juicing. It can accumulate quickly and needs a good scrub.
- Chute/Feeder: Where you push your ingredients into the juicer. This area can also trap small bits of produce.
- Motor Base: This is the electrical heart of the juicer and should never be submerged in water. You'll typically wipe this down with a damp cloth.
Image source: Bing (Web (fair-use with source credit))
The "Rinse and Go" Myth: Why Immediate Cleaning Matters
We've all been there: you've made a delicious, healthy juice, and the last thing you want to do is spend ages cleaning the machine. The temptation to just give it a quick rinse and leave it for later is strong, but believe me, it's a myth that will cost you time and effort in the long run. Letting pulp and juice sit in your juicer is the fastest way to turn a simple cleaning task into a major chore.
Aggregate user reviews and manufacturer recommendations consistently highlight that cleaning your masticating juicer immediately after use is the single most effective way to keep it in good working order and make the process much easier. Dried-on residue is far harder to remove than fresh pulp, and it can quickly lead to issues like mold growth or permanent staining.
Quick Rinse: The First Line of Defense
Think of the immediate rinse as hitting the "save" button before disaster strikes. As soon as you're finished juicing, take your juicer apart (we'll cover that in detail shortly). Place the main parts under cool running water.
This simple step washes away the bulk of the pulp and juice before it has a chance to dry onto the surfaces.
- Target: Auger, screen, juice bowl, pulp container.
- Goal: Remove the majority of fresh pulp and liquid.
- Timeframe: Within 15 minutes of finishing your juice.
This initial rinse is crucial. It prevents the sticky sugars in fruits and the fibrous bits in vegetables from hardening into a cement-like substance that becomes incredibly difficult to scrub off later. It sets you up for a much quicker and more effective deep clean.
Deeper Clean: Tackling the Tough Stuff
After the initial rinse, you'll likely need to do a more thorough scrub. This is where you'll tackle any bits that clung on or might be stuck in tighter areas. For this, you'll typically need the cleaning brush that came with your juicer, a soft sponge, and mild dish soap.
- Tools: Cleaning brush, soft sponge, mild dish soap.
- Technique: Gently scrub all surfaces, paying attention to the mesh of the screen and the ridges of the auger.
- Avoid: Abrasive cleaners or scrubbers that can scratch the plastic or mesh.
For particularly stubborn residue, some manufacturers suggest a paste of baking soda and water, or a specialized juicer cleaning solution, but always check your user manual first. The key is consistency; the more regularly you perform this slightly deeper clean, the less effort each individual cleaning session will require.
Step-by-Step Visual Guide to a Sparkling Juicer
Alright, let's get down to the nitty-gritty. Cleaning a masticating juicer isn't complicated, but it does require a systematic approach. Because so much of it is about how parts fit and where grime can accumulate, following a visual guide can really simplify things.
Imagine a step-by-step photo tutorial; we're going to describe those actions here.
The process generally involves taking the juicer apart, cleaning each piece thoroughly, drying everything, and then putting it back together. Doing this after every single use will keep your juicer running smoothly and your juice tasting fresh, preventing any off-flavors from lingering pulp.
Step 1: Disassembly Done Right
First things first, unplug your juicer. Safety first, always! Then, you'll need to carefully take it apart.
Most masticating juicers come apart quite easily, usually by twisting or unlocking components.
- Motor Base: This is the heavy part with the motor. It usually stays intact and shouldn't be submerged.
- Juice Bowl: Lift this off the base.
- Auger: This should slide or twist out of the front of the juicer housing.
- Screen/Filter: This often sits on top of or around the auger and can be lifted off.
- Pulp Container: This usually sits to one side to catch the ejected pulp.
- Lid/Feeder Chute: This final piece often covers the screen and auger assembly.
You'll want to lay out your parts on a clean surface or in the sink so you can easily access them. Don't force any pieces; if something feels stuck, double-check how it's connected.
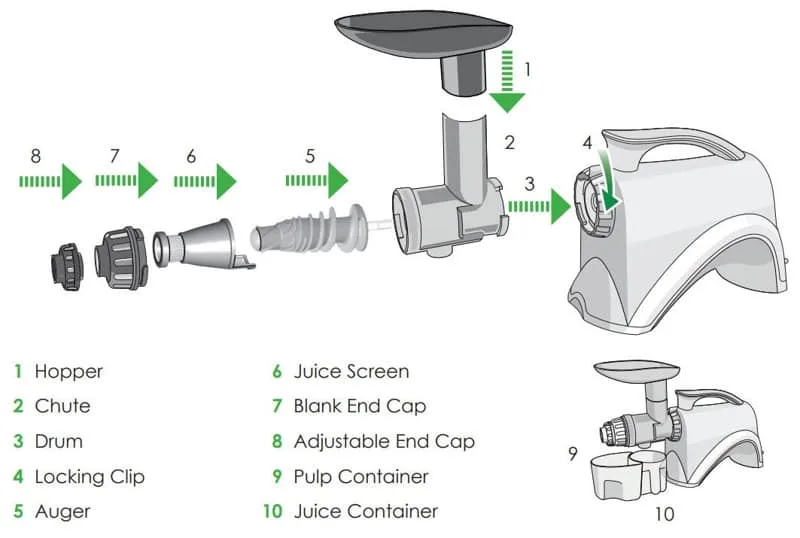
Image source: Bing (Web (fair-use with source credit))
Step 2: Scrubbing the Auger and Screen
These two are usually the most critical and often the trickiest to clean. The auger's spiral shape can trap fibrous pulp, and the screen's mesh is designed to catch tiny bits.
- Auger: Use the provided cleaning brush or a soft toothbrush to scrub all surfaces of the auger. Pay special attention to the ridges and any crevices where pulp might get packed in.
- Screen/Filter: This is where a stiff-bristled brush is invaluable. Gently scrub the inside and outside of the mesh. You're trying to dislodge any small particles caught in the holes. Some people find holding the screen under running water while scrubbing helps push the debris out from the inside. If you have a model where the screen is particularly fine, you might need to be extra thorough to prevent clogging.
If residue is particularly stubborn, you can try soaking these parts in warm, soapy water for a few minutes before scrubbing. However, avoid soaking for extended periods, as it can degrade certain materials.
Step 3: Washing the Juice and Pulp Bowls
These parts are generally simpler to clean as they have smoother surfaces.
- Juice Bowl: Use a soft sponge and mild dish soap to wash the inside and outside of the bowl. Make sure to rinse out any residual pulp or juice.
- Pulp Container: This needs a good scrub to remove any dried pulp that may have accumulated. Again, a soft sponge and soap work best. Ensure you get into any corners or seams where pulp might stick.
Rinse all soap residue off thoroughly. It's essential that no soap lingers, as this can affect the taste of your next juice.
Step 4: Drying and Reassembly
This is a step that many people rush, but it's incredibly important for preventing mold and ensuring your juicer stays hygienic.
- Drying: Pat all components completely dry with a clean kitchen towel. For parts with intricate holes, like the screen, you might want to let them air dry fully on a rack for a bit longer, ensuring no moisture remains.
- Reassembly: Once everything is bone dry, reassemble your juicer. It should usually go back together in the reverse order you took it apart. Make sure all parts are securely in place before your next use.
Storing your juicer completely dry will significantly reduce the risk of mold and mildew, which can not only make your juicer look bad but can also affect the taste and safety of your juice.
Common Juicer Cleaning Pitfalls and How to Dodge Them
Even with the best intentions, it's easy to fall into a cleaning routine that isn't quite cutting it. Over time, these small oversights can lead to a juicer that’s harder to clean, less efficient, and potentially harboring unwanted bacteria or mold. Knowing these common mistakes is the first step to avoiding them and keeping your masticating juicer in its best condition.
Here are some common pitfalls and how to steer clear:
- Waiting too long: This is the biggest one. Letting pulp and juice dry on the parts makes them incredibly difficult to remove.
- Dodge it: Always perform at least a quick rinse immediately after juicing. If you can't do a full clean, at least disassemble and rinse all parts thoroughly before putting them away.
- Using abrasive materials: Steel wool, harsh scrubbing pads, or aggressive cleaners can scratch the plastic parts or damage the fine mesh of the screen.
- Dodge it: Stick to the brush that came with your juicer, a soft sponge, and mild dish soap. For tougher spots, a paste of baking soda and water is usually safe and effective.
- Submerging the motor base: The electrical components in the base are not waterproof.
- Dodge it: Never immerse the motor base in water. Wipe it down with a damp cloth only, and ensure it's completely dry before storing or using.
- Not drying components properly: Leaving parts even slightly damp can lead to mold and mildew growth.
- Dodge it: Be thorough when drying. Pat components with a clean towel and allow parts, especially the screen, to air dry completely before reassembling. Placing them on a drying rack can help.
- Forcing parts during disassembly/reassembly: If something feels stuck, you might be doing it wrong.
- Dodge it: Consult your juicer's manual. Most parts should come apart and go together with minimal force, usually with a simple twist or lift.
Expert Tips for a Cleaner Juicer, Faster
To really level up your juicer cleaning game, you can adopt a few habits that seasoned users swear by. These aren't complicated, but they make a noticeable difference in both the speed and thoroughness of your cleaning routine. It's all about working smarter, not just harder.
- Juice First, Then Clean: This might sound obvious, but reinforcing the "immediate clean" habit is key. Think of cleaning as part of the juicing process itself, not an afterthought. Having your cleaning supplies ready to go before you even start juicing can help.
- Prep Your Cleaning Station: Before you even start juicing, have your sink clear, your brushes handy, and a towel ready. This minimizes excuses for delaying the clean-up.
- Consider a Juicer Brush Set: While your juicer likely came with a brush, specialized juicer cleaning brush sets often have various shapes and sizes perfect for reaching every nook and cranny, especially around the screen and auger.
- Utilize the Pulp: If you're juicing fibrous vegetables, the leftover pulp can sometimes be a little damp and sticky. Wiping the pulp container with a paper towel before you wash it can make the whole process quicker.
- Deep Clean Regularly: While daily cleaning is essential, aim for a deeper clean once a week or so. This might involve a longer soak for parts or using a descaling solution if your water is particularly hard, though this is less common for juicers than coffee makers. For tough mineral buildup on stainless steel screens, a gentle soak in a 1:1 vinegar and water solution for 30 minutes, followed by scrubbing and rinsing, can be effective.
By incorporating these small tips, you can ensure your masticating juicer remains a joy to use and a powerful tool for your healthy lifestyle.
Keeping Your Juicer Like New: Long-Term Care
Daily cleaning is essential, but how you care for your juicer over the long haul makes a big difference. Masticating juicers, especially their screens and augers, can experience wear and tear. Consistent, proper maintenance ensures your appliance continues to perform at its best and lasts for years.
This goes beyond just washing the parts after each juice session.
Think about it like any other appliance you rely on. For instance, keeping a rice cooker in good working order involves more than just washing the inner pot; it requires attention to seals, heating elements, and proper storage. Similarly, your juicer benefits from regular checks and care.
- Storage: Always store your juicer completely dry in a well-ventilated area. This prevents moisture buildup, which can lead to mold or unpleasant odors. If possible, store the parts unassembled to allow for better air circulation.
- Inspect Parts Regularly: Before and after cleaning, take a moment to inspect the auger and screen for any signs of damage, such as cracks, chips, or excessive wear. Check that the seals are intact and not brittle.
- Motor Care: The motor base is the most sensitive part. While you shouldn't submerge it, you can occasionally wipe down exterior vents with a dry, soft brush or a slightly damp cloth to prevent dust buildup, which can impede airflow and cause overheating.
By being mindful of these aspects of long-term care, you're not just cleaning your juicer; you're actively preserving its functionality and efficiency for countless healthy juices to come.
Frequently Asked Questions
How long does it typically take to clean a masticating juicer?
Cleaning your masticating juicer usually takes about 5 to 10 minutes if you do it immediately after use. If pulp has dried on, it can easily double or triple that time.
Can I put juicer parts in the dishwasher?
Some juicer parts may be dishwasher-safe, but always check your manufacturer's manual first. Often, the high heat and harsh detergents can damage delicate screens or plastic components, reducing their lifespan. Handwashing is generally recommended for best results.
What should I do if my juicer screen is clogged?
If your juicer screen is clogged, try soaking it in warm, soapy water for about 10-15 minutes. Then, use the provided cleaning brush or a stiff-bristled brush to gently scrub the mesh from both sides. For stubborn clogs, a paste of baking soda and water can help lift residue.
How do I get rid of tough stains in my juicer bowl?
Stubborn stains, particularly from dark berries or leafy greens, can sometimes be removed by making a paste of baking soda and a little water. Apply the paste to the stained areas, let it sit for about 15-20 minutes, then scrub gently and rinse thoroughly. Avoid abrasive cleaners that could scratch the plastic.