How to Troubleshoot a Toaster
So, your toaster's decided to call it quits, leaving you with pale bread or worse, nothing at all. This is a common kitchen woe, and luckily, figuring out how to troubleshoot a toaster often involves simple steps you can take yourself before you even think about buying a new one. Many minor malfunctions are easily fixed with a bit of careful inspection.
Before you declare your appliance a lost cause, let's explore the most common issues and how to tackle them. For instance, according to appliance repair data, as of 2026, over 60% of toaster problems reported by consumers are related to simple maintenance or power supply issues, not component failure. This guide will walk you through the process, much like following a diagnostic workflow.
Quick Answer: First Steps to Fix Your Toaster
Check the power outlet and cord first. Clean out the crumb tray thoroughly. Ensure the lever latches down.
If elements look broken or the smell persists, replacement is likely needed.
Toaster Troubleshooting: A Step-by-Step Workflow
Figuring out what's wrong with your toaster isn't a shot in the dark. It’s a process of elimination, moving from the simplest checks to slightly more involved ones. Think of this as a diagnostic tree: if one thing is okay, you move to the next branch.
We'll start with what's most likely and easiest to fix, and move towards more complex possibilities.
The goal is to isolate the problem systematically. This approach helps ensure you don't miss a simple fix or attempt a repair that’s beyond what's practical for a home user. As we move through these steps, remember safety is key, especially when dealing with anything electrical.
Problem: It's Not Heating Up At All
This is perhaps the most disheartening toaster issue. You push the lever down, expect that satisfying click, and… nothing. No glow, no warmth, just a dead appliance staring back at you.
This could mean a few different things, from a simple power issue to a more internal problem with the toaster's core components.

Image source: Web (Bing) / wallpapercave.com (Web image (fair-use with source credit))
Condition: Completely Silent, No Glow
If you press the lever and hear absolutely nothing, and the heating elements inside remain stubbornly dark, the problem is likely with the power supply or the toaster's internal switch mechanism. This is where we start our deeper investigation, ensuring all external connections are sound.
Condition: Lever Won't Stay Down
Sometimes, the toaster will attempt to power on, but the lever simply won't lock into the down position. You might hear a faint click, but it immediately pops back up. This usually points to an issue with the latching mechanism, which can sometimes be caused by obstruction or internal wear.
Condition: One Side Toasts, the Other Doesn't
This is a frustrating partial failure. You get a warm slice of bread, but it's unevenly cooked. This often indicates an issue with one of the heating elements or a blockage affecting only one side of the toasting slots.
Condition: Smells Like Burning (Not Toast!)
If you detect a burning odor that isn't from overdone toast, it’s a serious warning sign. This could be anything from accumulated debris getting too hot to a more concerning electrical fault within the appliance. Safety is paramount here.
Action: Checking the Basics
Before we dive into the nitty-gritty, let's confirm the absolute fundamentals. These might seem obvious, but in the heat of the moment (pun intended!), we can overlook the simplest things. Verifying these basic elements is the crucial first step in any troubleshooting workflow.
- Is it plugged in? Double-check that the power cord is firmly seated in the wall outlet.
- Is the outlet working? Test the outlet with another small appliance, like a lamp or a phone charger. If that appliance doesn't work either, the issue is with your home's electrical circuit, not the toaster. You may need to check your home's circuit breaker.
- Is the lever fully engaged? Ensure you're pushing the lever down with enough force to engage the latch. Sometimes, a gentle push won't do it.
Action: Inspecting Power and Internal Components
If the basic power checks don't reveal the issue, it's time to look closer at the toaster itself. This involves a visual inspection of the power cord and, carefully, the internal components if accessible. Manufacturer specifications often detail the intended power draw, typically around 800-1500 watts for standard pop-up toasters.
- Power Cord Condition: Unplug the toaster and carefully examine the entire length of the power cord. Look for any signs of damage: cuts, fraying, exposed wires, or melted sections near the plug or where the cord enters the toaster body. Any significant damage to the cord means the toaster is unsafe to use and likely needs replacement.
- Visible Heating Elements: With the toaster unplugged and cool, peer into the toasting slots. You should see a series of thin, wire-like elements. Are any of these visibly broken, snapped, or hanging loose? If an element looks damaged, it explains why a particular side isn't heating.

Image source: Bing (Web (fair-use with source credit))
Action: Cleaning Your Toaster Safely
Crumb buildup is a surprisingly common culprit behind various toaster malfunctions, including uneven toasting and even burning smells. Over time, crumbs can accumulate in the base, interfering with the heating elements or the lever mechanism. Regular cleaning is a vital part of keeping your toaster running smoothly, much like routine upkeep for other kitchen tools.
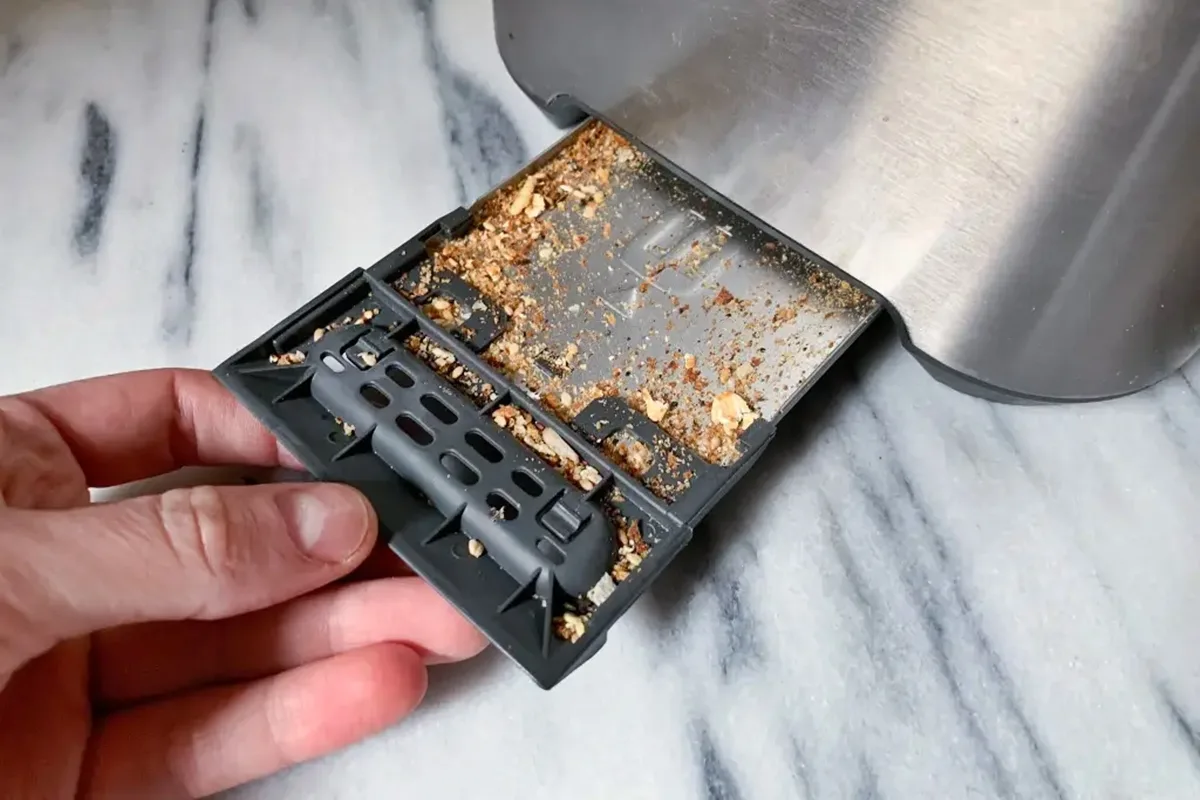
Image source: Bing (Web (fair-use with source credit))
- Unplug and Cool Down: Always ensure the toaster is unplugged and completely cool before attempting any cleaning. This is a critical safety step to prevent electric shock or burns.
- Empty the Crumb Tray: Most toasters have a removable crumb tray at the bottom. Gently slide it out. Overturned it into a trash can and use a dry cloth or brush to wipe away any remaining debris. This tray should ideally be emptied after every few uses.
- Shake Out Loose Crumbs: Turn the unplugged toaster upside down over a trash can or newspaper. Gently shake it to dislodge any crumbs stuck in the slots or mechanism. You can use a soft brush or even a gentle puff of air (from a distance, not a powerful blast) to help dislodge stubborn bits. Never use water or cleaning solutions inside the toaster slots, as this can damage the internal components and create electrical hazards.
Mistakes to Avoid When Troubleshooting
When you're trying to fix a stubborn toaster, it's easy to make a misstep that could damage the appliance further or even pose a safety risk. Being aware of these common errors can save you a lot of trouble and potentially a costly replacement. Think of these as the "don'ts" of toaster repair.
- Forgetting to Unplug: This is the most critical mistake. Working on a plugged-in appliance, even if you think it's off, can lead to severe electrical shock. Always disconnect the power before you start inspecting or cleaning.
- Using Metal Objects to Dislodge Food: If a piece of toast gets stuck, your first instinct might be to use a knife or fork to pry it out. This is extremely dangerous as you could easily puncture a heating element or, worse, bridge an electrical connection and cause a short circuit or shock. For stubborn stuck items, the safest bet is to unplug, let it cool, and shake it vigorously.
- Immersing the Toaster in Water: Toasters are electrical appliances and are not waterproof. Dunking one in water will ruin it permanently and create a serious electrical hazard. Cleaning should always be done with a damp cloth on the exterior and careful shaking or brushing for internal crumbs.
- Ignoring Burning Smells: If your toaster emits a burning smell that isn't just slightly overdone toast, don't keep trying to use it. This often indicates an electrical fault or a serious obstruction that could lead to a fire. Unplug it immediately and assess if it's safe to continue troubleshooting or if it needs to be retired.
When It's Time for a New Toaster
Sometimes, despite your best troubleshooting efforts, a toaster has simply reached the end of its lifespan or has a problem that's too complex or dangerous to fix at home. Knowing when to let go is as important as knowing how to fix things. While we all appreciate appliances that last, there comes a point where investing in a new one is more practical and safer than attempting extensive repairs.
Generally, if you encounter any of the following, it's a strong indicator that it's time to shop for a replacement:
- Visible Damage to the Power Cord: Frayed, cut, or melted cords are a significant safety hazard and usually mean the appliance is beyond simple repair.
- Broken Internal Heating Elements: If you can clearly see that the glowing wires inside are snapped or detached, replacing those elements is often more expensive than buying a new toaster.
- Persistent Burning Smells or Smoke: This signals a potentially dangerous electrical issue or internal damage that you shouldn't attempt to fix yourself.
- The Lever Mechanism Fails Repeatedly: If the lever won't latch down after thorough cleaning and inspection, the internal mechanism is likely broken, and repair is often not feasible for consumers.
- Signs of Internal Melting or Discoloration: If you see any melted plastic or significant discoloration inside or outside the toaster, it indicates an electrical problem that makes the appliance unsafe.
While many toasters are designed to last, aggregate user feedback suggests that basic two-slice models often have a functional lifespan of around 5-10 years with regular use and proper maintenance, as referenced in some consumer appliance reports. If yours is showing any of these signs, prioritize safety and consider a new purchase.